To Share a Sharepoint Pointer
Codenaut emptor (not "code-not"; more of a combination of "astronaut" and "caveat" is what is intended here): This may, or may not, apply to other versions of Sharepoint (besides 2010); it probably does to some extent, but I don't know how much, as 2010 is the only version of Sharepoint I've ever worked with.
If you need to create a web part in code, there are a few steps you need to follow. Here they are:
Create a new project in Visual Studio (2010, presumably). After selecting New Project, choose Installed Templates > Visual C# > Sharepoint > 2010 > Empty SharePoint Project as the starting point.
When prompted for your preference, you will probably want to select "Farm solution" over "Sandboxed solution" but if you know you want the latter, that's your prerogative.
Right-click your Project and select Add > New Item... > Visual Web Part
Open the <nameyougavethevisualwebpart>.cs file below the <nameyougavethevisualwebpart> folder.
You will see that the class implements the WebPart interface and has a modicum of code:
[ToolboxItemAttribute(false)]
public class UCSCVisualWebPart : WebPart
{
private const string _ascxPath =
@"~/_CONTROLTEMPLATES/UCSCWebPart/UCSCVisualWebPart/UCSCVisualWebPartUserControl.ascx";
protected override void CreateChildControls()
{
Control control = Page.LoadControl(_ascxPath);
Controls.Add(control);
}
}
In the CreateChildControls() method, you can replace the two lines of default code shown with just this one for now:
base.CreateChildControls();
It is here in CreateChildControls() that you create the controls you want to add to the WebPage.
You can alternatively, though -- especially if you have some conditional logic -- want to keep CreateChildControls() relatively concise, and conditionally call other methods from CreateChildControls() that return created controls. For example, you might do something like this in CreateChildControls():
protected override void CreateChildControls()
{
base.CreateChildControls()
HtmlTable tbl = null;
switch (someCondition)
{
case 0:
WriteSections1And2();
break;
case 1:
break;
default:
WriteSections1And2();
break;
}
}
Note: If you want to add some space to the bottom of the Web Part, you can add a breaking space this way:
HtmlGenericControl _breakingSpace = new HtmlGenericControl("br");
this.Controls.Add(_breakingSpace);
GenerateSections1And2() could return an htmlTable control like so:
private void WriteSections1And2()
{
    HtmlTable tblSection1 = null;
    HtmlTable tblSection2 = null;

    var section1Hdr = new Label
    {
        CssClass = "finaff-webform-field-label",
        Text = "<h2>Section 1: Payment Information</h2>"
    };
    this.Controls.Add(section1Hdr);

    tblSection1 = GenerateSection1();
    this.Controls.Add(tblSection1);

    String checkboxText = "<span class=\"finaff-webform-field-label\">204 submitted or on file. <strong>NOTE:</strong> If not on file, complete a <a href=\"https://financial.ucsc.edu/Financial_Affairs_Forms/Payee_Setup_204.pdf\" target=\"_blank\">Payee_Setup_204</a></span>";
    ckbx204Submitted = new CheckBox();
    ckbx204Submitted.Text = checkboxText;
    this.Controls.Add(ckbx204Submitted);

    var section2Hdr = new Label
    {
        CssClass = "finaff-webform-field-label",
        Text = "<h2>Section 2: Requester Information</h2>"
    };
    this.Controls.Add(section2Hdr);

    tblSection2 = GenerateSection2();
    this.Controls.Add(tblSection2);
}
In the case shown above, a "label" (LiteralControl) is added, followed by an HTML table with various rows, followed by the same thing a second time (a "label" and another table).
As an example of what the methods that return the table do, here is GenerateSection1():
private HtmlTable GenerateSection1()
{
HtmlTable dynamicTable = new HtmlTable();
var row1 = new HtmlTableRow();
var cellLitCtrl_1 = new HtmlTableCell();
var cellTxtbx_1 = new HtmlTableCell();
row1.Cells.Add(cellLitCtrl_1);
row1.Cells.Add(cellTxtbx_1);
var reqDateStr = new Label
{
CssClass = "finaff-webform-field-label",
Text = "Requester Date:"
};
cellLitCtrl_1.Controls.Add(reqDateStr);
boxRequestDate = new TextBox
{
CssClass = "finaff-webform-field-input",
Text = DateTime.Today.ToShortDateString()
};
cellTxtbx_1.Controls.Add(boxRequestDate);
dynamicTable.Rows.Add(row1);
. . .
. . .
return dynamicTable;
}
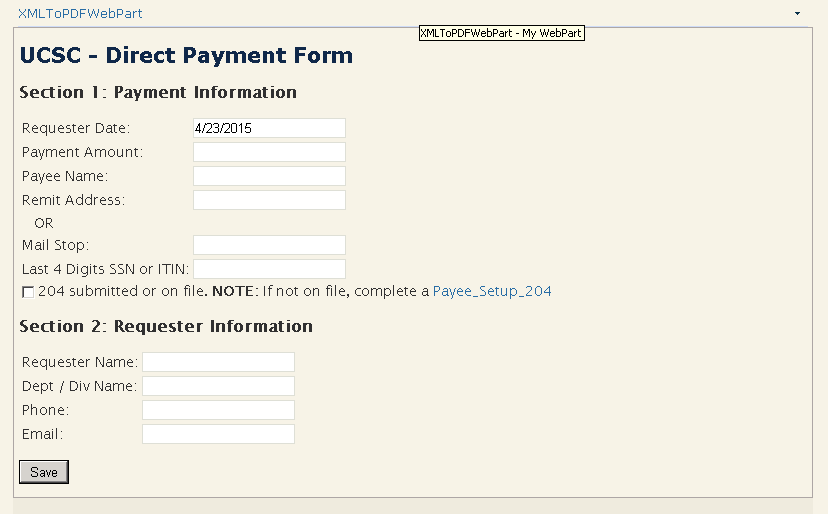
When ready, select Build > Deploy, add your new WebPart to a Web Page, and you will be able to see the WebPart you've created in code on the page, something downright beautiful (to a legally blind man wearing green goggles tipsy on Ripple) like this:
Note: To reference a .CSS file, add some code like this to the WebPart's constructor (replacing "Style Library/ucsc_style_webparts.css" with the location and name of your .CSS file):
public XMLToPDFWebPart()
{
    CssRegistration css = new CssRegistration();
    css.After = "corev4.css";
    css.Name = "/Style Library/ucsc_style_webparts.css";
    this.Controls.Add(css);
}
Registering the CSS file like this is what makes it possible to reference the "finaff-webform-field-label" and "finaff-webform-field-input" classes in the GenerateSections1And2() method.
Exercise Left
If you are irrationally exuberant as a result of this shared Sharepoint pointer, jump up, click your heels, and recite aloud, "How many Points get a SharePoint share, if a Sharepoint could share points?!? Huh?!?" (If some rapper makes millions of those lyrics, I want a cut).

