Microsoft SharePoint Designer Workflow
Workflows are now an important part of any project. We can develop a Microsoft SharePoint Workflow using the available templates, SharePoint designer and Visual Studio. In this article, we will mainly focus on workflow creation using Microsoft SharePoint Designer.
Advantages
- Basic workflow can be implemented by trained users
- Relatively quick to implement for low complexity workflow
Disadvantages
- No built-in source control
- Difficult to deploy to other environments
- Sequential workflow only
Workflow created in three ways using Microsoft SharePoint designer:
- List workflow
- Reusable workflow
- Site workflow
Note: In this SharePoint for dummies tutorial, you will learn simple basic workflow, where current date is set in list item through SharePoint designer. I have used SharePoint Designer 2010 for implementation purposes, but the process will remain the same if you use SharePoint Designer 2013.
Step 1: Create a List for SharePoint workflow
- Login with SharePoint site.
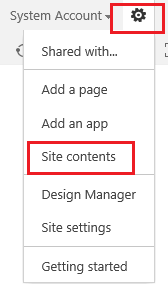
- Navigate to Site and Click on “Settings” option and then click on “site contents” option.
- Then click on “add an app” option.

- Select “Custom list” option from the “your app” page. It will be popup for open create custom list.
- Give the proper name and click on Create button.
- These steps will create custom list in site, now you can add multiple columns with different data type in this list.
- Now open create custom list and go through list setting and click on “Create column” option and create multiple column with different data type as per need.
- I have added Current Date and Description filed in this list.
Note: We have created a simple List here but another SharePoint for Dummies article on Multiple Ways to Create a Custom List in Microsoft SharePoint 2013 is already covered here.
Step 2: Create workflow in SharePoint Designer
- Open your SharePoint site in SharePoint designer.
- Click on “List and library” option in Navigation section.
- Select “
TodaysDate” List and double click on it, it will open list’s properties.
- Now, Click on “List Workflow” in ribbon bar and fill-up workflow information.
- It will open new window for workflow.
- Click on “Local Variables” in ribbon bar.
- It will open local variable window, where you can local add variable.
- Add current date as local variable.
- Now, come to the workflow part, write set and just click on search option and select “set Workflow variable”.
- Now, click on “workflow variable” and select “
CurrentDate” option from dropdown.
- Now click on value field and set current date option.
- Now select under line option and select.
- Select “Set Field in Current Item”.
- Now, click on Field item and select “
CurrentDate”.
- Now, click on Value filed and click on selected item. It will open one pop-up. You have to select Data source as “Workflow variable and parameters” and Field from source as “current date”.
- Click on workflow settings in ribbon bar.
- Select “Start workflow automatically when an item is created” option. In this option, our workflow will be automatically started on while any item is adding.
- Now click on Publish button in the ribbon bar. So our workflow will be published and it is ready to use.
Step 3: Microsoft SharePoint Workflow Check
- Open SharePoint site and open
TodaysDate custom list. - Click on new item. It will open popup for entering value. You have to just add Title field’s value and click on save button.
then….
- Now, our workflow will start and it will set current date field’s value and workflow will completed.
More Related from Microsoft SharePoint For Dummies
The post 3 steps to create a Workflow using SharePoint Designer appeared first on SharePoint For Dummies.

