Get access to the new Intel® IoT Developer Kit, a complete hardware and software solution that allows developers to create exciting new solutions with the Intel® Galileo and Intel® Edison boards. Visit the Intel® Developer Zone for IoT.
Intel Edison is small enough for wearables. It gives lot of flexibility to developers through the languages and programming environment it offers and it has integrated Wi-Fi and Bluetooth that makes it ideal for a wearable. Now a days there are many wearables in market for different purposes, so why not we make one for babies. With increase in nuclear families there is no one to guide the new parents about their new born baby. They are always worried about their baby regarding his health, temperature, environment etc. Babies need to be monitored 24*7 which is not always possible as in some families both the parents are working, sometimes they have to do lots of household chores and other issue is sleep also hence in these cases parents need a Smart Baby Monitoring System that can help them to keep track on baby’s health and alert them if any irregular activity happens.
Our Smart Baby Monitor will
- Monitor baby if he is sleeping or playing.
- Will notify parents if he is crying.
- Monitors baby’s temperature.
- Immediately alerts if it notices abnormal temperature.
- Visually represents data.
- Data can be monitored from anywhere.
Requirements

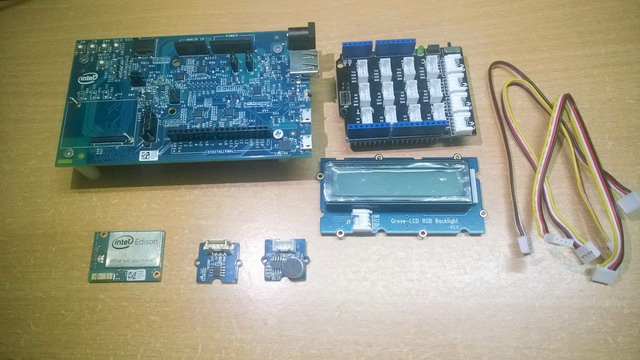
Intel Edison Module
Arduino expansion board for Edison
Analog Microphone
Temperature Sensor
16*2 LCD Display
Power supply
USB cable
Jumper wires
Analog Microphone is a simple sound sensor that detects the sound strength of environment. Here in this project I am using Grove sensors with a Grove Base Shield. We are going to code in Node.js using Intel XDK IoT Edition.
Making Connections
- Connect your Edison to power supply and to your PC via USB cable.
- It will take 15-20 seconds to boot up, after that stack the Grove Base Shield.
- Connect the Sound Sensor to analog pin A0
- Connect the temperature sensor to A1.
- Connect the LCD Display to one of the I2C port.
Programming
- Open Intel XDK IoT edition, if it is not already installed in your PC get it from https://software.intel.com/en-us/iot/downloads
- If you have flashed you Edison with the Flash Lite Tool Node.Js will be already installed on your board.
- Connect IDE to your Edison board. It will ask you for username and password, default username is root with no password.

- Select a blank Node.Js template and create a new project.

Code for the Analog Microphone
function readSoundSensorValue() {

    var buffer = new upmMicrophone.uint16Array(128);

    var len = myMic.getSampledWindow(2, 128, buffer);

    if (len)

    {

        var thresh = myMic.findThreshold(threshContext, 30, buffer, len);

        myMic.printGraph(threshContext);

        if (thresh)

            console.log("Threshold is " + thresh);

        v.saveValue(thresh);

        if(thresh>50 && thresh<150)

         showNormalLCD();

        if(thresh>=150)

        showLCD();

        if(thresh<50)

        showSleepLCD();
    }
}
setInterval(readSoundSensorValue, 1000);


<a href="https://software.intel.com/sites/default/files/managed/74/61/code.png"><img height="900" width="718" src="https://software.intel.com/sites/default/files/managed/74/61/code.png" alt="" /></a>
Code for the Temperature Sensor
var temp = new groveSensor.GroveTemp(1);

console.log(temp.name());

var i = 0;

var waiting = setInterval(function() {

        var celsius = temp.value();

        var fahrenheit = celsius * 9.0/5.0 + 32.0;

        console.log(celsius + " degrees Celsius, or " +

            Math.round(fahrenheit) + " degrees Fahrenheit");

        i++;

        if (i == 10) clearInterval(waiting);

        }, 1000);
Sending data to Cloud
var ubidots = require('ubidots');


var client = ubidots.createClient('YOUR-API-KEY');


client.auth(function () {

  this.getDatasources(function (err, data) {

    console.log(data.results);

  });

  var ds = this.getDatasource('xxxxxxxx');


  ds.getVariables(function (err, data) {

    console.log(data.results);

  });

  ds.getDetails(function (err, details) {

   console.log(details);

});


  var v = this.getVariable('xxxxxxx');


  v.getDetails(function (err, details) {

    console.log(details);

  });

  v.getValues(function (err, data) {

    console.log(data.results);

  });
Here I am using Ubidots for IoT cloud, with Ubidots we can visualizing the data in an effective way. It supports a wide range of devices and can also trigger some actions like sending mails and messages. It also offers numbers of API to speed our development with the language of our choice. Hence I have chosen its Node.Js library to interact with my Edison.
Setting up Ubidots
- Log in to your Ubidots account or you can create one here http://ubidots.com/
- Select the "Sources" tab and then click on "Add Data Source" to create a new data source. Here I have added My Edison.


- Once the data source is created we have to add variables to it. Here in this project we are going to send the Sensor and Temperature data, hence we will create two variables.

- Click on the variable and copy the variable ID. Paste this in your code.

- Select My Profile->API Keys. Get your API Key from here.

- On your Dashboard add a widget of your choice, depends on how you want to visualize the data.
- I have chosen Gauge for the sound sensor and a Graph for temperature. By looking at the Gauge you can easily determine at intensity of sound and hence your baby’s activity and with Graph you can evaluate a sudden variation in temperature.
Build, Upload and Run your app on Edison. You will see the sensor values in debug console, if everything works fine you will notice data being send to Ubidots cloud. Navigate to Ubidots dashboard, you will see all the data sent from the sensor in our widgets. Here I have also created some alerts, if the sound level exceeds up to a certain level (means baby is crying) an alert will send to our mobile phone through SMS.


When it is about babies this much is not sufficient, I will be working on some advance stuff with more accurate sensing and better alerts that I will share in the next part.
