Hello All! Welcome to TotalALM. This is a new blog being written by Kevin Mack, and Brandon Rohrer, and you will be seeing many more posts from the two of us about all things ALM. To find out more about who we are, please feel free to check out our bios on this site.
But enough about us, We’ve both been lucky enough to be able to experiment and do some work with new Release Management vNext.
For those of you not fully aware, over the past year Microsoft has really been expanding their offerings for both Visual Studio Online, and Team Foundation Server in some pretty exciting new directions. For starters, MSBuild went through some pretty big changes with the TFS 2015 upgrade, in that it moved away from requiring On Premise installations of TFS on build servers and removed its antiquated Agent / Controller system, which was causing issues with the enterprise. Instead it moved to a better Agent / Pool system, which allows for much greater flexibility. The other major change being that all of the work is now being done via the browser. Allowing more flexibility and less tooling to make things easier to manage and making the web portal a one-stop-shop for managing projects.
So to start thing off, for those who aren’t aware, very shortly Microsoft will be releasing “Release Management vNext” via their Visual Studio Online offering. This will enable, depending on your licensing, the ability for teams to leverage from the cloud the ability to handle deployment of the results of automated builds in a continuous or even just automated manner.
Difference between MSBuild / Release Management
If you looking for a quick primer, feel free to look here. This post will take you through the process of using Release Management vNext to take an automated build and deploy those bits to an Azure web app, and the processes required to tokenize that output appropriately.
The Difference Between MSBuild and Release Management.
For starters, let’s take a look at MSBuild and Release Management. For many developers out there that I’ve met first have a hard time understanding when this one product ends and the other begins. So to give a little context, let’s first look at the differences:
- MSBuild: MSBuild is a process of creating build definitions that will take a project within Team Foundation Server and run an automated build. These builds generate deliverable components, which Release Management can use.
- Release Management: Release Management is a Microsoft product which takes the bits from MSBuild and then runs through automated processes to deploy and configure those bits into different environments. This assists with maintaining different environments such as Development, Staging, and Production.
Now what some of you are probably thinking is that MSBuild can deploy bits, and that's true it can. But it is very limited in its ability to do so. With MSBuild you are restricted to the idea of publishing build artifacts out to a server as-is. Which is not that great if you are trying to maintain separate environments, which usually have different configurations (connection strings, appsettings, WCF configurations, etc).
Where Release Management shines is that it allows you to take those bits, and then run processes like "Tokenization" to replace settings, similar to a web.config transform in visual studio.
We could do blog post, after blog post on Release Management (and probably will). But for right now, we are going focus our efforts on Release Management vNext.
What is Release Management vNext?
Release Management vNext, is the latest release to Visual Studio Online, and will be coming to OnPremise Team Foundation Server within the next year. Starting with TFS 2015, and Visual Studio Online (VSO), MSBuild was moved away from a client desktop application and into the cloud. This was done by adding the "Build" tab within the team projects in TFS/VSO, as shown below:

When you click on that tab, you will be taken to the following screen.
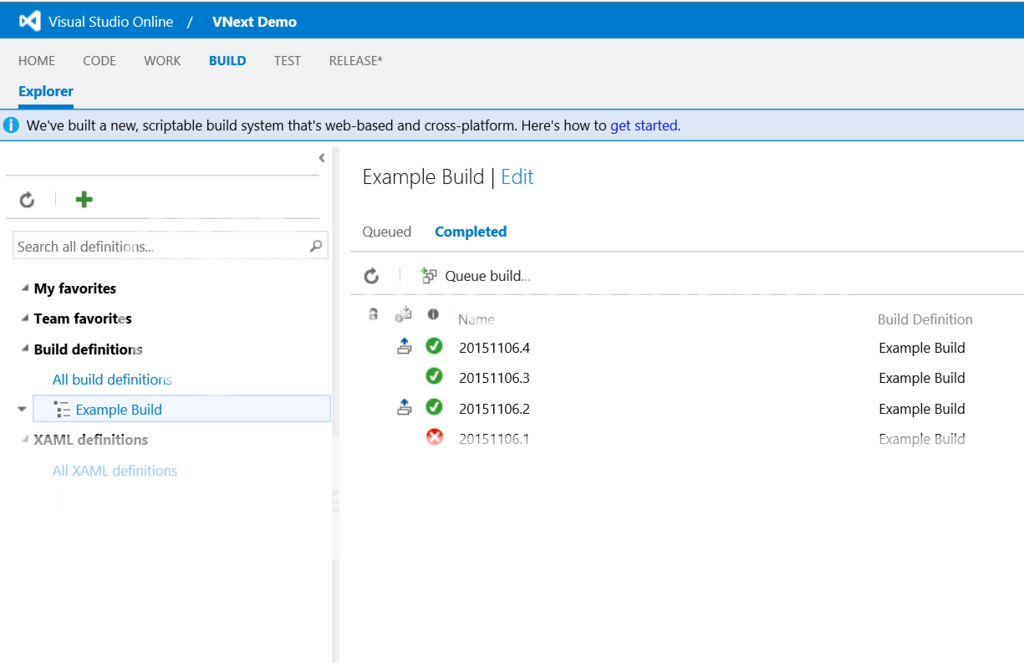
Now its important to note, in previous versions of MSBuild, you would configure a XAML Build definition. That's not something you want to do now. XAML Builds are going away, and there is no direct update path. So moving forward you are going to want to leverage the new Build definition type, like we do in this post.
MSBuild Configuration
So we've configured our build, and here is the configuration of the build.
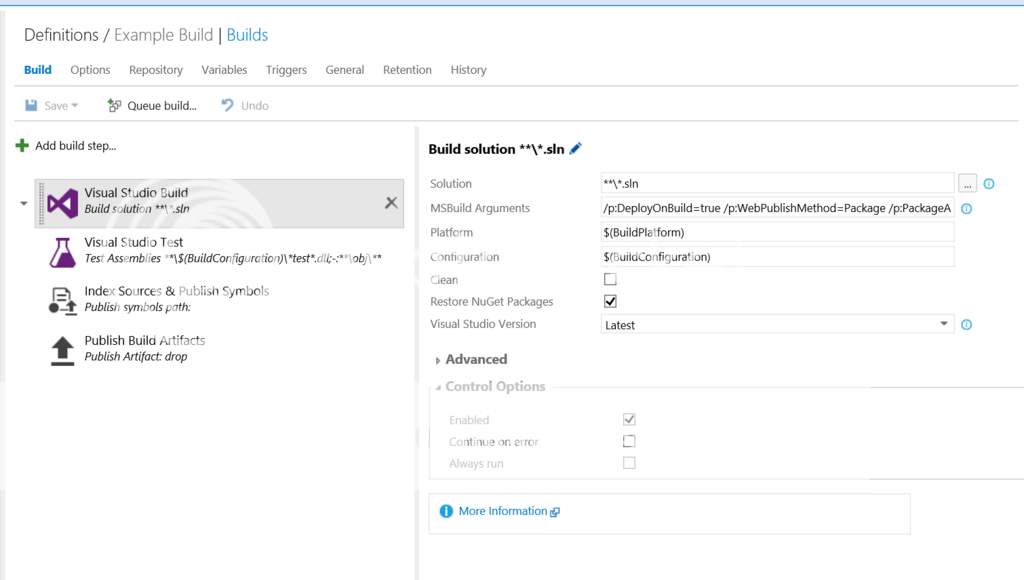
Now by default, when you create a build your going to see a lot of similarities between what was generated and was displays here. We are going to make some slight changes to better support our deployment to Microsoft Azure. First we are going to configure the Visual Studio Build step listed below.
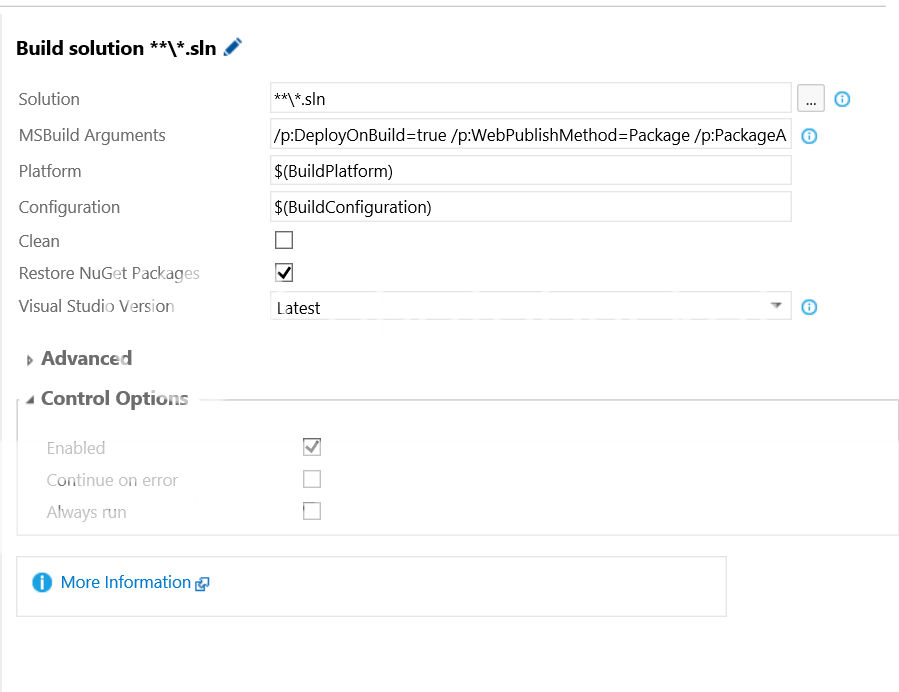
Notice first that we defined the solution file that we want to build, and then we passed in a string of build arguments. That string is shown below:
/p:DeployOnBuild=true /p:WebPublishMethod=Package /p:PackageAsSingleFile=true /p:SkipInvalidConfigurations=true
What this string does...is tell Visual Studio that when it completes the build it will put together a web deployment package and that it is a single file. This will generate our zip file.
Also important here is to click "Restore Nuget Packages"...because you'd have to be crazy not to.
The next two steps in the build we are going to leave unchanged. This will run all automated tests as part of the build, and publish the .pdb files for symbols and error handling.
The final step however we are going to change slightly. Below is the configuration:
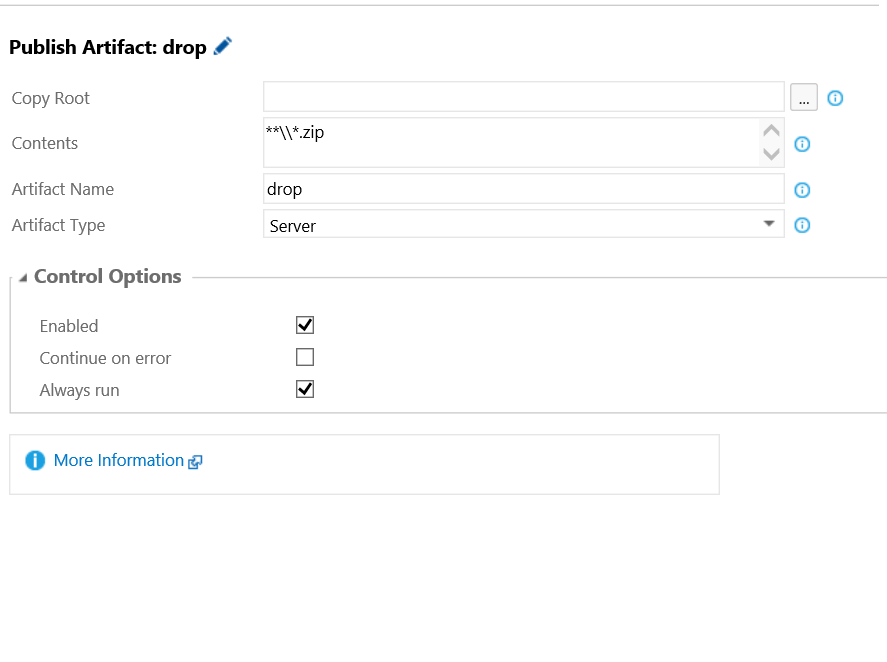
We have updated the contents to pull only the zip files and put them into a folder called "drop". This will ensure that only our web deployment packages make it past the build.
Now its important to note a few things here, the first being that as part of our build. We've created the following tasks. Now we want to leverage Release Managemt as we are going to take that zip file that is being created, and publish it up to multiple slots in Azure. The intention being that we would release the bits up to a development slot, and then be able to trigger a release to a staging slot, and finally for a production slot.
Now let's take a quick look at some of the other tabs we are going to update for this build.
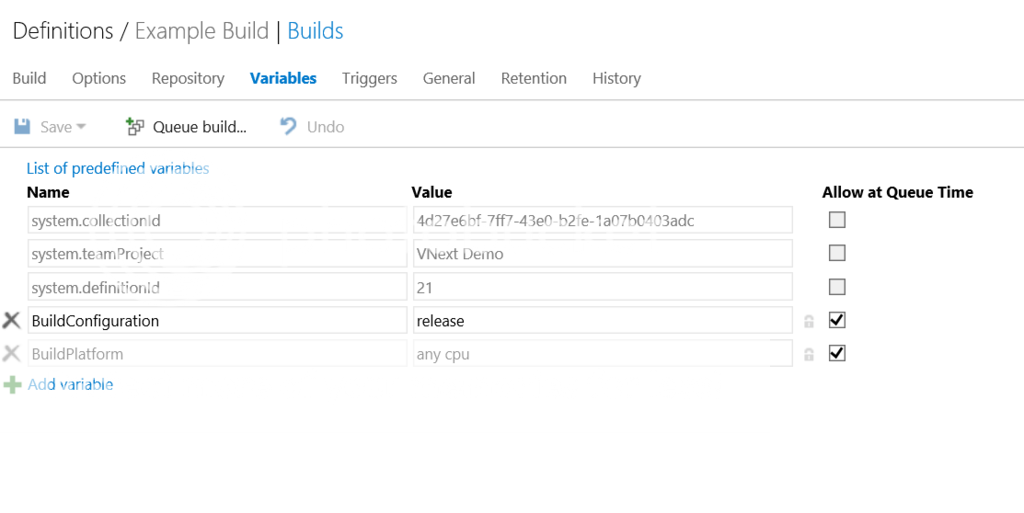
On the variables tab, its important to note that you can define some of the variables including the build configuration. Now given that we are using web.config transforms, we are going to let Release Management handle the tokenization of our web.configs. But its important to note here that setting "Release" will streamline the actual build. This removes the debugging symbols and puts the app in release mode. Because Release Management can only leverage the fully built bits, this is required to be done by MSBuild.
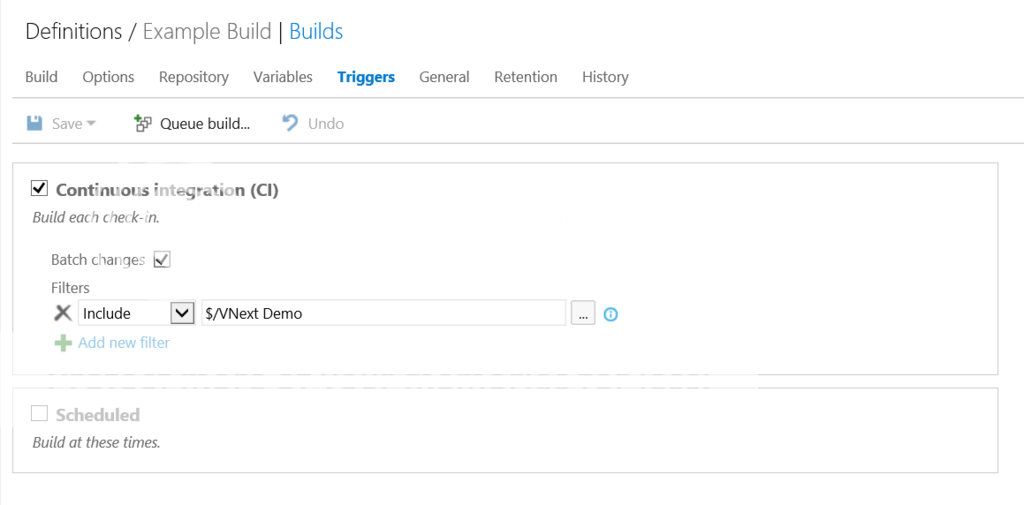
On the triggers tab, we have the option of setting up Continuous Integration. Now its worth mentioning that you should think about this, for several reasons. But the top being if you are using a hosted build agent, you only have so many build minutes a month, and CI will devour them quickly. For this demo we are not using a hosted agent, but instead an agent stood up on an Azure IaaS VM. This allows us to leverage that build server instead of using our VSO minutes.
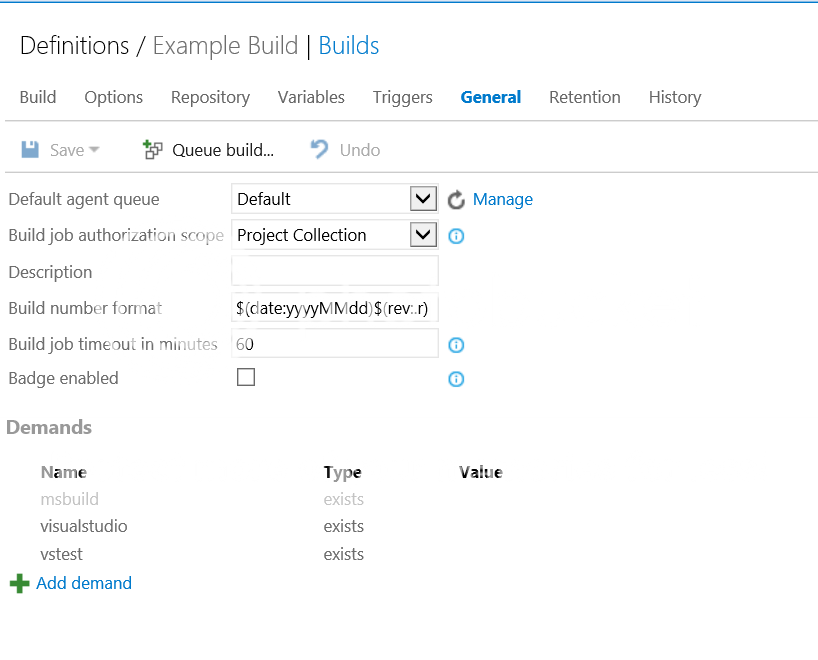
On the General tab, we have the ability of setting some features like how the building numbering works, etc. But most important here is that you are setting the default agent queue, this determines what agent how your builds will be handled and directly relates to the Agent Pool that you are using.
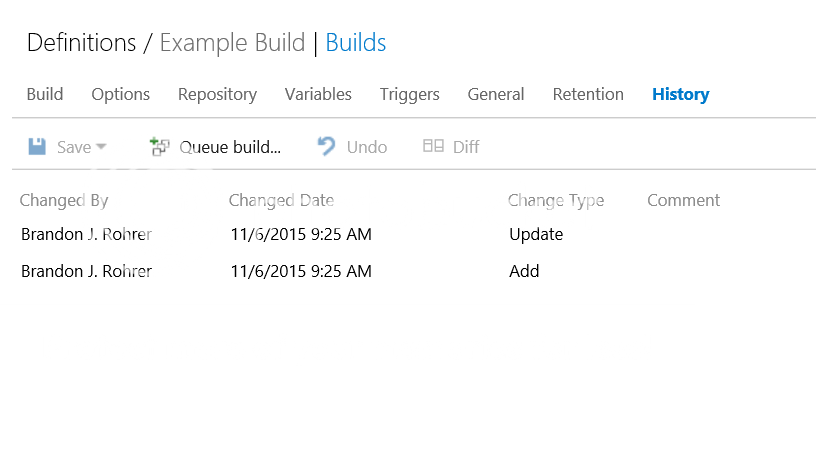
Finally I wanted to briefly mention this tab. The history tab, one of the latest enhancements in VSO, and eventually to TFS On premise is that any changes made to the build definition are tracked and a history is provided. This is something very important to remember.
Now back to our build...
Again, I know some of you are saying there is the ability to publish right there, in MSBuild, and your right there is. But what it can't do is tokenization of the web.config. So we are going to hand off the build artifacts to release management for the purpose of executing the tokenization / configuration and then replacing the appropriate values.
The Problem?
If we look at the build artifacts for this build, we are creating a Web Deploy kit, a zip file for use in publishing to Azure. Which normally would be great, except for us wanting to use tokenization. So we need to execute the following steps:
- Unzip the package to a working folder
- Tokenize the configs (app or web)
- Rezip the file
- Publish to Azure
The problem is that VSO out of the box, does not have the capability to unzip and rezip a file. We could write powershell scripts to do this, but I don't like the idea of having to cart around scripts with the build artifacts that aren't related to the app.
The Solution!
So we solved this problem by creating custom VSO / RM tasks. We created three tasks, and those tasks are:
As you can see above, the links go to GitHub, where we've put the code for each of these custom VSO tasks. You can find instructions here on how to upload these custom tasks into your Visual Studio Online tenant.
Slight hiccup
Before we go any further, there was a slight hiccup related to Azure. When the zip file is generated by MSDeploy, it uses relative paths, which is essential for the Azure deployment. When you create it using the .net libraries, or manually it generates a zip wwith absolute paths that will cause failure. So to get around this we implemented 7zip, which allows for setting the file path mode as a parameter.
Release Management Configuration
When we click on the "Release Tab" we will be presented with the screen below:
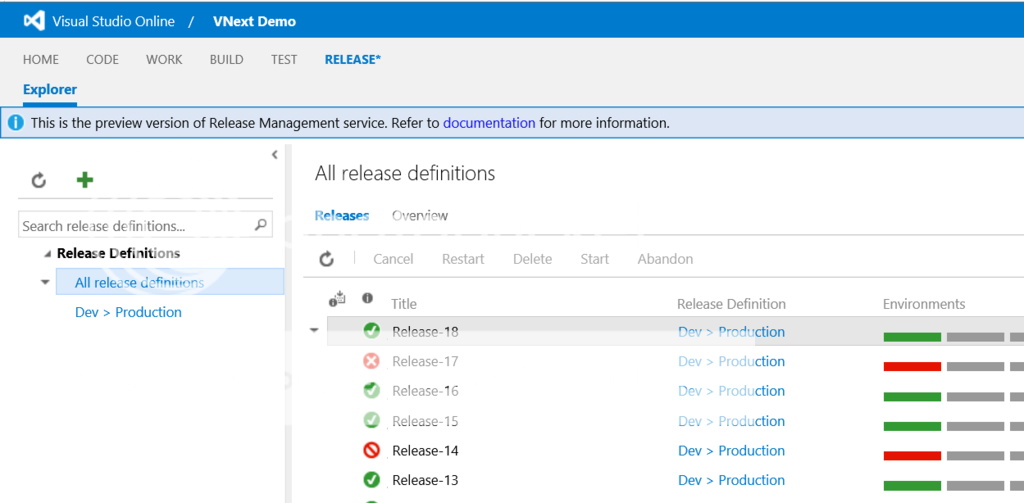
This looks pretty similar in design and layout to the MSBuild tab, and it is meant to. This allows us to define our release definitions by click the "+" button below. And then see the history of the times each release is run. If we open up our Release Definition, it will look like what is shown below:
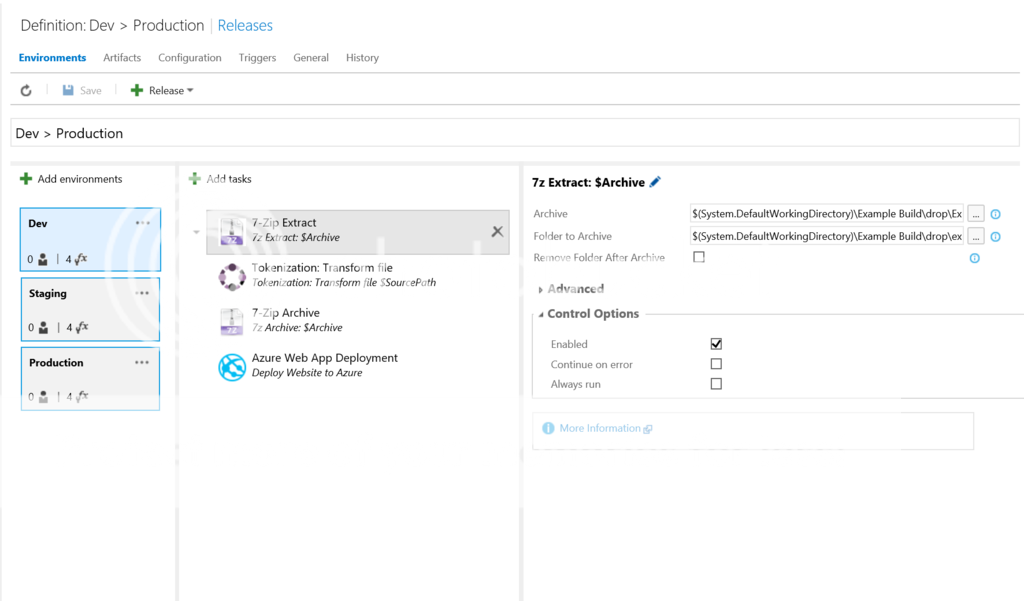
Notice here that on the far left is the listing of the environments that we are using, and in the middle are the release steps for each environment. Let's take a quick look at those environment tabs.
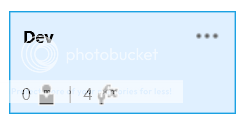
For each environment tab, we immediately see the name in the upper left, and the "..." in the upper right, which activates the menu to make changes to the environment. There are also 2 numbers in the lower left hander corner. The first number (shown as 0 here) is the number of approvers assigned for this environment. The second number (shown as 4 here) are the number of steps in this environments release.
Now if I want to add an environment, I can click the "+" button above the environments and I will be presented with the following dialog.
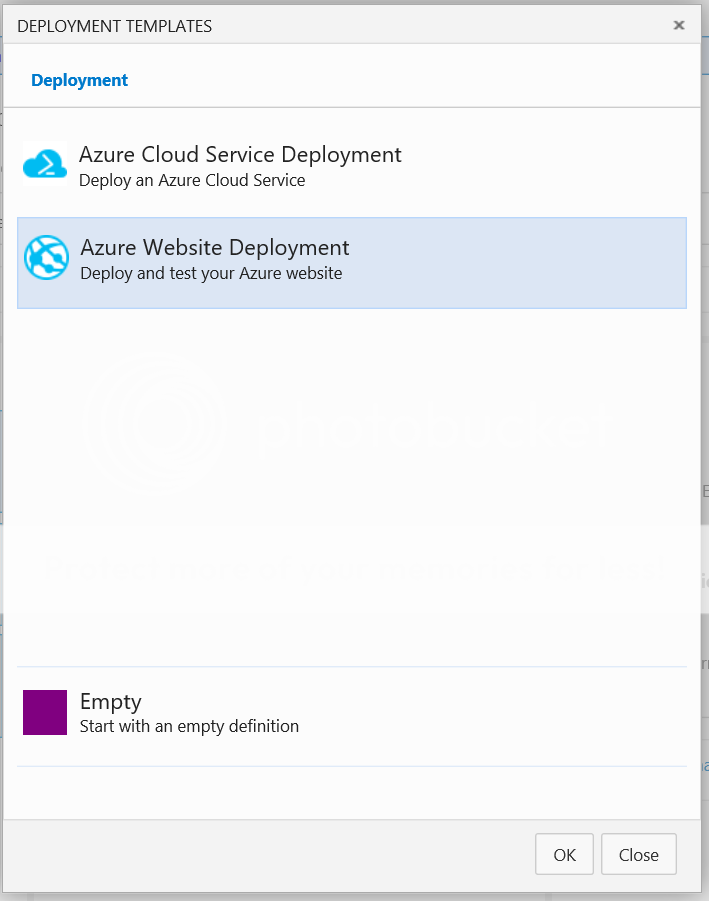
After I make my selection for what kind of environment it is, I will see my screen change as shwon below:
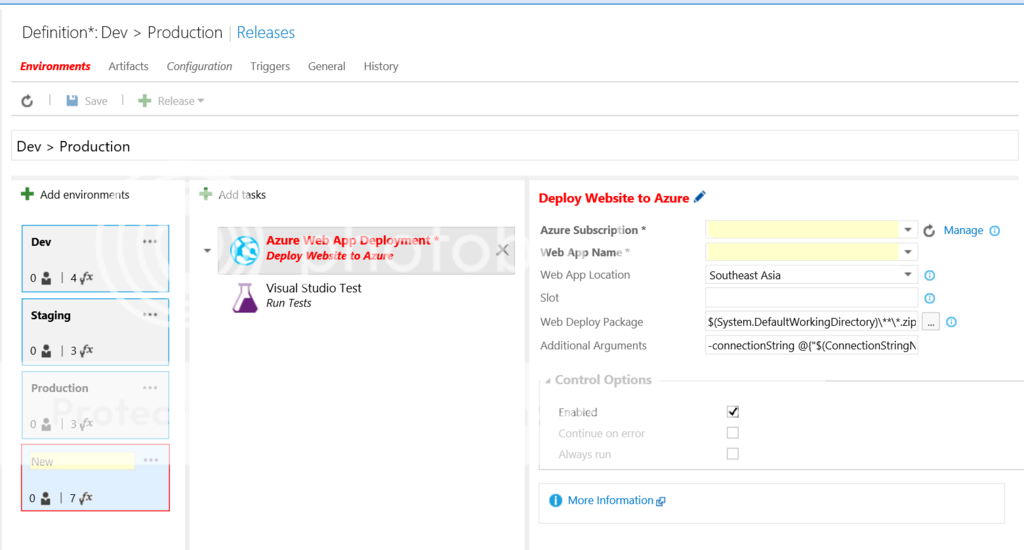
This requires me to give the environment a name, and configure the deployment to that environment.
Now once you have your environment configured the next step is to add tasks to that environment. I can do that by clicking the "Add Tasks" button shown above. Once I do, I will have access to all of these tasks shown in the dialog below.
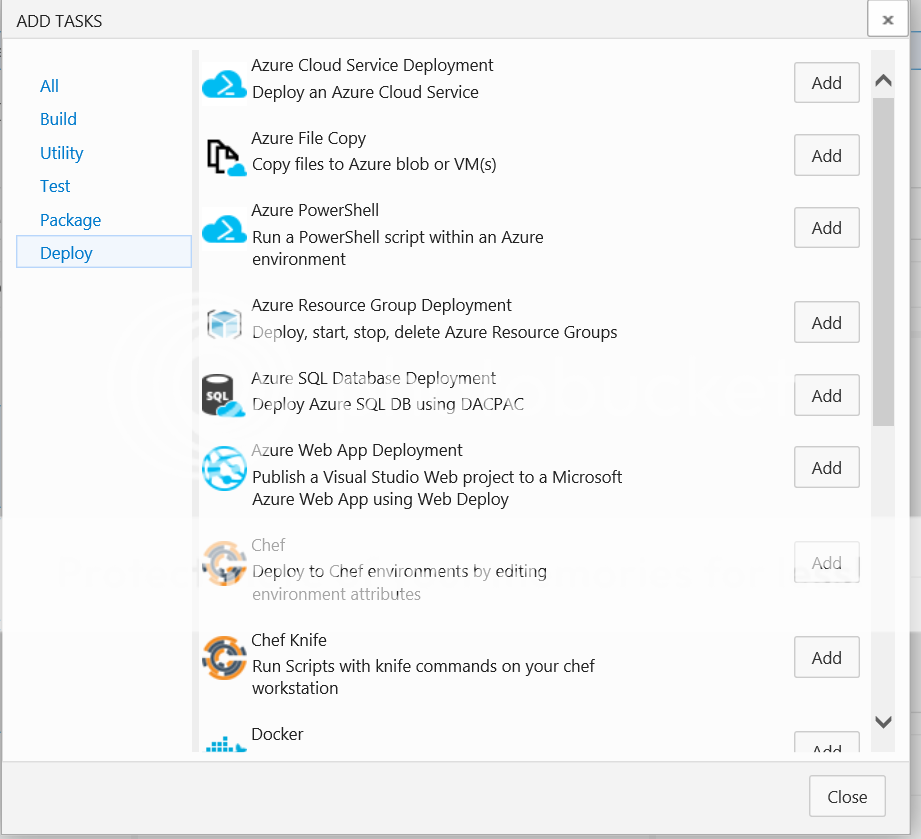
There is a wealth of tasks and options here, but as we previously stated, we wanted some custom tasks. So we went through the steps above and uploaded them. Our custom tasks will appear right along side the existing tasks.
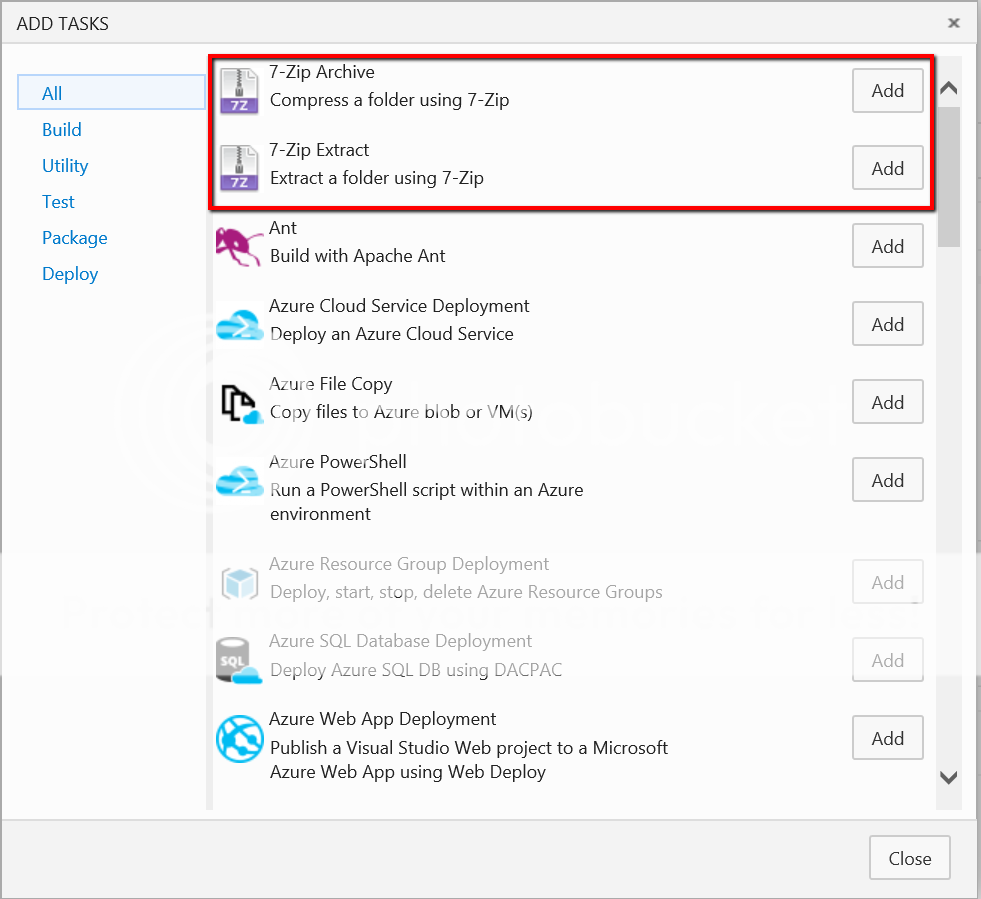
Now that we've picked our tasks, let's configure them each. So our first step is to "Unzip" the web deployment package. By doing this we are preparing for our tokenization step.
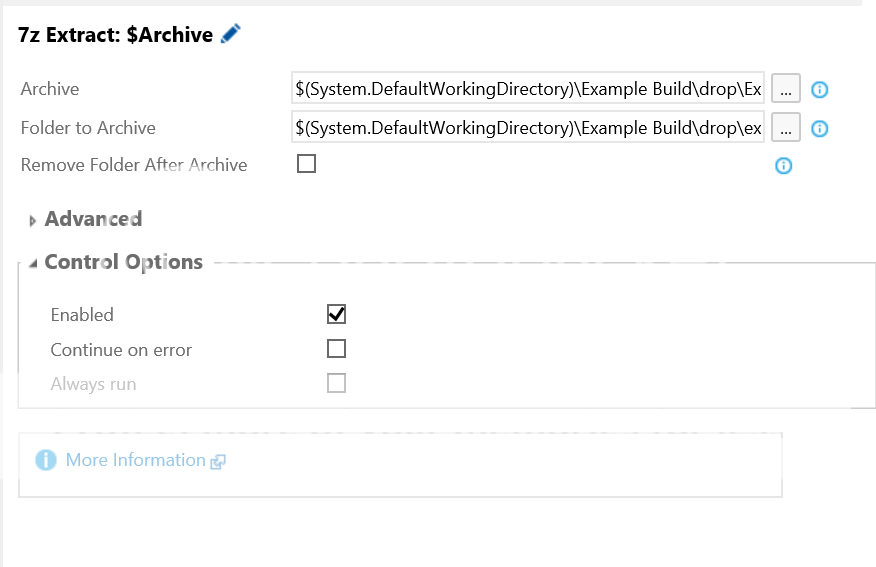
Now notice it wants to know where the zip file is, and then where to unzip this. Now a word of caution for this task. Given how powershell works, you want to make sure you are unzipping to a temporary directory within the "drop" folder. Because powershell will not be able to generate a zip file based on a directory that the zip file is in.
Next we are going to want to configure our "Tokenization" task.
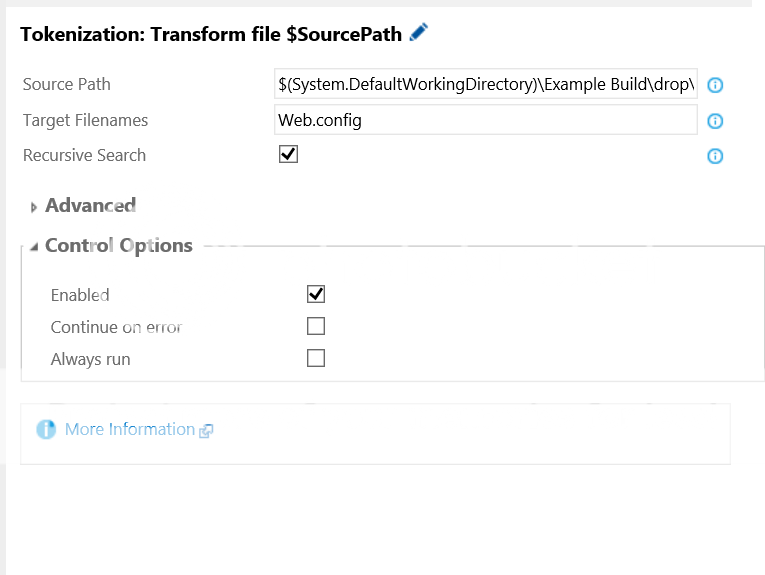
Now your probably wondering why we build our own tokenization, when there is a tokenizer available. Our version will recursively search the director for any files named web.config, where as the default tokenizer will not. This gives us considerably more flexibility.
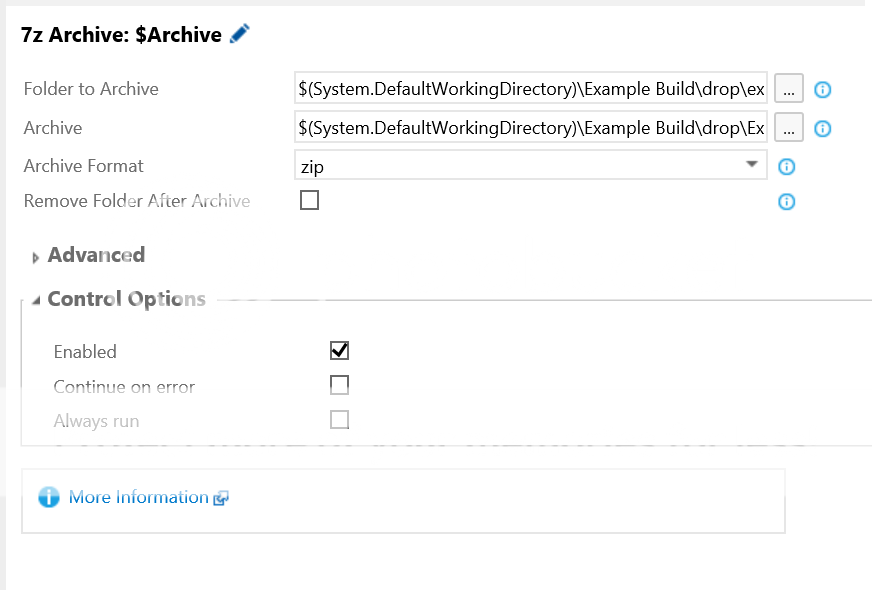
We are going to configure the zip directory, and specifically here we are pointed to the temp folder we created in the unzip and generating the zip based on that. As mentioned above we are using 7zip and specifying the proper format to make sure it works with the next step.
Our final step is to configure the deploy website to azure. As shown below we specified the subscription, the web app name and location as well as the slot we want to deploy to.
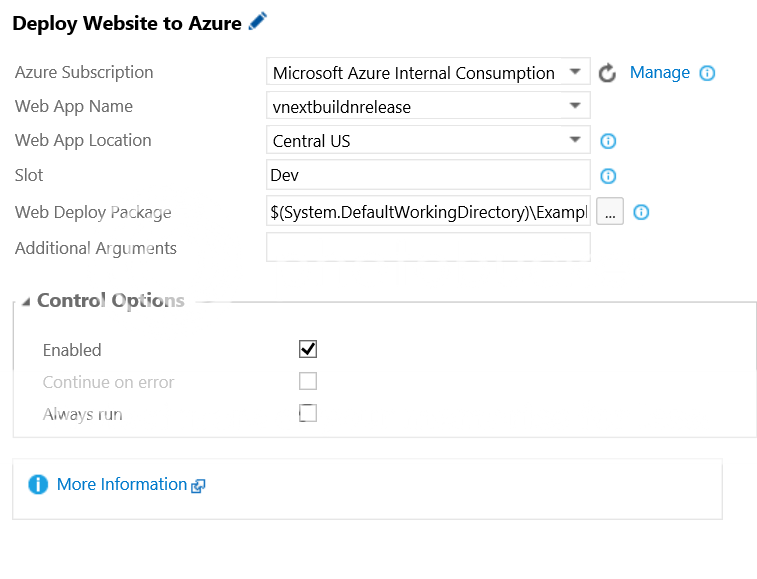
Now before we leave this configuration, let's take a look at some of the other tabs.

On the configuration tab, we can specify any variables that we want populated during this release.

And the "Triggers" tab gives us the option of setting up continuous deployment. If our MSBuild is set up for continuous integration, this would make it that every checkin would trigger a deployment. It is possible to get to that point but requires a pretty mature development shop to accomplish this.

Finally the history tab, which much like MSBuild allows us to see a history of changes to this release definition.
Once our release is configured, we can trigger a release by click the plus sign back on the "Release" tab, or the button on the release definition mared "+ Release", this will bring up the following prompt.
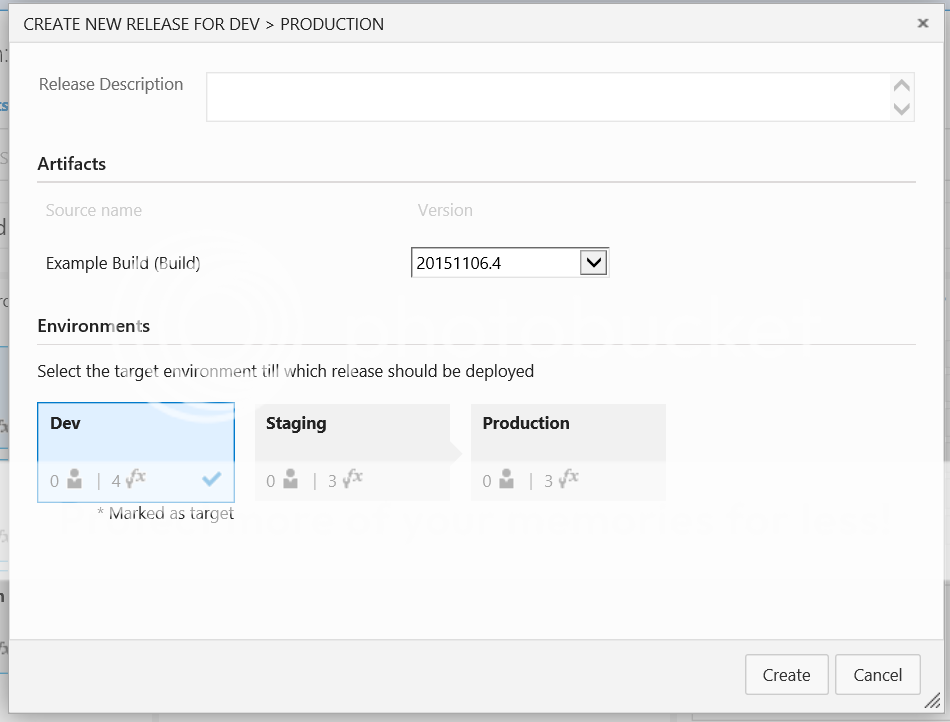
We are given the option of selecting the artifacts we want to use and then the one or many environments we want to push to. Upon doing so, we can then see the release executing as shown below.

If we open that release to see the detail we will be presentd with the following screen.
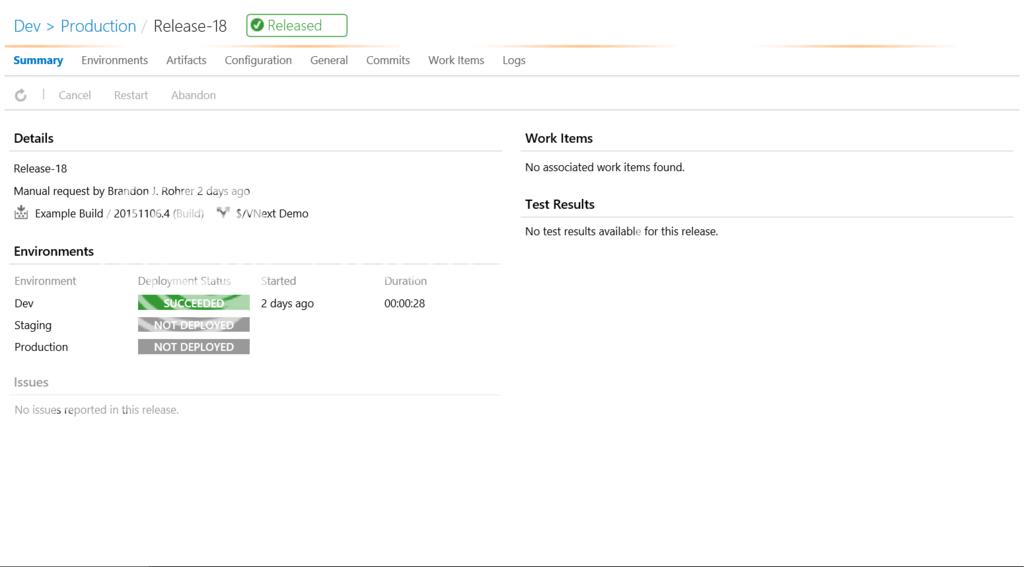
Given the integrated nature of VSO/TFS, we can actually see the results of any unit tests or what work items are associated with this release. This helps with the creation of Release Notes or providing those details to customers.
Closing Thoughts
Release Management vNext is definitely still in its infancy, but given that you can now leverage the browser to create and maintain your releases, and have better integration with the rest of VSO makes it a particularly attractive option for handling deployment. But VSO is the only product on the market to provide this kind of one-stop-shop for tracking work items, source control, automated builds, and now automated deployments.
