Sometimes, we need an app to do organization wide activities such as list all the user contacts. Or send an email to all contacts or modify some attribute for all users. This requires the app to have access to the full data of the organization regardless of the logged in user’s access level. For this, we can use the SharePoint App only permissions. Let’s see how we can configure the app only permissions.
Open the Azure management portal at https://manage.windowsazure.com. Login with your Office 365 or SharePoint online credentials. Click on the directory listing. Go to the Applications tab.
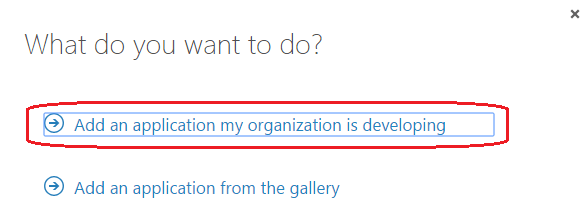
Click on the Add button on the bottom of the page. Click on the ‘Add an application my organization is developing’.

Give a name for the app. Leave the default selection of ‘Web application and/or web api’.

For the sign on url, give https://localhost:44304/Home and App ID uri should be something unique, so we can give https://localhost:44304/MyApp.
This will take you to the app dashboard. Keep this window open, we’ll come back to configure it.
Create the Certificates
Open the Visual Studio command prompt.
Change to the location where you want to store the certificate. Run the command. Change the start and end dates of the certificate to include the current date.
makecert.exe -r -pe -n "CN=My Cert" -b 01/01/2015 -e 01/01/2016 -ss my -len 2048
Open the mmc.exe.
Click on File -> Add/Remove Snap-in

Click on the Certificates -> Add. Leave the default as my user account and click finish.

Then click OK.
Creating Public Certificate
Now, click on Personal -> Certificates. Locate the certificate name which you created in the above step.
- Right click and click All Tasks -> Export

- In the wizard that pops up, click Next. Leave the default ‘No, do not export the private key’. Click Next.
- Select the ‘Base-64 encoded X.509 (.CER)’ . Click Next.
- Select the file location and save the certificate to a file.
Creating Private Certificate
Repeat step 1. But this time, select the private key in step 2.

Select the PFX option and include all certificates.

Give a password. Save the file as in step 4.
Now, open up PowerShell console. Change the folder location to where you saved the certificates.
Create a new certificate object:
$cert = New-Object System.Security.Cryptography.X509Certificates.X509Certificate2
Import the certificate which we created above:
$cert.Import("G:\Demo\Cert\MyCert.cer")
Get the raw certificate data:
[System.Convert]::ToBase64String($cert.GetRawCertData())

This is the Base64 value. Copy the generated code and remove any newline characters in the string. So, it will be one long string.
Then, generate the thumbprint:
[System.Convert]::ToBase64String($cert.GetCertHash())
Next, generate a new Guid.
[System.Guid]::NewGuid().ToString()
Keep these values. We’ll need it in the next steps.
Now, let’s go back to the Azure management portal. Click on the Manage Manifest at the bottom and click on the download manifest. It will download a json file.

Modify the json file with the following. Replace the values which you got from running the powershell commands above.
"keyCredentials": [{
    "customKeyIdentifier":"thumbprint",
    "keyId":"guid",
    "type":"AsymmetricX509Cert",
    "usage": "Verify",
    "value": "base64Value"
    }]
Once you have saved the json file, come back to the Azure management portal and upload the json file by clicking on Manage Manifest -> Upload Manifest
Now you can give the permissions, e.g., Read Directory Data.

And, instead of delegated permissions, you can select the required App only permissions such as Read All Groups.

You can add additional set of permissions for another area such as Exchange Online by clicking on add application.
Ensure that you have selected the following permissions:
- Read directory data
- Read all users’ full profiles
- Read all users’ basic profiles
- Read calendars in all mailboxes
- Read user contacts
- Read user calendars
- Read user mail
To test our app only permissions, let's get the solution provided by Microsoft. Download the solution from the github location https://github.com/mattleib/o365api-as-apponly-webapp to the folder where you have stored the certificates.
Open the solution in Visual Studio.
Right click on the Content folder and add the private certificate(.pfx)
Open the web.config and update the following in the appSettings:
RedirectUriLocalHost and RedirectUri to https://localhost:44304/Home/
In the Azure management portal, open the application you created previously. Go to the Configure tab.
- Copy the Client id and put the value for
ClientId. - Specify the certificate path which we added previously. In our case, set the
ClientCertificatePfx to ~/Content/MyCert.pfx. - Specify the password which you gave while creating the certificate in
ClientCertificatePfxPassword. - You can specify the Office 365 username in
DebugOffice365User so it will be pre-filled in the app.
Go ahead and run the application.
The start page will be shown:

It will give a prompt for admin consent. Click on Accept.

The app screen is loaded.

Based on the data available in the organization, you can click on the different buttons to retrieve the data. Based on the permissions, we would also be able to write data back to Office 365.
The post SharePoint App only permissions appeared first on SharePoint Guide.
