In the series of Zero to Hero in SSIS, this is our next post. In this post, we will see Conditional Split transformation.
I am pretty much sure that by the name you got some impression what it would be.
So, a Conditional Split Transformation is a way by which you can conditionally split an input into multiple output.
Suppose you are a food supplier and you cook both veg & non veg food. Now according to orders by client, you need to move those order requests to a particular kitchen to prepare those orders.
Let’s understand it by following step by step execution example.
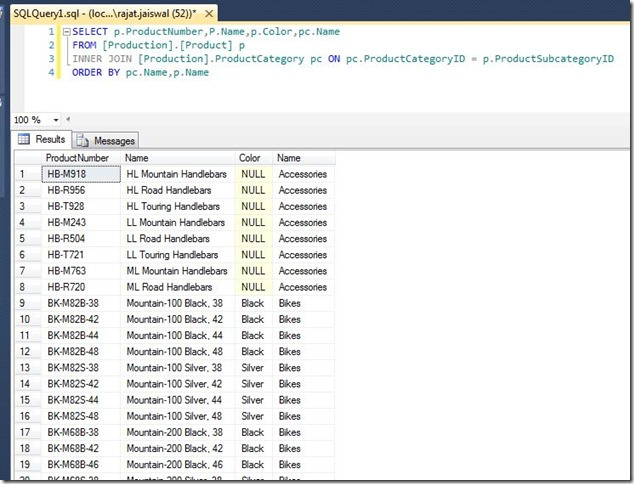
In this example, I am using AdventureWorks database as a source database connection. We are fetching products along with categories. We need Bikes products in a different file and the rest of the products in a different file. You can see products with categories shown below in this image Accessories, bikes are the categories.

Step 1
Create a new package and drag drop data flow task control and double click it. You will get a new screen which has data flow task. Now drag drop Source Assistance from SSIS controls tool bar.

Now as usual, we have to configure the database connection string and set the database to adventureworks.

Step 2
Once the database is configured, right click on control and choose edit property. You will get the below screen where you need to specify the query which we have shown earlier in the figure.

Once you are done with the above steps, you need to configure columns as well, so click on Columns and configure it.

Step 3
Now drag drop conditional split and connect input arrow to it as shown in the figure:

Step 4
Now choose edit option by right clicking the conditional split and configure it. When you click, you will get a screen like below. You will find a different condition operator. One important point to remember here is that you need to drag drop column name to condition textbox. As our aim is to have product with Bikes category in a different file and other categories in different file. So we use the following condition as shown in the below figure.

Step 5
Now drag drop a flat file destination and assign the output of the above conditional split to File destination. You will get the following screen. As you see, we are assigning Bike condition output to this file which means all the products which belong to bikes categories should be available in this.

Step 6
Now configure the flat file destination by choosing the edit option.


Step 7
In a similar way, we have to capture the output which does not belong to Bikes category as shown in the below figure:

Step 8
In a nutshell, we will get the following screen:

We are almost done here. Now to check whether this conditional split is working or not. To check this, hit F5 or run the package. So, if you see below, everything is working fine. We got 32 rows in bike category and 73 rows in other categories.

To cross check result, we will see the file output as well:

So, if you go through all the above steps, we have achieved a Conditional split example.
I hope this post might help you to understand conditional split.
In the next step, we will go for the next step in SSIS.
Enjoy !!!
Filed under: CodeProject, News, Sql server, SQL Server Integration Service, SSIS, TIPS
Tagged: Conditional split, SSIS, step by step SSIS, TIPS
