This article will show you how to implement Code First approach and CRUD Operations using Code First. You will learn how to use Migration in case of Code First. This tutorial will be helpful for beginners who want to learn code-first approach from scratch.
Introduction
There are three different approaches to implement Entity Framework in applications:
- Database First
- Model First
- Code First
Which approach we should use is not the intent of this article but here are some points on which we can decide which approach we should use.
Database First: If we have existing database, then we should choose Database first approach. In this approach, we can generate a model based on our database. In this approach, we create an .edmx file where all the information gets saved.
Model First: If we don't have any existing database, then we can create a conceptual model through this approach and later, we can create a SQL script to create database.
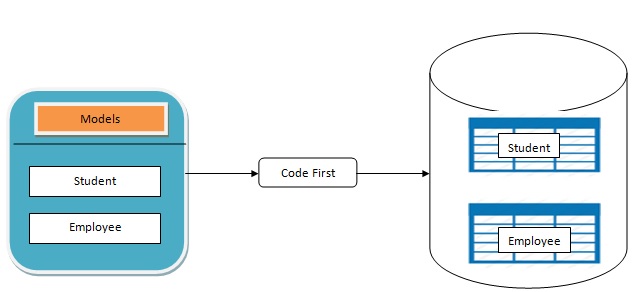
Code First: If we don't have any existing database, then we can go for Code first approach. In this approach, Entity Framework will not create any .edmx or hidden code. Using this approach, we design our model classes and with the help of these model classes, database gets created automatically.
In this article, we will see how we implement Code First approach and CRUD Operations using Code First. We will see how we use Migration in case of Code First. This tutorial is helpful for beginners who want to learn code-first approach from scratch.
Code First Approach
In Code First Approach, we don't create .edmx file. We create our Model class and with the help of those model classes, database gets created automatically.

Starting the Code
1. Open Visual Studio and Go to File --> New-->Project and Create a New MVC project (I am using MVC4 and Visual Studio 2012) as below and give a name to it. (In my case, name is CodeFirstApproach.)

2. Add a Model in Model Folder named Student and apply some attributes which we have inside System.ComponentModel.DataAnnotations namespace.
public class Student
   {
       [Key]
       public int ID { get; set; }
       [StringLength(50)]
       public string Name { get; set; }
       [StringLength(50)]
       public string Email { get; set; }
       [StringLength(50)]
       [DataType(DataType.Password)]
       public string Password { get; set; }
   }
Main Player of Code First (Context Class)
Context class is the main player of code first. Create a context class in Model Folder and give a name to it (In my case, name is MyDataContext.cs) and inherit this from DBContext class and add a constructor in MyDataContext class and call base class constructor and pass the connection string to the base class constructor as below.
Note: For DbContext class, use System.Data.Entity Namespace.
public class MyDataContext : DbContext
   {
     public MyDataContext():base("Data Source=.;Initial Catalog=CodeFirst;
                                  trusted_connection=true")
      {

      }

     public DbSet<Student> Students { get; set; }
   }
Note: We can give the connection string name from the web config file also rather than complete connection string name. In that case, we will pass only connection string name instead of complete connection string.
Add a Controller and Action Method
Add a controller named StudentController and add an action method named AddStudent.
public class StudentController : Controller
    {
        [HttpGet]
        public ActionResult AddStudent()
        {
            return View();
        }
    }
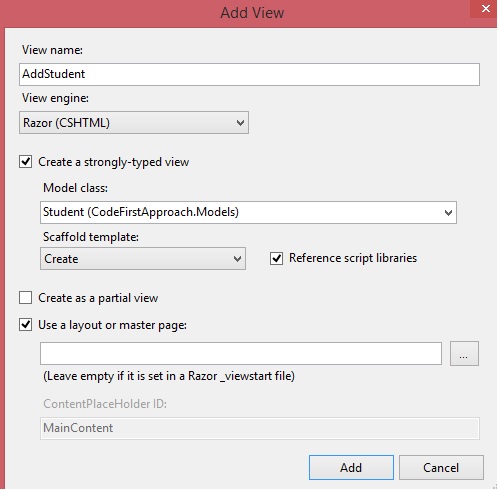
Add a view (Right click on the View and click Add View). Select Create Strongly-TypedView and select Student class which we created in our Model Folder as a Model class. Select Create in Scaffold Templates.

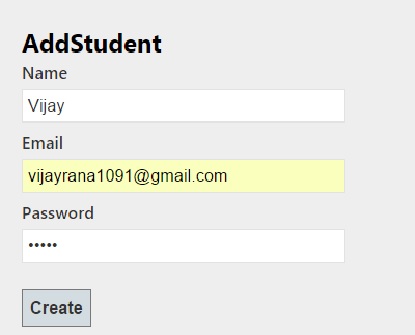
Run the application and Type Student/AddStudent in the URL as ControllerName/ActionName.

Create another action method in StudentController which will handle the post request. In this action method, we will create the object of my context class and add student entity in Students DbSet.
public class StudentController : Controller
{
    [HttpGet]
    public ActionResult AddStudent()
    {
        return View();
    }
    [HttpPost]
    public ActionResult AddStudent(Student std)
    {
      using(MyDataContext objContext = new MyDataContext())
        {
            objContext.Students.Add(std);
            objContext.SaveChanges();
        }
        return View();
    }
}
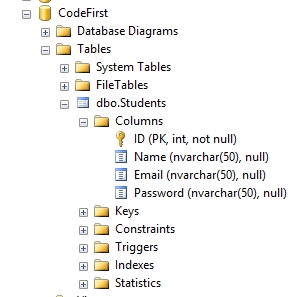
Fill the Student Form and click on create button. We will see a new database created (CodeFirst) and a table (Student) as below:

In the above Table structure, we can see that Students table gets automatically created. Code First automatically creates ID as primary key and adds Identity on ID Column. Name, Email and Password column length is the same as we provided StringLength on Properties on Model Class.
After adding some more records through StudentForm, we have the below data in our student table:

What if we need to add a extra column. Let's say address in our Model. So that complete model is:
public class Student
    {
        [Key]
        public int ID { get; set; }
        [StringLength(50)]
        public string Name { get; set; }
        [StringLength(50)]
        public string Email { get; set; }
        [StringLength(50)]
        [DataType(DataType.Password)]
        public string Password { get; set; }

        public string Address { get; set; }
    }
If we will run the app and add a student, we will get the below exception:

Now we have three options:
DropCreateDatabaseIfModelChanges: We can set this in our MyDataContext Constructor. But if we set this, then whenever our model will be changed, our database will drop and be recreated. So all the data in the database will be lost.DropCreateDatabaseAlways: We can set up this also in our MyDataContext Constructor. This will drop and create database always whenever we will perform any operation on our datacontext. So all the data in the database will be lost again.
We can set up these properties as below:
public MyDataContext():base("Data Source=.;Initial Catalog=CodeFirst;
                             trusted_connection=true")
   {
     Database.SetInitializer<MyDataContext>
              (new DropCreateDatabaseIfModelChanges<MyDataContext>());
   }
or:
public MyDataContext():base("Data Source=.;Initial Catalog=CodeFirst;
                             trusted_connection=true")
   {
       Database.SetInitializer<MyDataContext>
                (new DropCreateDatabaseAlways<MyDataContext>());
   }
In both the above options, we are losing data. So what if we don't want to lose our data and want to add an extra column in our table. As we have some Additional Information in the above exception, we can take the help of Migrations approach in such scenarios.
Code First Migrations Approach
To use the Code First Migrations, first we need to enable the Migrations in our project.
To enable Migrations, Go to Tools-->NuGet Package Manager and then Open Package Manager Console.
Run the below commands one by one:
- PM> UnInstall-Package EntityFramework
- PM> Install-Package EntityFramework
- PM> Enable-Migrations -ContextTypeName CodeFirstApproach.Models.MyDataContext
Once we will run the above commands, a migrations folder will get added in our solution which will contain a configuration class file and another file with date Time stamp. This file contains the initial state of table.
Now run the below command with a MigrationName (AddAddressProperty in my case).
- PM> Add-Migration AddAddressProperty
The above command will create another file in Migrations Folder and which contains the changes you made in your model after the last Migration.
Now update your database.
- PM> Update-Database
Now check the Students table, a new column named address will be there.
Now every time we will add a column in our model, we need to perform the above steps. Ohh No... Automatic Migration is here for our help.
Automatic Migration
In the constructor of this configuration file, set AutomaticMigrationsEnabled = true and in your MyDataContext Constructor, set the below initializer
public MyDataContext():base("Data Source=.;Initial Catalog=CodeFirst;trusted_connection=true")
      {
         Database.SetInitializer
         (new MigrateDatabaseToLatestVersion<MyDataContext, Configuration>());
      }
Now add another property in your model, let's say City and run the application again. Wow, this time it's added automatically in your table.
Insert Master Data (Using SQL Query) in Code First
Suppose we want to add a PhoneNo property in our model and want to give some default values. This can be easily done by using SQL query in code first approach.
Run the below command in PM Console window:
PM> Add-Migration AddPhoneNoProperty
This will create a file in Migration Folder. Open that file and add a SQL update statement as below:
public partial class AddPhoneNoProperty : DbMigration
 {
     public override void Up()
     {
         AddColumn("dbo.Students", "PhoneNo", c => c.String());
         Sql("update students set PhoneNo=9711965544 where PhoneNo is null");
     }

     public override void Down()
     {
         DropColumn("dbo.Students", "PhoneNo");
     }
 }
This will add a PhoneNo column in student table with some default values as below:

History
- 20th March, 2016: Initial version
