Introduction
Sometimes, we want to wrap multiple views in a single window and navigate through them with a Tab Container. This can be done in Android using TabHost control.
There are two ways to use a TabHost application in Android:
- Using the
TabHost to navigate through multiple views within the same activity. - Using the
TabHost to navigate through Actual multiple Activities using intents.
We will explain both ways through this tutorial.
Anatomy of Tabbed Application
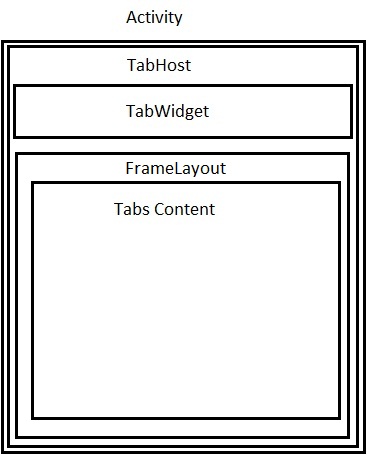
An activity with a TabHost may look like this:

The Activity consists of:
- A
TabHost: The root element of the layout - The
TabHost wraps a TabWidget which represents the tab bar. - The
TabHost wraps a FrameLayout which wraps the contents of each tab.
There are some rules that we must stick to when using a Tabbed activity:
- If the activity is of type
TabActivity [optional], then the TabHost must have the id @android:id/tabhost. - The
TabWidget must have the id @android:id/tabs. - The
FrameLayout must have the id @android:id/tabcontent.
Now, let's see an example to an activity with multiple tabs.
This is the layout:
="1.0"="utf-8"
<TabHost android:layout_width="fill_parent"
android:layout_height="fill_parent"
android:id="@+id/tabHost"
xmlns:android="http://schemas.android.com/apk/res/android"
>
<TabWidget
android:layout_width="fill_parent"
android:layout_height="wrap_content"
android:id="@android:id/tabs"
/>
<FrameLayout
android:layout_width="fill_parent"
android:layout_height="fill_parent"
android:id="@android:id/tabcontent"
>
<LinearLayout
android:layout_width="fill_parent"
android:layout_height="wrap_content"
android:id="@+id/tab1"
android:orientation="vertical"
android:paddingTop="60px"
>
<TextView
android:layout_width="fill_parent"
android:layout_height="100px"
android:text="This is tab1"
android:id="@+id/txt1"
/>
</LinearLayout>
<LinearLayout
android:layout_width="fill_parent"
android:layout_height="fill_parent"
android:id="@+id/tab2"
android:orientation="vertical"
android:paddingTop="60px"
>
<TextView
android:layout_width="fill_parent"
android:layout_height="100px"
android:text="This is tab 2"
android:id="@+id/txt2"
/>
</LinearLayout>
<LinearLayout
android:layout_width="fill_parent"
android:layout_height="fill_parent"
android:id="@+id/tab3"
android:orientation="vertical"
android:paddingTop="60px"
>
<TextView
android:layout_width="fill_parent"
android:layout_height="100px"
android:text="This is tab 3"
android:id="@+id/txt3"
/>
</LinearLayout>
</FrameLayout>
</TabHost>
Then in the code of our activity:
public void onCreate(Bundle savedInstanceState) {
super.onCreate(savedInstanceState);
setContentView(R.layout.main);
TabHost tabHost=(TabHost)findViewById(R.id.tabHost);
tabHost.setup();

TabSpec spec1=tabHost.newTabSpec("Tab 1");
spec1.setContent(R.id.tab1);
spec1.setIndicator("Tab 1");

TabSpec spec2=tabHost.newTabSpec("Tab 2");
spec2.setIndicator("Tab 2");
spec2.setContent(R.id.tab2);

TabSpec spec3=tabHost.newTabSpec("Tab 3");
spec3.setIndicator("Tab 3");
spec3.setContent(R.id.tab3);

tabHost.addTab(spec1);
tabHost.addTab(spec2);
tabHost.addTab(spec3);
}
is going to look like this:

- We create tabs using
TabSpecs class. - We set the title of each tab using
TabSpecs.setIndicator() method. - We set the content of each tab using
TabSpecs.setContent() method. - If you use
TabActivity as a base class to your activity, you do not need to call TabHost.Setup() method.
We can add an icon to the title of the tab like this:
TabSpec spec1=tabHost.newTabSpec("Tab 1");
spec1.setContent(R.id.tab1);
spec1.setIndicator("Tab 1",getResources().getDrawable(R.drawable.flash));

TabSpec spec2=tabHost.newTabSpec("Tab 2");
spec2.setIndicator("Tab 2",getResources().getDrawable(R.drawable.sun));
spec2.setContent(R.id.tab2);

TabSpec spec3=tabHost.newTabSpec("Tab 3");
spec3.setIndicator("Tab 3",getResources().getDrawable(R.drawable.chart));
spec3.setContent(R.id.tab3);
It will look like this:

We can also specify the indicator to be a view:
TabSpec spec1=tabHost.newTabSpec("Tab 1");
spec1.setContent(R.id.tab1);
TextView txt=new TextView(this);
txt.setText("Tab 1");
txt.setBackgroundColor(Color.RED);
spec1.setIndicator(txt);
Setting the Content of Tabs
We saw how to set the contents of tabs by specifying multiple layout resources to be displayed within the same activity.
What if we have multiple Activities in our application and we want to navigate between them using tabs? In this case, we will have one activity as the root activity of the application.
This activity will have the TabHost and will navigate to other activities using Intents.
Note: The root activity must inherit from TabActivity. The root activity will have layout file like this:
="1.0"="utf-8"
<TabHost android:layout_width="fill_parent"
android:layout_height="fill_parent"
android:id="@android:id/tabhost"
xmlns:android="http://schemas.android.com/apk/res/android"
>
<TabWidget
android:layout_width="fill_parent"
android:layout_height="wrap_content"
android:id="@android:id/tabs"
/>
<FrameLayout
android:layout_width="fill_parent"
android:layout_height="fill_parent"
android:id="@android:id/tabcontent"
>
</FrameLayout>
</TabHost>
The other activities will have a simple layout consisting of a TextView.
Now to the code of the root activity:
public class TabDemo extends TabActivity {
@Override
public void onCreate(Bundle savedInstanceState) {
super.onCreate(savedInstanceState);
setContentView(R.layout.main);
TabHost tabHost=getTabHost();
TabSpec spec1=tabHost.newTabSpec("Tab 1");
spec1.setIndicator("Tab 1",getResources().getDrawable(R.drawable.sun));
Intent in1=new Intent(this, Act1.class);
spec1.setContent(in1);
TabSpec spec2=tabHost.newTabSpec("Tab 2");
spec2.setIndicator("Tab 2",getResources().getDrawable(R.drawable.chart));
Intent in2=new Intent(this,Act2.class);
spec2.setContent(in2);
tabHost.addTab(spec2);
tabHost.addTab(spec3);
}
}

Adding Tabs at Run-time
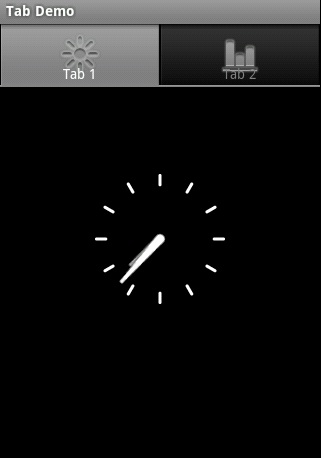
We can add tabs to TabHost at run-time using TabSpec.setContent(TabContentFactory) method.
The TabContentFactory is an interface that requires the implementation of a callback method createTabContent(String tag) which returns the view to be added to the content of the tab. So in the last example, if we changed code that adds the content of the second tab to this:
TabSpec spec1=tabHost.newTabSpec("Tab 1");
spec1.setIndicator("Tab 1",getResources().getDrawable(R.drawable.sun));
spec1.setContent(new TabContentFactory() {
@Override
public View createTabContent(String tag) {
return (new AnalogClock(TabDemo.this));
}
});
the activity will look like this:

View more tutorials on http://android-pro.blogspot.com.
History
- 6th September, 2010: Initial post
