Blog Reference: Building a simple Toast Notification with text (Part 2)
I hope you read my previous post on “Building a Toast Notification with text for apps targeting Universal Windows Platform”. There we learned how to create a very basic toast notification. Continuing the series of posts, today we will learn how to add buttons within the notification.
Let’s begin with building toast notification with text and buttons. Stay tuned to learn creating more complex notifications in next blog posts of this series.

If you are a developer and building apps or games for Windows 10, targeting Universal Windows Platform (aka. UWP), you might want to show toast notifications to the user of your app/game. You might also want to provide some additional content like textbox, button, etc. to get specific inputs.
As the days are passing by, there is a need to do all the things quickly without launching apps and thus there is a need to inject more contents to the notification. For example, you are building an app that sends a notification to perform some specific operation, can be done directly from the notification message. User will not have to launch the app to perform it.
If you read my previous blog post on creating a simple toast notification, you have already learned how to implement it. Once your basic code block is ready, you can now enhance it to add one or two buttons into that. To do this, you need to add action within the notification template. These are specified under the <actions> element. When you specify <action>, this appears as a button on Desktop and Mobile. A developer can specify up to 5 custom or system actions inside a toast notification.
Below is the code snippet that we are using to demonstrate here. Please have a look into it and proceed next to understand it better.
var template = "<toast launch=\'app-defined-string\'>" +
"<visual>" +
"<binding template =\'ToastGeneric\'>" +
"<text>Sample Notification</text>" +
"<text>" +
"Would you like to visit kunal-chowdhury.com?" +
"</text>" +
"</binding>" +
"</visual>" +
"<actions>" +
"<action activationType=\'background\'
content=\'yes\' arguments=\'yes\'/>" +
"<action activationType=\'background\'
content=\'no\' arguments=\'no\'/>" +
"</actions>" +
"</toast>";
var xmlDocument = new XmlDocument();
xmlDocument.LoadXml(template);
var toastNotification = new ToastNotification(xmlDocument);
var notification = ToastNotificationManager.CreateToastNotifier();
notification.Show(toastNotification);
The “activationType” specified in action tag can be of foreground, background, protocol or system. This is optional and set as “foreground” by default. If you want to launch a different app, set it to “protocol”. In case it is a system define action, set it as “system”.
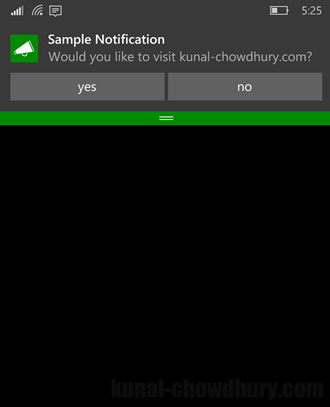
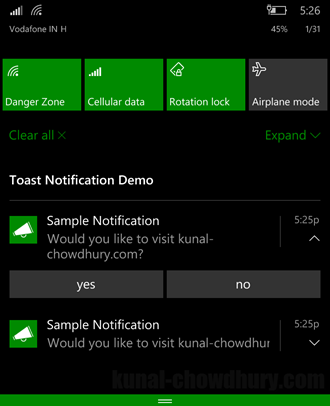
Here, you can see how our demo code creates the Toast Notification inside a Windows 10 Mobile (Screenshot #1) and how it looks in the notification center if not attempted by the user (Screenshot #2). If there’s a bigger content or has buttons, user can expand it to see the entire content. Once you expand, you will be able to perform actions on the button specified.


I hope that the post was simple and easy to understand, if you are a beginner with building Universal Windows apps. The demo that is shown above works on any UWP app as it shares the same SDK and platform code.
It was definitely a simple one with one or two buttons with text as content. In the next post, we will go a little bit deeper and discuss building a little complex toast notification message with text message, input box and buttons inside it. Till that time, happy coding and read my other posts related to building apps for Universal Windows Platform.
Don’t just stop here. If you are available on Twitter, Facebook, Google+ and have not yet connected with me, do so now and get all the updates/posts that I share over those social networking sites. You can also subscribe to my blog’s RSS feed and Email newsletter to get immediate notification of new posts.
