Introduction
I love the voices of "Alvin and The Chipmunks" and "Darth Vader".
I wrote this application to change my voice in "real time" either to a chipmunk or Darth Vader using an audio pitch shifting algorithm.
Ingredients
This application uses the excellent C# audio library CSCore to capture, play and process audio and the pitch shifting algorithm written by Stephan Bernsee (see references).
Application
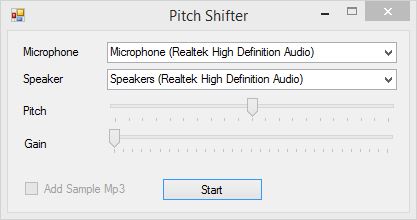
This is how the application looks when you start it. It uses Wasapi to capture and play audio so you need at least Windows Vista to be able to run.

Select your preferred microphone and speaker and click Start.
ATTENTION: Please use a headset with a microphone to avoid nasty feedback on your speakers.

Play with the "Pitch" and "Gain" sliders to change your sound.
When you click the "Add Sample Mp3" checkbox, the sample mp3 file starts to play and stops when you uncheck it. You can change this mp3 file with your favorite karaoke song to sing like a chipmunk or Darth Vader.
Interesting Parts of the Code
When you click the Start button, the application initializes the capture device in "exclusive mode" to enable minimum latency. This enables to hear what you speak into the microphone from the speakers with minimum delay.
mSoundIn = new WasapiCapture(false, AudioClientShareMode.Exclusive, 5);
mSoundIn.Device = mInputDevices[cmbInput.SelectedIndex];
mSoundIn.Initialize();
mSoundIn.Start();
Then it creates a SampleDSP object and sets the gain and pitch values.
var source = new SoundInSource(mSoundIn) { FillWithZeros = true };
mDsp = new SampleDSP(source.ToSampleSource().ToMono());
mDsp.GainDB = trackGain.Value;
SetPitchShiftValue();
To be able to add an mp3 source later, it creates a mixer and adds the DSP object to the mixer.
mMixer = new SimpleMixer(1, 44100) {
FillWithZeros = false,
DivideResult = true };
mMixer.AddSource(mDsp.ChangeSampleRate(mMixer.WaveFormat.SampleRate));
The final step is to initialize the play device also in "exclusive mode" and start it.
mSoundOut = new WasapiOut(false, AudioClientShareMode.Exclusive, 5);
mSoundOut.Device = mOutputDevices[cmbOutput.SelectedIndex];
mSoundOut.Initialize(mMixer.ToWaveSource(16));
mSoundOut.Play();
When you click the "Add Sample Mp3" checkbox, the following code is executed. If the checkbox is checked, it adds the mp3 file to the mixer as a sound source. If it is unchecked, it removes the mp3 source from the mixer.
if (mMixer != null)
{
    if (chkAddMp3.Checked)
    {
        mMp3 = CodecFactory.Instance.GetCodec("test.mp3").ToMono().ToSampleSource();
        mMixer.AddSource(mMp3.ChangeSampleRate(mMixer.WaveFormat.SampleRate));
    }
    else
    {
        mMixer.RemoveSource(mMp3);
    }
}
The SampleDSP class reads data from the sound source and adds gain and changes pitch according to the GainDB and PitchShift properties.
float gainAmplification = (float)(Math.Pow(10.0, GainDB / 20.0));
int samples = mSource.Read(buffer, offset, count);
if (gainAmplification != 1.0f)
{
    for (int i = offset; i < offset + samples; i++)
    {
        buffer[i] = Math.Max(Math.Min(buffer[i] * gainAmplification, 1), -1);
    }
}

if (PitchShift != 1.0f)
{
    PitchShifter.PitchShift(PitchShift, offset, count, 2048, 4, mSource.WaveFormat.SampleRate, buffer);
}
return samples;
It's not the scope of this article to tell you how the pitch shifting algorithm in the PitchShifter class works. If you wonder how, please read the wonderful "Pitch Shifting Using the Fourier Transform" article.
Below, you can find a simple diagram showing how the audio is processed.

References
History
- Version 1.0.0 - Initial version of the application and the tip
