Introduction
One of the most common uses of datagrid is monitoring. Such monitoring screens are often needed to track scheduled jobs, view simulation results, analyze tabulated data like stocks, etc. Although there are other possible ways, I find this approach good and hence thought of sharing it.
Using datagrid in multithreaded environment is tricky. Let us iterate over the problems first.
- There will be a background thread to process data and based on the result of this processing, the data grid will be updated.
- UI controls in WPF can be updated by UI thread only.
- There can be more than one UI control which will work together to achieve the overall functionality (Progress bar, buttons, etc.). Coders often make a mistake of passing control reference in an insecure way.
- The source of data to which the
datagrid will be bound should not be modifiable by any other class.
The Template
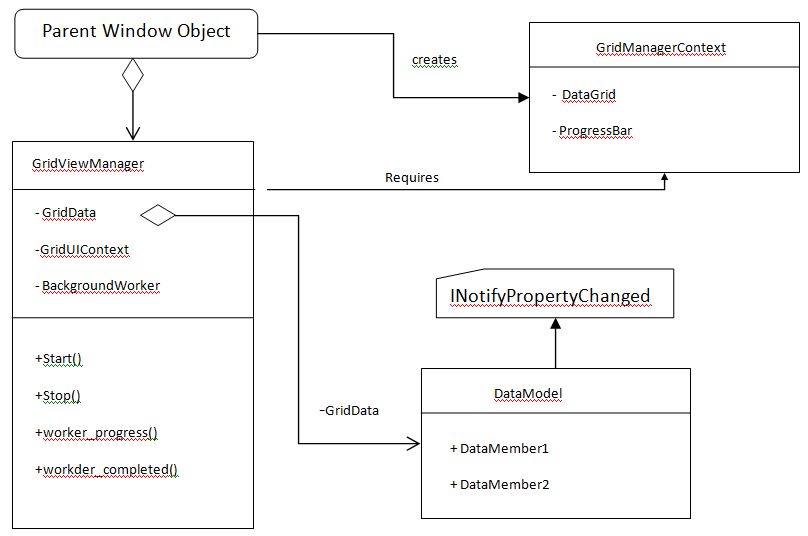
I am not a big fan of datatable and dataset as they don’t provide strong type checking. I prefer binding to datamodel objects. Here is a rough UML diagram to get started.

Here, we start defining all components one by one.
Define DataModel
Create a data holder class as data model. To make it auto updatable, it has to implement INotifyPropertyChanged. Here is a sample implementation.
public class NetworkDetails : INotifyPropertyChanged
{
    public string IpAddress { get; set; }

    private bool m_IsMonitoring = false;

    public bool IsMonitoring
    {
        get { return m_IsMonitoring; }
        set
        {
            if (m_IsMonitoring == value)
                return;

            m_IsMonitoring = value;

            OnPropertyChanged("IsMonitoring");
        }
    }

    private int m_LoadFactor = 0;

    public int LoadFactor
    {
        get { return m_LoadFactor; }
        set
        {

            if (m_LoadFactor == value)
                return;

            m_LoadFactor = value;

            OnPropertyChanged("LoadFactor");
        }
    }

    public event PropertyChangedEventHandler PropertyChanged;

    protected void OnPropertyChanged(string property)
    {
        if (PropertyChanged != null)
        {
            PropertyChanged(this, new PropertyChangedEventArgs(property));
        }
    }
}
Define GridViewManager
This class will encapsulate the overall grid operations and coordinate with other controls. Some common operations carried out by this class will be:
- Manage background worker (
start, stop, consume events) - Launch data processing operations
- Update processed data into
datamodel and since data model is implementing INotifyPropertyChanged, the changes will be reflected back in datagrid. - Update other UI controls like progress bar or buttons.
public class GridViewManager
{
    public ObservableCollection<NetworkDetails> lstNetworkDetails =
				new ObservableCollection<NetworkDetails>();
    BackgroundWorker m_bgworker = new BackgroundWorker();
    MainWindow.GridViewManagerContext m_context = null;
    public GridViewManager(MainWindow.GridViewManagerContext sgmc)
    {
        m_context = sgmc;
        m_bgworker.WorkerReportsProgress = true;
        m_bgworker.DoWork += worker_DoWork;
        m_bgworker.RunWorkerCompleted += bgworker_RunWorkerCompleted;
        m_bgworker.ProgressChanged += bgworker_ProgressChanged;
    }

    void bgworker_ProgressChanged(object sender, ProgressChangedEventArgs e)
    { … }

    void bgworker_RunWorkerCompleted(object sender, RunWorkerCompletedEventArgs e)
    { … }

    void worker_DoWork(object sender, DoWorkEventArgs e)
    { … }

    public void Start()
    { … }

    public void Stop()
    { … }
}
Control the Creation of GridViewManager
The GridViewManager class holds the collection which will be bound to itemsource of gridview. It is basically a subordinate class of main window and it is going to heavily use other WPF controls as well to achieve overall functionality. This class must be used within the vicinity of UIThread. It should ideally be a nested class. However, that can clutter the code too much. If we can restrict the instantiation of gridviewmanager class to main window, then it will solve the problem. Had it been C++ , we could have leveraged friend functions. However, in C#, we can use some alternative mechanism to limit the instantiation. Here is how you can achieve the same:
- Create another class to hold all UI Controls together. Let's call it
GridViewManagerContext. - Define only one constructor in
GridViewManager which expects an object of GridViewManagerContext. With this GridViewManager can only be created with GridViewManagerContext object. - Make the constructor
private for GridViewManagerContext. That way, it cannot be instantiated by anyone. - Define a nested
private interface in Main Window object for creating instance of GridViewManagerContext. - Create nested factory class inside
GridViewManager to create instance of GridViewManagerContext. Implement the nested private interface explicitly in the factory class. - What’s the use of this jugglery? You will realize that now
GridViewManager class can only be instantiated by MainWindow object.
There may be other ways to achieve code safety, however, I find this one to be simpler. Here is a sample code which is trimmed to clarity. Please note that these are nested classes in parent window object.
private interface IPrivateFactory
{
GridViewManagerContext CreateInstance();
}
public sealed class GridViewManagerContext
{
private GridViewManagerContext()
{ … }
public class GridViewManagerContextFactory : IPrivateFactory
{
GridViewManagerContext IPrivateFactory.CreateInstance()
{
return new GridViewManagerContext();
}
}
}
public MainWindow()
{
InitializeComponent();
IPrivateFactory factory = new GridViewManagerContext.GridViewManagerContextFactory();
GridViewManagerContext context = factory.CreateInstance();
sgm = new GridViewManager(context);
dgTest1.ItemsSource = sgm.lstNetworkDetails;
}
Refer to the attached zip file for complete code clarity.
Points of Interest
I have used this template in multiple projects and found this is a simplest one to follow. There are other alternatives, but every one has some loopholes. The handling of controls in a separate class should be done with care, that is where most of the code fails.
