I’m writing an agenda application, where the data can be delivered to the calendar control using either REST or OData V4. I choose the latter because this will allow for much more flexibility afterwards.
I already have an MVC 5 project containing the calendar control, so now I want to create the OData services.
NuGet is your friend
I first need to add the OData NuGet package in the project. I suppose that you know how to use NuGet, but just to be sure: Tools > NuGet Package Manager > Package Manager Console.
In the console type
Install-Package Microsoft.AspNet.Odata
This will do all the work for you:
PM> Install-Package Microsoft.AspNet.Odata
Attempting to gather dependencies information for package ‘Microsoft.AspNet.Odata.5.9.0’ with respect to project ‘SyncfusionMvcApplication1’, targeting ‘.NETFramework,Version=v4.6.1’
// Removed a lot of NuGet output here
Added package ‘Microsoft.AspNet.OData.5.9.0’ to ‘packages.config’
Successfully installed ‘Microsoft.AspNet.OData 5.9.0’ to SyncfusionMvcApplication1
As you can see the OData package has some dependencies, which are nicely solved by NuGet. The net result is that 2 assemblies have been added to the project: Microsoft.OData.Core and Microsoft.OData.Edm.
Creating the Entity Framework classes
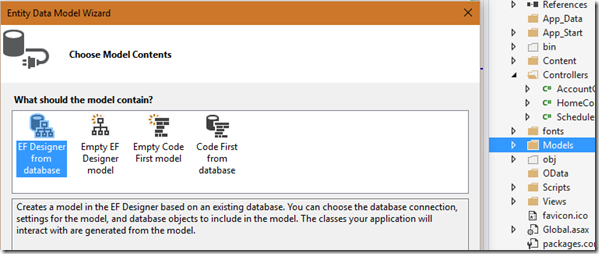
I already have an existing database so I will create my EDM from that database (call me lazy…) Right click on the Models folder and select “ADO.NET Entity Data Model”. Pick the first choice (EF Designer from database).

Then choose your data connection. In my case it is a SQL Server database, running on my development machine:

In the next dialog I choose the necessary tables. For this example I’ll only need 1 table:

Clicking “Finish” takes me to the EventsContext.edmx diagram. Under de Models folder some new classes have been generated to make it easy to work with the data.
Of course it is also possible to work “code first”, in the end all we need is a way to retrieve and update data. For the OData example this could even be a static list of events, but there is no fun in that!
Create the OData endpoint
If you created your project with the WebAPI option, you should be fine. You’ll have a WebApiConfig.cs file under the App_Start folder which contains the method Register( ) that will be called from within the Application_Start( ) method in Global.Asax.
If this is not the case then you have some manual work to do:
Create the WebApiConfig class under the App_Start folder
Right click on the App_Start folder, and then add a class (add > class). Name the class WebApiConfig and open the generated WebApiConfig.cs file. Mind that when you create a class under a folder, the namespace of this class will contain the folder name. So remove “.App_Start” from the namespace name.
The name of the class (and its namespace) are not important, but to remain compatible it is a good idea to use the standard naming conventions.
In our case the class looks like
using System.Web.OData.Builder;
using System.Web.OData.Extensions;
using System.Web.Http;
using SyncfusionMvcApplication1.Models;
namespace SyncfusionMvcApplication1 //.App_Start => removed
{
public static class WebApiConfig
{
public static void Register(HttpConfiguration config)
{
ODataModelBuilder builder = new ODataConventionModelBuilder();
builder.EntitySet<Events>(“Events”);
config.MapODataServiceRoute(
routeName: “ODataRoute”,
routePrefix: “OData”,
model: builder.GetEdmModel());
}
}
}
We first create a builder that will contain the model to be represented by the OData services. This is done by creating an ODataConventionModelBuilder object, that derives from ODataModelBuilder. This class will generate an EDM using the same entity- and property names as in the model classes. This is done in the next line:
builder.EntitySet<Events>(“Events”);
The documentation says that the method EntitySet(…) registers an entity set as a part of the model. So the model now contains an Events entityset that can be returned to our client. In the next line:
config.MapODataServiceRoute(
routeName: “ODataRoute”,
routePrefix: “OData”,
model: builder.GetEdmModel());
I set up a route that will be prefixed with OData. So the URL for the OData services will be something like http://myservice/OData/Events. OData URLs are case-sensitive. Notice that the builder that we just set up is passed here as the last parameter.
You may need to verify that this method is called from Global.asax.cs. Check the Register() function for the following line:
WebApiConfig.Register(config);
If the line isn’t there you’ll need to add it. Make sure that you add this line at the end of the Register function, otherwise you’ll get a very confusion exception saying: “valuefactory attempted to access the value property of this instance.”
So now we have set up the project to use OData, next thing we need to do is to create an OData controller. It turns out that this is the easy part.
Adding the OData Controller
Given that a good developer is lazy (but a lazy developer is not necessarily a good one) I searched a bit for OData V4 Scaffolding. We’re lucky, because this exists:
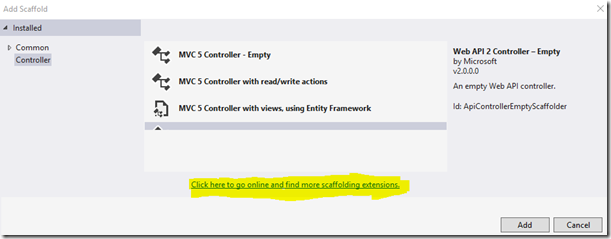
Right-click on the OData folder that you just created and select Add > Controller. In VS 2015 you’ll find a list of controller types that you can add, including some OData V3 Controllers.
Click on the “Click here to go online and find more scaffolding extensions” link below the dialog.

In the “Extensions and Updates” dialog type “OData V4” in the “Search Visual Studio Gallery” text box. In the list you’ll find “OData v4 Web API Scaffolding”, which is the one you want to download. Allow the installer to make changes to your system. Unfortunately you’ll need to restart Visual Studio, so let’s do that now and have some coffee 
After the restart of Visual Studio open your project and go back to the (still empty) OData folder. Go through the same motions as before: right-click > Add > Controller. Two more choices are presented now:
Microsoft OData v4 Web API Controller. This creates an OData controller with all the CRUD actions. This clearly indicates that we don’t need Entity Framework (EF) to create OData controllers. So it is possible (and often preferable) to implement the Repository pattern and then use the repositories to obtain or modify the data. If you plan to do this, then beware of the caveats that we’ll encounter later in this blog (see the part on IQueryable).
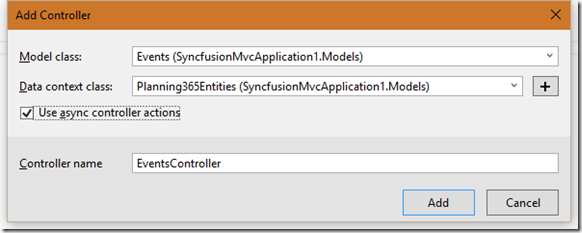
Microsoft OData v4 Web API Controller Using EF. This does the same, but from an EF data context. Given that we’re using EF in this example, let’s try this one. A dialog box pop up, fill the fields like this:

and click “Add” to generate your controller.
Running your application will take you to your homepage, add /OData/Events to the URL and you’ll get the list of all the events in the database.
Reminder: OData is case sensitive, so for example /OData/events will NOT work. This is by design.
Show me the code
It is nice to have all the code scaffolded, but when you want to modify something you must know where to do it. So let’s go over the generated code in EventsController.cs.
Class declaration
public class EventsController : ODataController
{
private Planning365Entities db = new Planning365Entities();
The first thing to notice is that the EventsController class derives from ODataController. The ODataController class derives from ApiController, which makes this service a REST service with a bit more functionality (ODataController adds the protected methods Created and Updated to return action results for the respective operations).
Get the Events
A xxxEntities object db is created to access the database using Entity Framework.
// GET: odata/Events
[EnableQuery]
public IQueryable<Events> GetEvents()
{
return db.Events;
}
The actual code is simple: return db.Events;
This returns an IQueryable, which is important because there is also the [EnableQuery] attribute. The combination of these 2 makes that we can create lots of queries from this method. You can try the following http GET requests:
We could have written this function like this:
[EnableQuery]
public List<Events> GetEvents()
{
return db.Events.ToList();
}
The results are the same, but…
- db.Events is materialized by the ToList() function. This means that I also had to adapt the signature to become a List<Events>.
- So when we would query a table with 100.000 rows, and the use the $filter clause in the http request to only return 10 records, ToList() will first retrieve all 100.000 records, and then the LINQ Where clause will be applied to this (in-memory) list.
- In the first (correct) version, we returned an IQueryable, which means that LINQ will now let the database do its work (that means: a SQL where clause will be added to the request and only the 10 relevant records are retrieved from the database. Needless to say that this is a lot more efficient!
I’m raising this issue because often when a repository is implemented, this will return a collection instead of an IQueryable, which would cause this (subtle) bug. This also shows that it is a good idea to test your code with large datasets, so you may catch this kind of errors before you go to production!
Get an event by its key
// GET: odata/Events(5)
[EnableQuery]
public SingleResult<Events> GetEvents([FromODataUri] long key)
{
return SingleResult.Create(db.Events.Where(events => events.Id == key));
}
Again the actual code is simple: db.Events.Where(events => events.Id == key)
db.Events.Find(key) would be more efficient, but we are returning a SingleResult class. This is actually an IQueryable with zero or one records in it. So we need to pass it an IQueryable object, which the Where method does.
The EnableQuery attribute is used again here, so allow for more than just the simplest queries. We can try:
Updating an event
For Updates we typically use the PUT verb. This will then replace the current event with the new event.
It is also possible to update entities using the PATCH or MERGE verbs. Both verbs mean the same and are allowed. The difference with PUT is that they don’t replace the entity, but only do a partial update: only the fields that have been changed will be modified in the data store.
// PUT: odata/Events(5)
public async Task<IHttpActionResult> Put([FromODataUri] long key, Delta<Events> patch)
{
Validate(patch.GetEntity());
if (!ModelState.IsValid)
{
return BadRequest(ModelState);
}
Events events = await db.Events.FindAsync(key);
if (events == null)
{
return NotFound();
}
patch.Put(events);
try
{
await db.SaveChangesAsync();
}
catch (DbUpdateConcurrencyException)
{
if (!EventsExists(key))
{
return NotFound();
}
else
{
throw;
}
}
return Updated(events);
}
As a first remark: the class Events indicates a single event. I did not put it in singular when the Entity Framework data model was created, hence this name. So don’t let that put you on the wrong foot.
In the function signature we see that the patch parameter is of type Delta<Events> instead of just Events. This type tracks the changes for the Events class, allowing the line patch.Put(events) to do its work: overwrite the fields of the found event with the fields of the patch object.
The rest of the function is straightforward.
If you look at the Patch() method, you’ll see exactly the same code except for the line
patch.Patch(events);
The Patch method will only update the changed fields.
The Post( ) and Delete( ) methods should be clear by now.
Conclusion
Using the OData V4 templates it is easy to create OData services. There are some things that are good to know, but most can be inferred from the code.
Some references
http://www.asp.net/web-api/overview/odata-support-in-aspnet-web-api/odata-v4/create-an-odata-v4-endpoint
https://blogs.msdn.microsoft.com/davidhardin/2014/12/17/web-api-odata-v4-lessons-learned/


