Introduction
In MVC, we cannot use multiple model tag on a view. But many times, we need to pass multiple models from controller to view or we want to show data from multiple model on a view. For example we want to show a Blog and List of Comments of this Blog on a Single View or suppose if we want to show a Category and List Of Products related to this category on a View. So in such situations, we need to pass multiple models to a Single View. We have many solutions of this problem. So in this article, we will see different approaches to Bind Multiple Models on a View.
Problem Statement
We have two models named Blog and Comment and we want to create a view where we will show Blog Title and Blog Description and List of Comments related to the Blog.
Problem While Binding Two Models
If we will try to Bind Blog and Comment Model on a View as below, then at run time, we will get an exception that we cannot Bind Multiple Models on a View.

And the exception:

So in MVC, we need some approach through which we can achieve this and luckily I am giving 10 approaches to achieve the same. I am not an expert, I'm sure I'll make mistakes or go against best practices several times. I will not discuss the pros and cons of different approaches. My intent is to show different approaches through which we can solve this problem.
Different Ways to Achieve
We will see the below 10 ways to bind multiple models on a single view:
- View Model
- View Bag
- View Data
- Temp Data
- Session
- Dynamic
- Tuples
- Render Action
- JSON
- Navigation Properties
We will see all these approaches with the help of an example (solution of the above problem statement). So in our problem statement, we want to display a Blog and List of Comments on a view.
Below are the main players of this article:
- Blog Model
- Comment Model
GetBlog(): In this method, I will create dummy data for Blog.GetComments(): In this method, I will create dummy data for comments.- A
Controller (I will name it BlogCommentController) - View
I created a project named MultipleModels and now I will create all the required elements before starting different approaches.
- Blog Model: Create a Model named
BlogModel. Right click on Models folder and add a class named BlogModel. I created the below BlogModel class in Models folder.
public class BlogModel
 {
     public int BlogID { get; set; }
     public string BlogTitle { get; set; }
     public string BlogDescription { get; set; }
     public DateTime CreatedDate { get; set; }
 }
- Comment Model: Right click on Models folder and add another class named
CommentModel as below:
public class CommentModel
  {
      public int CommentID { get; set; }
      public string Comment { get; set; }
      public string CommentedBy { get; set; }
      public int BlogID { get; set; }
  }
1. View Model
ViewModel is a class which contains the properties which are represented in view or represents the data that you want to display on your view/page.
Suppose if we want to create a View where we want to display a Blog and List of Comments, then we will create our View Model (BlogCommentViewModel.cs). Create a folder named ViewModel in your project and right click on that folder and create a class file named "BlogCommentViewModel.cs".
public class BlogCommentViewModel
  {
      public BlogModel Blog { get; set; }

      public List<CommentModel> Comments { get; set; }
  }
In above ViewModel (BlogCommentViewModel), we created a property named Blog of BlogModel Type because we want to display a single Blog Detail on our View/Page and a second property named Comments of List of CommentModel type because we want to display the list of comments associated to the Blog.
Note: We can place the viewmodel (BlogCommentViewModel) in any folder in our project, but I created a folder named ViewModel where I will place all the viewmodels created for this project.
It's time to create a controller named BlogController and create a action method inside named GetBlogComment as below:
public class BlogController : Controller
  {
      public ActionResult GetBlogComment()
      {
          return View();
      }
  }
Now first create a object of view Model and then set Blog and Comments properties as below. I created two functions for Blog (GetBlogModel()) and Comment (GetCommentModel()) dummy data.
public class BlogController : Controller
    {
        public ActionResult GetBlogComment()
        {
            BlogCommentViewModel BCVM = new BlogCommentViewModel();
            BCVM.Blog = GetBlogModel();
            BCVM.Comments = GetCommentModel();
            return View(BCVM);
        }

        public BlogModel GetBlogModel()
        {
           BlogModel bModel = new BlogModel() { BlogID = 1,
                                                BlogTitle = "MVC Blog",
                                                BlogDescription = "This is MVC Blog",
                                                CreatedDate = DateTime.Now };
            return bModel;
        }

        public List GetCommentModel()
        {
            List cModel = new List();

            cModel.Add(new CommentModel() { BlogID = 1, CommentID = 1,
                                            Comment = "Good One", CommentedBy = "Vijay" });
            cModel.Add(new CommentModel() { BlogID = 1, CommentID = 2,
                                            Comment = "Nice", CommentedBy = "Nishant" });
            cModel.Add(new CommentModel() { BlogID = 1, CommentID = 2, Comment = "Perfect",
                                            CommentedBy = "Saurabh" });
            return cModel;
        }
    }
Note: Don't forget to add Models and ViewModels namespaces.
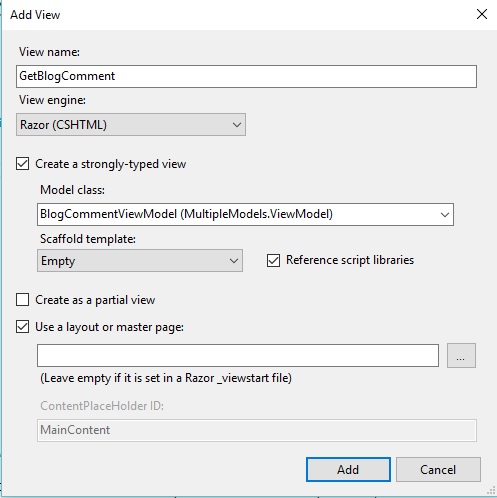
Now right click on GetBlogComment() action method and select Add View and while creating view select "Create a Strongly-Typed view" and select your view model named 'BlogCommentViewModel' and select "Empty" in scaffold Template as below:
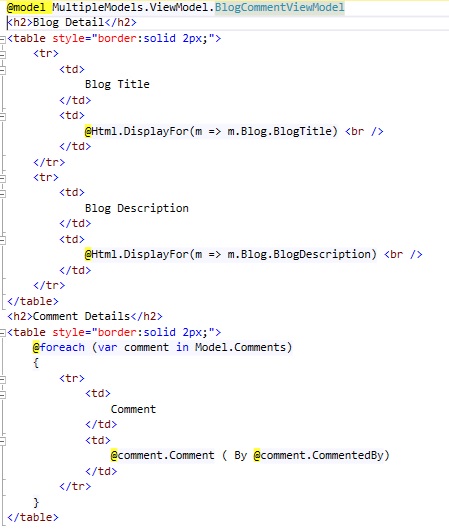
Now change your created view (GetBlogComment.cshtml) as below:
I added some table CSS also in Style.css:
table, td, th {
        border: 1px solid #ddd;
        text-align: left;
    }
    table {
        border-collapse: collapse;
        width: 100%;
    }
    th, td {
        padding: 15px;
    }
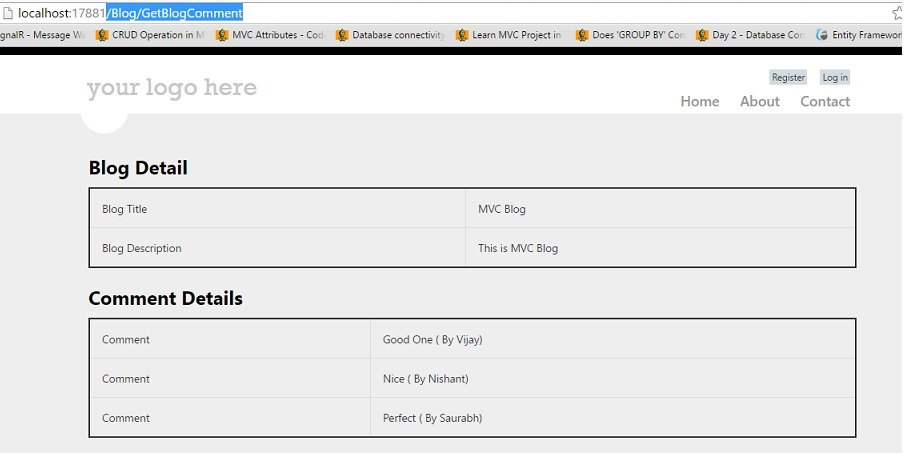
Now run the application and type /Blog/GetBlogComment(ControllerName/ActionName) in browser and we will get output as below:
2. View Bag
We use view Bag to pass data from controller to view. ViewBag uses the property that takes advantage of the new dynamic features in C# 4.0. There is no typecasting needed in case of ViewBag. So we can take help of ViewBag to pass multiple data from controller to View. ViewBag is a property of ControllerBase class. View Bag scope is only during the current request.
To pass multiple models, we will create two view bag in our action method as below:
public ActionResult GetBlogComment()
    {
        ViewBag.Blog = GetBlogModel();
        ViewBag.Comments = GetCommentModel();
        return View();
    }
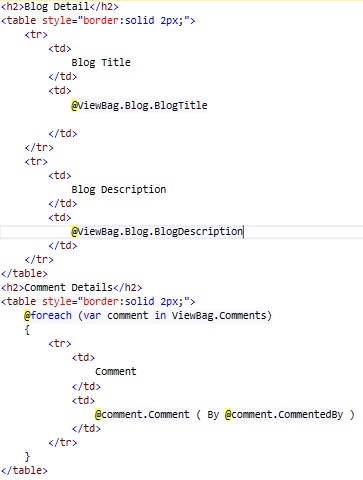
Now change your view (GetBlogComment.cshtml) according to view Bag as below:
Run the application and we will get the required output.
3. View Data
ViewData is used to pass data from controller to view. View Data scoper is only during the current request. View Data needs typecasting for getting data. ViewData is a property of ControllerBase class. ViewData is a derivative of the ViewDataDictionary class, so we can access with “key/value”.
To use the ViewData for multiple models, change your action method as below:
public ActionResult GetBlogComment()
     {
         ViewData["Blog"] = GetBlogModel();
         ViewData["Comments"] = GetCommentModel();

         return View();
     }
Now change your view (GetBlogComment.cshtml) according to view Data as below:
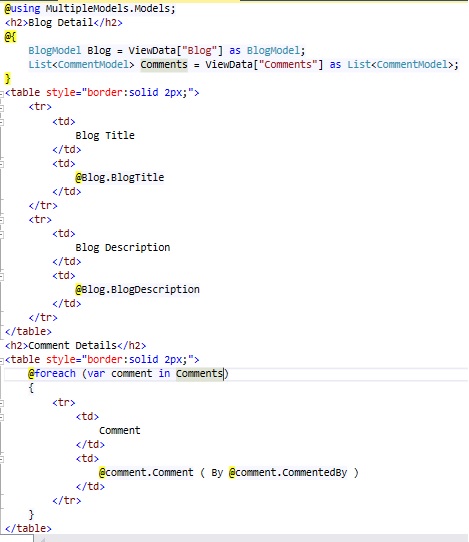
Run the application and we will get the same result as in approach 1.
4. Temp Data
TempData is also a dictionary derivative from TempDataDictionary class. TempData is stored in short lives session. We can pass multiple models through TempData also.
Change your action method as below:
public ActionResult GetBlogComment()
     {
         TempData["Blog"] = GetBlogModel();
         TempData["Comments"] = GetCommentModel();

         return View();
     }
Now change your view (GetBlogComment.cshtml) according to Temp Data as below:
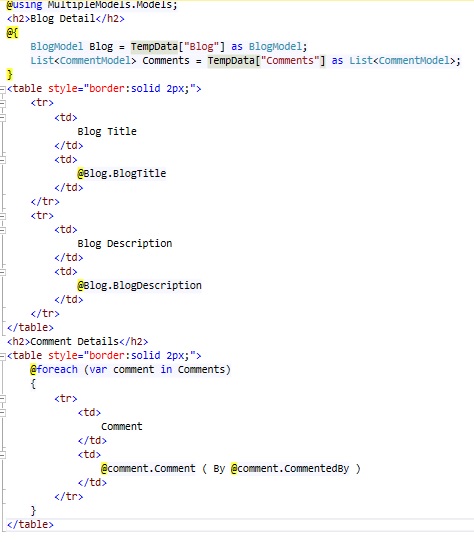
Now run the application and we will get the required result.
5. Session
Session is used to pass data across controllers in MVC Application. Session data never expires (by default session expiration time is 20 minutes but it can be increased). Session is valid for all requests, not for a single redirect.
For Session, change your action method as below:
public ActionResult GetBlogComment()
     {
         Session["Blog"] = GetBlogModel();
         Session["Comments"] = GetCommentModel();

         return View();
     }
Now change your view (GetBlogComment.cshtml) according to Session as below:
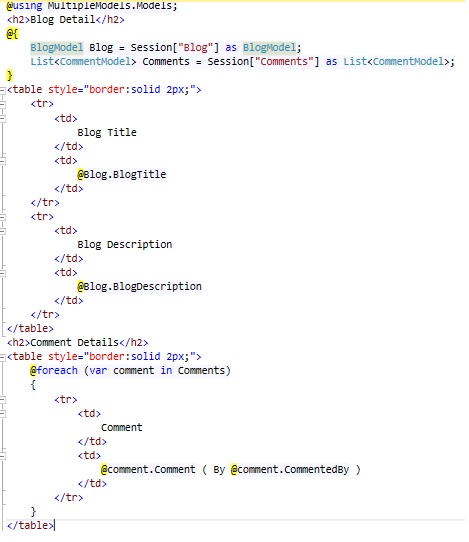
Run the application and we will get the expected result.
6. Dynamic (ExpandoObject)
The ExpandoObject class enables us to add and delete members at run time. So if we want to build up an object to work with on the fly at runtime, then we can use Expando Object.
I am not going in detail about ExpandoObject. Let's see how can we use Expando with Multiple Models.
Change the action method as below:
public ActionResult GetBlogComment()
     {
         dynamic BCVM = new ExpandoObject();
         BCVM.Blog = GetBlogModel();
         BCVM.Comments = GetCommentModel();
         return View(BCVM);
     }
Note: To use ExpandoObject, add System.Dynamic Namespace.
Change your view as below:
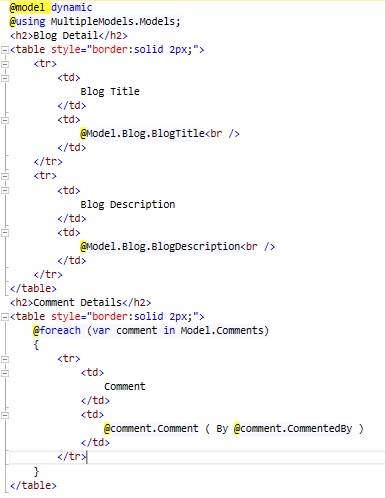
Run the application and we will get the expected result.
7. Tuples
Tuple is an ordered sequence, immutable, fixed-size and of heterogeneous objects. Each object in tuple is being of a specific type.
Tuples are not new in programming. They are already used in F#, Python and databases. They are new to C#. The tuples were introduced in C# 4.0 with dynamic programming.
We can use Tuples also to pass multiple models to view as below:
public ActionResult GetBlogComment()
     {
         var BCVM = new Tuple<BlogModel,
                    List<CommentModel>>(GetBlogModel(), GetCommentModel());
         return View(BCVM);
     }
And now change your view as below:
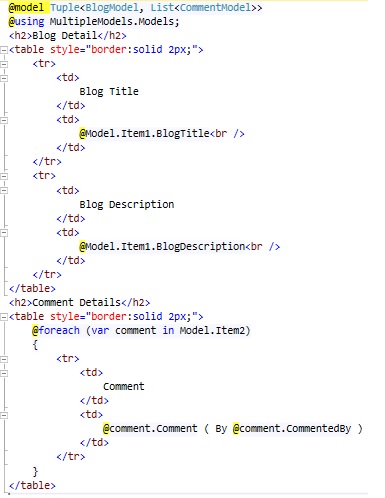
Run the application to see the result.
8. Render Action
Render actions are special controller methods defined only to be called from view. We create Render Action Method same as we create regular Action Method.
A Render action is a public method on the controller class. Render Action is called from view not from URL so we should decorate RenderAction with the [ChildActionOnly] attribute.
I am creating two Action Methods from where I will return partial view Results and will render those results on view using RenderAction methods.
public ActionResult GetBlogComment()
      {
          return View();
      }

      public PartialViewResult RenderBlog()
      {
          return PartialView(GetBlogModel());
      }

      public PartialViewResult RenderComments()
      {
          return PartialView(GetCommentModel());
      }
Right click on RenderBlog() and add a view as below (Make sure we need to create a partial view so check that option).
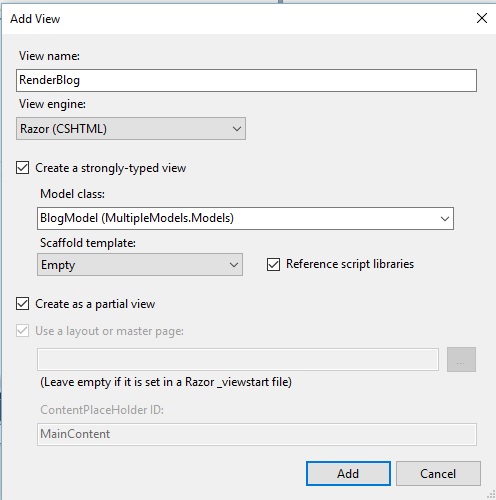
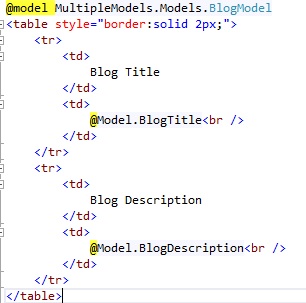
Now change the code of your created partial (RenderBlog.cshtml) view as below:
In the same way, right click on RenderComments and create another partial view as below:
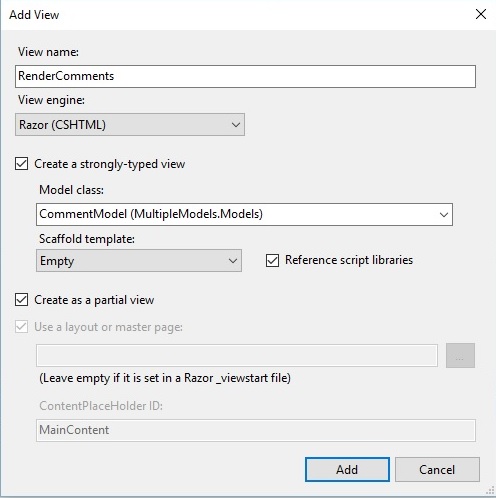
Change this partial view (RenderComments.cshtml) as below:
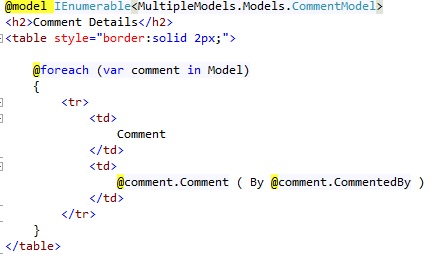
It's time to render these two partial views on our main view named GetBlogComment.cshtml.

Now run the application and we will get the required result.
9. JSON
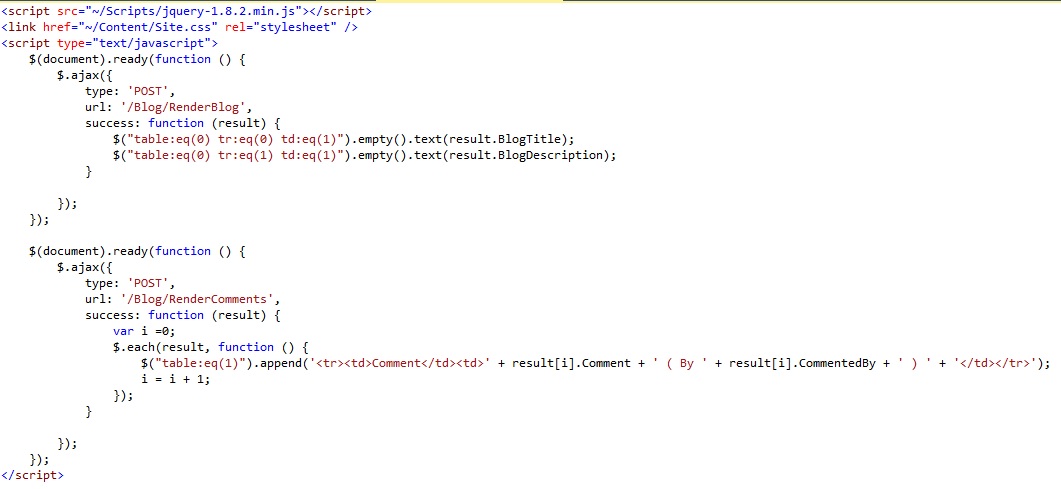
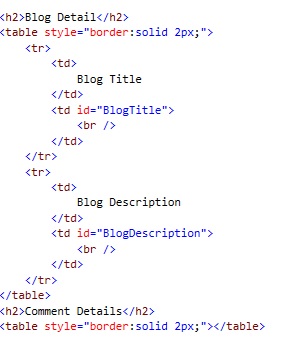
We can Bind Multiple Models with the help of Json as well. We will retun JsonResult from action Method and on View through JQuery, we can parse the JSON data and Bind on View. Here is the code.
Change your action method so that Action Method can return the JSON.
public ActionResult GetBlogComment()
     {
         return View();
     }

     public JsonResult RenderBlog()
     {
         return Json(GetBlogModel());
     }

     public JsonResult RenderComments()
     {
         return Json(GetCommentModel());
     }
Change your view as below:
10. Navigation Properties
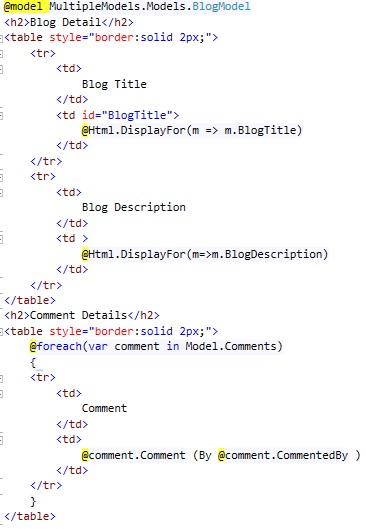
If we have two related models, then we can bind a model into another model as a property and can pass to a View. For example, we have a Blog Model and Comment Model and a blog can contain multiple comments so we can declare a Navigation Property in Blog Model as below:
public class BlogModel
{
public int BlogID { get; set; }
public string BlogTitle { get; set; }
public string BlogDescription { get; set; }
public DateTime CreatedDate { get; set; }
public List<CommentModel> Comments { get; set; }
}
Now change your GetBlogModel() function and GetBlogComment() Action as below:
public ActionResult GetBlogComment()
{
BlogModel BM = GetBlogModel();
return View(BM);
}
public BlogModel GetBlogModel()
{
BlogModel bModel = new BlogModel()
{
BlogID = 1,
BlogTitle = "MVC Blog",
BlogDescription = "This is MVC Blog",
CreatedDate = DateTime.Now,
Comments = GetCommentModel()
};
return bModel;
}
public List<CommentModel> GetCommentModel()
{
List<CommentModel> cModel = new List<CommentModel>();
cModel.Add(new CommentModel()
{ BlogID = 1, CommentID = 1, Comment = "Good One", CommentedBy = "Vijay" });
cModel.Add(new CommentModel()
{ BlogID = 1, CommentID = 2, Comment = "Nice", CommentedBy = "Nishant" });
cModel.Add(new CommentModel()
{ BlogID = 1, CommentID = 2, Comment = "Perfect", CommentedBy = "Saurabh" });
return cModel;
}
Now create your view as below:
Finally, if this was helpful and you liked this post, please vote.
History
- 26th June, 2016: Initial version
