Introduction
This article is a How To on converting images from RGB to grayscale in MatLab without built-in functions. This will allow you to understand how MatLab works with image layers and know how the underlying RGB to grayscale conversion function works... more importantly, it is always more fun to write functions yourself.
Background
There are many benefits to converting images to grayscale and knowing how to do it. In my opinion, the primary benefit of converting a color image to grayscale is that it takes up considerably less space. If you are new to how images are stored in a computer, let me explain.
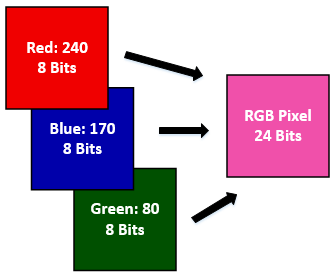
An RGB image is essentially three images layered on top of one another; a red scale image, a green scale image, and a blue scale image, with each pixel in them being 8 bits (intensity value ranging 0 - 255). To store a single pixel of an RGB image, you need to store 8 bits for all three colors, so a total of 24 bits per pixel.

When you convert this image to grayscale, you then need to only store a single 8 bit value per pixel for the grayscale value. You go from 24 bits per pixel down to 8 bits per pixel, so your grayscale images will be a mere 33% the size of the originals.
Besides saving you a ton of space, it makes more sense to work with grayscale images in many different situations. Grayscale images are much easier to work with in a variety of image processing applications. Just ask yourself, what would be easier for a computer to operate with, an image containing three layers of color values or an image with a single layer? Pretty clearly, the single layered image. To build on that, it is also easier to distinguish features of an image when only dealing with a single layer. So processes like edge detection, principle component analysis, local binary patterns, and things of that nature are much easier not only for the computer to handle, but for you to code.
Using the Code
If you have never worked with MatLab before, the syntax may be a bit confusing but worry not, it isn't that difficult. Below, you can see the function for converting an RGB image to grayscale.
function returnedImage = toGrayscale(image)
        i = image;
        R = i(:, :, 1);
        G = i(:, :, 2);
        B = i(:, :, 3);
        newImage = zeros(size(i,1), size(i,2), 'uint8');

        for x=1:size(i,1)
           for y=1:size(i,2)
               newImage(x,y) = (R(x,y)*.3)+(G(x,y)*.6)+(B(x,y)*.1);
           end
        end

        returnedImage = newImage;
end
The first step is to separate the image into three different 2d matrices of R, G, and B. The syntax of "R = i(:, :, 1);" means that you are creating a new matrix R and setting it equal to all the rows and columns of the first layer in image i (hopefully that makes sense). You then create a new image containing all zeros of the same size as the original.
After that, you simply loop through every pixel in the new image, and set that pixel equal to a sum of the R, G, and B pixels in the same location multiplied by a specified weight. As you can see from mine, R is multiplied by .3, G by .6, and B .1. You then return the image.
Your first thought may be to simply take the average of the all three pixels and set that as the value in the grayscale image, but that turns out to be too dark. The weights are really up to you and you can change them as you see fit. For my applications, I found this weighting scheme to work the best.
To implement, you would code something like below:
myImage = imread('faceplantImage.jpg');

figure
subplot(1,2,1);
imshow(myImage);
title('Original Image');

subplot(1,2,2);
grayScaleImage = toGrayscale(myImage);
imshow(grayScaleImage);
title('Grayscale Image');
From that, you can see your finished grayscale image compared with your original.

Points of Interest
If you are new to MatLab and interested in learning more, here is a great resource:
