Get access to the new Intel® IoT Developer Kit, a complete hardware and software solution that allows developers to create exciting new solutions with the Intel® Galileo and Intel® Edison boards. Visit the Intel® Developer Zone for IoT.
The Intel® Edison board is a powerful, new, single-board computer capable of handling broad-spectrum of Internet of Things (IoT) applications, from small to reliable industrial projects. Using the JavaScript* framework Cylon.js*, you can control different robotic components easily in a web-based interface. To do so, you need a basic robot kit that has two direct-current (DC) motors controlled and powered only by the board: There’s no need for extra hardware, which makes the project easy to set up.
Cylon.js has an easy syntax that helps you understand code without any prior knowledge of programming. It names the components based on their type, and generating commands need to work with the driver you use (for example, for your motor device, you need the turn_on and turn_off commands to make the robot move).
This article is meant to help beginners understand the basic requirements for creating wireless controlled robots using the built in Wi-Fi module from the Intel® Edison board. To make sure that the board has enough power to supply the motors and the Wi-Fi module, connect it to a power supply of 7–15 V with 1,000 mA (1.0 A).
To upload JavaScript code to the Intel® Edison board, you can use Intel® XDK IoT Edition. For details on how to set up the Intel® Edison board, see Getting started with the Intel® XDK IoT Edition.
To upload the code that gives you control of your robot, use the Cylon.js HTTP application programming interface (API). This API is already implemented: You just have to call the function and let Cylon.js handle the rest.
Board Setup
Based on the robot kit you have (most of them have the same design), you need to make the same connections for both motors:
- GND - GND (on the Intel® Edison board)
- VCC - 5 V (on the Intel® Edison board)
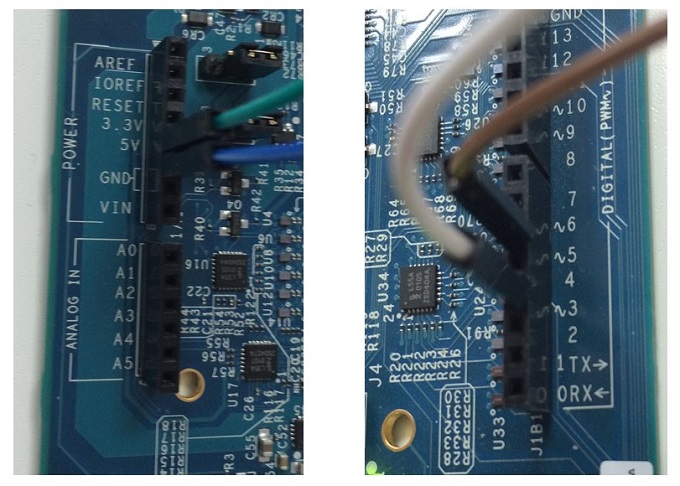
- Forward Digital Pin (IB)* - Pin ~3 (PWM pin on the Intel® Edison board)
- Backward Digital Pin (IA)* - Pin ~5 (PWM pin on the Intel® Edison board)
* The names of the pins can vary based on your robot kit.
The pins you must connect to your Intel® Edison board to power the motor are shown in Figure 1.

Figure 1. The pin connections on the Intel® Edison board
Note: These pins power a single motor. You must do the same for the second motor, using pins ~6 and ~9 on your board.
For this articles, you’ll use a robot kit equipped with two 5-V DC motors and a driver to control each. The motor has two pins to control each direction and two pins for GND and VCC (5-V pin on the board), as shown in Figure 2. It’s easy to find out where the pins go because every motor has the same setup.

Figure 2. The four pins you must connect to your Intel® Edison board
Controlling the Motors
The Cylon.js HTTP API provides a means to control the motors directly from a web browser, making it easy to control the robot. You use a natural language to send commands to the specific pins, which means that you can prototype easily without having to write code.
For this step to work, you must find the IP address that the Intel® Edison board uses to connect to your wireless router. For instructions, see Connecting your Intel® Edison board using Wi-Fi.
After running the code from your integrated development environment, on the Intel® Edison board you should get the output shown in Figure 3.

Figure 3. This output tells you which devices are connected and that the server is running.
To control the motors connected to the board, access the corresponding link for the device you plan to control. By using the Cylon.js HTTP API, you can do so by entering the following URLs in your browser’s address bar. They use the names of the devices as listed in the console output in Figure 3, and each corresponds to a pin on the Intel® Edison board:
- To make the motor go forward, enter this URL: http://edison.local:3000/api/robots/tank/devices/motor_1_forward/commands/turn_on
- To make the motor go backward, enter this URL: http://edison.local:3000/api/robots/tank/devices/motor_1_forward/commands/turn_off.
Now, based on your board configuration, you can stop and start the robot and make it move by replacing edison.local with the IP address you get from your board. (In Intel® XDK IoT Edition, you can see the IP address when you uploading the code—for example, 192.168.0.100):
- http://192.168.0.100:3000/api/robots/tank/devices/motor_1_forward/commands/turn_on
- http://192.168.0.100:3000/api/robots/tank/devices/motor_1_forward/commands/turn_off
Summary
After learning how to remotely control motors using the Cylon.js framework, you can easily extend your application to command different components by replacing the devices connected to your Intel® Edison board based on the examples from the Cylon.js documentation.
