Intro
A beginner/hobbyist project that uses Visual Basic to send gamepad data via a Bluetooth connection to control an Arduino remote tractor is presented.
Background
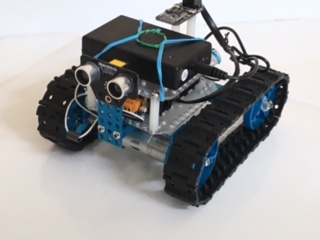
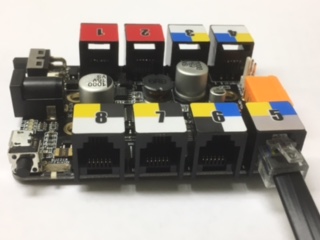
Robotics projects have become popular in STEM classes in many schools as well as for the hobbyist. This project makes use of both Arduino and Visual Basic code to control an Arduino-style Orion starter robot tractor (Makeblock ; www.makeblock.com). The Orion board is an Arduino clone. It is highly suitable for beginners as it substitutes RJ-25 connections for jumper wires and has its own libraries to take advantage of those connections. The various analog and digital ports are color coded for ease of use. The VB portion of the project controls a gamepad and transmits joystick output to the Arduino/Orion controller via Bluetooth. The Arduino code provides for execution of the joystick instructions and echoes the instructions back to the VB program for confirmation.


Objectives
- Gamepad integration in a VB.NET program
- Bluetooth communication from the VB program to a remote Arduino module
- Arduino control of the tractor
- Easy to follow, heavily commented code
The Code
Joystick control can be accomplished by one of two methods. A commonly expected method uses one joystick, obtaining directions using X and Y inputs and translating them into various directional vectors.
However, since our remote robot is a tractor, a simpler, but more realistic approach was taken with each joystick on the game pad controlling its own tread on the tractor. This is a historically accurate method of steerage.
The gamepad is exposed via the Winmm.dll. This is an older 32 bit library, but good for our purposes here. The next version will take advantage of DirectX gamepad interfaces.
First, the structure of the gamepad is defined (https://msdn.microsoft.com/en-us/library/dd757112.aspx):
<StructLayout(LayoutKind.Sequential)>
Public Structure JOYINFOEX
Public dwSize As Integer
Public dwFlags As Integer
Public dwXpos As Integer
Public dwYpos As Integer
Public dwZpos As Integer
Public dwTpos As Integer
Public dwUpos As Integer
Public dwVpos As Integer
Public dwButtons As Integer
Public dwButtonNumber As Integer
Public dwPOV As Integer
End Structure
The joystick is created and a timer is added to poll the joystick for changes:
Public Joypos1 As JOYINFOEX
Joypos1.dwSize = 64
Timer1.Enabled = False
The timer event polls the joystick, specifically looking for the Y and T axes which will determine the Left and Right Track’s directional information. This data is then processed and sent to the Arduino/Orion. Since the joystick data is sent in integers 0 to 65536, an offset to make "0" the "midpoint" is used. The position of the joystick is then processed to yield up, neutral and down for forward, stop and reverse, which will be passed to the Arduino. The -32 to 32 scale is arbitrary here but will be used in the development of the single joystick vector in a later iteration of the project.
Private Sub Timer1_Tick(sender As Object, e As EventArgs) Handles Timer1.Tick
joyGetPosEx(0, Joypos1)
lblYaxis.Text = "Y = " & (Joypos1.dwYpos.ToString - 32767)
lblTaxis.Text = "T = " & (Joypos1.dwTpos.ToString - 32767)
Dim intJoyConvY As Integer
intJoyConvY = CInt(Math.Round(Joypos1.dwYpos))
If intJoyConvY > -1 Then
If intJoyConvY <= 20000 Then
intJoyConvY = -32
End If
End If
If intJoyConvY > 20000 Then
If intJoyConvY <= 40000 Then
intJoyConvY = 0
End If
End If
If intJoyConvY > 40000 Then
intJoyConvY = 32
End If
Dim intJoyConvT As Integer
intJoyConvT = CInt(Math.Round(Joypos1.dwTpos))
Still within the Timer event, both gamepad axes are polled and parsed into individual motor commands, ready to be sent to the Arduino:
Dim RMotor As Integer
Dim strCmd As String = ""
Dim LMotor As Integer
LMotor = intJoyConvY
RMotor = intJoyConvT
If LMotor = 32 And RMotor = 32 Then
charCmd = "F"
strCmd = "forward"
End If
If LMotor = -32 And RMotor = -32 Then
charCmd = "B"
strCmd = "backward"
End If
Finally, the parsed command is sent to the Arduino via Bluetooth. The gamepad is polled every 250 ms (adjustable for performance) and only changes in data are sent to avoid overwhelming communications.
Try
If charCmd <> charOldCmd Then
rtbMonitor.Text = ""
SerialPort1.Write(charCmd)
rtbMonitor.Text = charCmd & vbCrLf
charOldCmd = charCmd
Else
rtbMonitor.Text = rtbMonitor.Text & "No Changes" & vbCrLf
End If
Catch ex As Exception
MessageBox.Show(ex.Message & " Open Port Before Proceeding")
End Try
End Sub
Bluetooth communication is via a serial port. The Windows Device Manager Ports section will identify the correct port. A Try Catch construction is used to catch errors. The output sent to the Arduino and feedback from the Arduino are both captured in textboxes in the VB program interface.
Arduino/Orion Coding
Ease of use makes the Makeblock Orion perfect for a beginner. The Makeblock libraries are incorporated into the Arduino program. Arduino is coded in "C" and is in two parts. The "Setup" holds variables, included libraries and Makeblock specific references. Arduino code would substitute PIN locations for these references. For those wishing to convert to ArduinoUno, identify the analog ports of the motors and the location of the Bluetooth device and write outputs to them. The Bluetooth (serial port) is opened at Orion’s default 115200 baud.
#include <MeOrion.h>
#include <Wire.h>
#include <SoftwareSerial.h>
MeDCMotor leftMotor(M1);
MeDCMotor rightMotor(M2);
MeBluetooth bluetooth(PORT_3);
int leftSpeed = 130;
int rightSpeed = 130;
double turnSpeed = 0.6;
The "Loop" portion of the code is what "runs" the Arduino. The code tests for the functioning of the Bluetooth connection, calls the readBluetooth() function and passes the input char to a Switch/Break construct, each Switch calling its respective function to move the tractor. Various turns are accomplished by mismatch of track speeds and directions. Two additional buttons are captured (not shown) to respectively increase and decrease the two speed variables.
void loop() {
if (bluetooth.available()){
char cmd = readBlueTooth();
bluetooth.println(cmd);
switch(cmd){
case 'F':
forward();
bluetooth.print(cmd);
break;
case 'B':
backward();
bluetooth.print(cmd);
break;
case 'r':
toRight();
bluetooth.print(cmd);
break;
case 'L':
spinLeft();
bluetooth.print(cmd);
break;
char readBlueTooth(){
char btInput;
btInput = (char) bluetooth.read();
return btInput;
}
void forward(){
rightMotor.run(rightSpeed);
leftMotor.run(leftSpeed);
}
void backward(){
leftMotor.run(-leftSpeed);
rightMotor.run(-rightSpeed);
}
void toRight(){
leftMotor.run(leftSpeed);
rightMotor.run(rightSpeed*turnSpeed);
}
void spinLeft(){
rightMotor.run(rightSpeed*turnSpeed);
leftMotor.run(-leftSpeed*turnSpeed);
}
Future plans include single joystick mode of control with the use of DirectX to read the gamepad data, along with a more detailed view of the mathematics of a joystick. Voice recognition for control of the Arduino and incorporation of a visual display into the VB program, for true remote operation are also contemplated.
