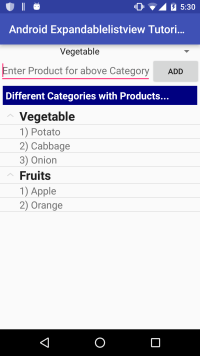
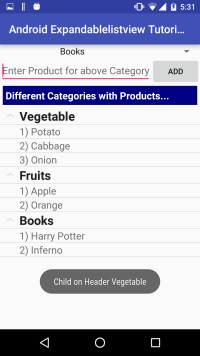
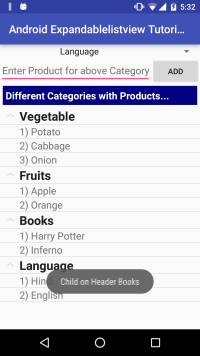
In this Android ExpandablelistView tutorial, we will learn how to make an expandable list in Android. You can think of this as an expandable list android example. Here, we will make a custom ExpandablelistView where a user can add data in the menu and can even add a new category. For adding new category, we will use a dropdown Spinner and a search button will be used to add products in that category.


What is Android ExpandableListView
Android expandable list view shows items in a vertically scrolling two-level list. This differs from the ListView by allowing two levels: groups which can individually be expanded to show its children. You can attach listeners to the Android ExpandableListView to listen for OnClick events on the Group or the individual children.
In this tutorial, we will make different sections of categories like Vegetables, Fruits, Grocery, Books, etc. In each category, we can have different products. For example: We can add Asparagus, Potato, Cabbage in Vegetables, etc. We will break this Android Expandable list view in parts so that you will be able to easily understand the code along with its application.
Creating a New Project
- Go to File → New → New Project and enter your Application Name (We have named as Android ExpandablelistView Tutorial).
- Enter Company Domain, this is used to uniquely identify your App’s package worldwide.
- Choose project location and minimum SDK and on the next screen, choose Empty Activity, since we would be adding most of the code ourselves. Then Click on Next.
- Choose an Activity Name. Make sure Generate Layout File check box is selected, otherwise we have to generate it ourselves.Then click on Finish. We have left Activity Name as
MainActivity. - Gradle will configure your project and resolve the dependencies. Once it is complete, proceed to the next steps. Make sure
build.grade has the following code especially compile ‘com.android.support:appcompat-v7:23.1.1’:
First, we will discuss its Layout and then we will go through MainActivity.
Layout of Android ExpandablelistView Tutorial
In the layout, we will have a spinner to select the category, a button to add a product and finally an Android expandable list view.
activity_main.xml
="1.0"="UTF-8"
<RelativeLayout xmlns:tools="http://schemas.android.com/tools"
xmlns:android="http://schemas.android.com/apk/res/android"
android:layout_width="match_parent"
android:layout_height="match_parent"
android:orientation="vertical">
<Spinner android:id="@+id/department"
android:layout_width="match_parent"
android:layout_height="wrap_content"
android:layout_alignParentLeft="true"
android:layout_alignParentTop="true"
android:textStyle="bold"
android:paddingLeft="100sp"/>
<Button android:id="@+id/add"
android:layout_width="wrap_content"
android:layout_height="wrap_content"
android:layout_alignParentRight="true"
android:layout_below="@id/department"
android:text="Add" />
<EditText android:id="@+id/product"
android:layout_width="fill_parent"
android:layout_height="wrap_content"
android:layout_alignBaseline="@id/add"
android:layout_alignParentLeft="true"
android:layout_below="@id/department"
android:layout_toLeftOf="@id/add"
android:ems="10"
android:hint="Enter Product for above Category"
android:inputType="text" />
<TextView android:id="@+id/textView1"
android:layout_width="match_parent"
android:layout_height="wrap_content"
android:layout_alignParentLeft="true"
android:layout_below="@id/product"
android:layout_margin="5dp"
android:background="#000080"
android:padding="5dp"
android:text="Different Categories with Products..."
android:textAppearance="?android:attr/textAppearanceMedium"
android:textStyle="bold" android:textColor="#ffffff"/>
<ExpandableListView android:id="@+id/myList"
android:layout_width="match_parent"
android:layout_height="fill_parent"
android:layout_below="@id/textView1" />
</RelativeLayout>
Also, create two more layout files namely child_row.xml and group_heading.xml in the same path as activity_main.xml. child_row.xml will be responsible for generating layout for products added under different categories of Android expandable list view and group_heading.xml will generate view for main category.
child_row.xml
="1.0"="utf-8"
<RelativeLayout android:layout_width="match_parent"
android:layout_height="match_parent"
android:orientation="vertical"
xmlns:android="http://schemas.android.com/apk/res/android">
<TextView
android:id="@+id/sequence"
android:layout_width="wrap_content"
android:layout_height="wrap_content"
android:layout_alignParentLeft="true"
android:layout_alignParentTop="true"
android:paddingLeft="35sp"
android:textAppearance="?android:attr/textAppearanceMedium" />
<TextView
android:id="@+id/childItem"
android:layout_width="wrap_content"
android:layout_height="wrap_content"
android:layout_alignParentTop="true"
android:layout_toRightOf="@id/sequence"
android:textAppearance="?android:attr/textAppearanceMedium" />
</RelativeLayout>
group_heading.xml
="1.0"="utf-8"
<LinearLayout xmlns:android="http://schemas.android.com/apk/res/android"
android:layout_width="fill_parent"
android:layout_height="55dip"
android:orientation="vertical" >
<TextView
android:id="@+id/heading"
android:layout_width="wrap_content"
android:layout_height="wrap_content"
android:paddingLeft="35sp"
android:textAppearance="?android:attr/textAppearanceLarge"
android:textStyle="bold" />
</LinearLayout>
Make following changes in strings.xml:
<resources>
    <string name="app_name">"Android Expandablelistview Tutorial "
    </string>
    <string name="menu_settings">Settings</string>
    <string name="title_activity_main">MainActivity</string>

    <string-array name="dept_array">
        <item>Vegetable</item>
        <item>Fruits</item>
        <item>Grocery</item>
        <item>Electronics</item>
        <item>Books</item>
        <item>Language</item>
    </string-array>

</resources>
So, layout of Android ExpandablelistView Tutorial is complete. Now, let’s move to adding life to the layout, i.e., MainActivity.
Android Custom Adaptor
Create a new Java file named MyListAdapter.java at the same path where MainActivity.java is located, i.e., …/AndroidExpandablelistviewTutorial/app/src/main/java/com/androidtutorialpoint/androidexpandablelistviewtutorial/MyListAdapter.java.
An adapter links an Android ExpandableListView with the underlying data. The implementation of this interface will provide access to the data of the children (categorized by groups), and also instantiate Views for children and groups.
MyListAdapter.java
package com.androidtutorialpoint.androidexpandablelistviewtutorial;

import java.util.ArrayList;

import android.content.Context;
import android.view.LayoutInflater;
import android.view.View;
import android.view.ViewGroup;
import android.widget.BaseExpandableListAdapter;
import android.widget.TextView;

public class MyListAdapter extends BaseExpandableListAdapter {

    private Context context;
    private ArrayList<HeaderInfo> deptList;

    public MyListAdapter(Context context, ArrayList<HeaderInfo> deptList) {
        this.context = context;
        this.deptList = deptList;
    }

    @Override
    public Object getChild(int groupPosition, int childPosition) {
        ArrayList<DetailInfo> productList =
        deptList.get(groupPosition).getProductList();
        return productList.get(childPosition);
    }

    @Override
    public long getChildId(int groupPosition, int childPosition) {
        return childPosition;
    }

    @Override
    public View getChildView(int groupPosition, int childPosition, boolean isLastChild,
                             View view, ViewGroup parent) {

        DetailInfo detailInfo = (DetailInfo) getChild(groupPosition, childPosition);
        if (view == null) {
            LayoutInflater infalInflater = (LayoutInflater)
            context.getSystemService(Context.LAYOUT_INFLATER_SERVICE);
            view = infalInflater.inflate(R.layout.child_row, null);
        }

        TextView sequence = (TextView) view.findViewById(R.id.sequence);
        sequence.setText(detailInfo.getSequence().trim() + ") ");
        TextView childItem = (TextView) view.findViewById(R.id.childItem);
        childItem.setText(detailInfo.getName().trim());

        return view;
    }

    @Override
    public int getChildrenCount(int groupPosition) {

        ArrayList<DetailInfo> productList =
        deptList.get(groupPosition).getProductList();
        return productList.size();
    }

    @Override
    public Object getGroup(int groupPosition) {
        return deptList.get(groupPosition);
    }

    @Override
    public int getGroupCount() {
        return deptList.size();
    }

    @Override
    public long getGroupId(int groupPosition) {
        return groupPosition;
    }

    @Override
    public View getGroupView(int groupPosition, boolean isLastChild, View view,
                             ViewGroup parent) {

        HeaderInfo headerInfo = (HeaderInfo) getGroup(groupPosition);
        if (view == null) {
            LayoutInflater inf = (LayoutInflater)
            context.getSystemService(Context.LAYOUT_INFLATER_SERVICE);
            view = inf.inflate(R.layout.group_heading, null);
        }

        TextView heading = (TextView) view.findViewById(R.id.heading);
        heading.setText(headerInfo.getName().trim());

        return view;
    }

    @Override
    public boolean hasStableIds() {
        return true;
    }

    @Override
    public boolean isChildSelectable(int groupPosition, int childPosition) {
        return true;
    }
}
Also, we will make separate classes for type of category and products associated with them. Category will be of type HeaderInfo. Create a class named HeaderInfo.java at the same path as MyListAdapter.java.
HeaderInfo.java
package com.androidtutorialpoint.androidexpandablelistviewtutorial;

import java.util.ArrayList;

public class HeaderInfo {

    private String name;
    private ArrayList<DetailInfo> productList = new ArrayList<DetailInfo>();

    public String getName() {
        return name;
    }
    public void setName(String name) {
        this.name = name;
    }
    public ArrayList<DetailInfo> getProductList() {
        return productList;
    }
    public void setProductList(ArrayList<DetailInfo> productList) {
        this.productList = productList;
    }
}
Products in each category will be of type DetailInfo so create a new class named DetailInfo.java:
DetailInfo.java
package com.androidtutorialpoint.androidexpandablelistviewtutorial;

public class DetailInfo {

    private String sequence = "";
    private String name = "";

    public String getSequence() {
        return sequence;
    }
    public void setSequence(String sequence) {
        this.sequence = sequence;
    }
    public String getName() {
        return name;
    }
    public void setName(String name) {
        this.name = name;
    }
}
Finally, we will fill categories and products in our list of Android ExpandablelistView Tutorial through MainActivity.
MainActivity.java
package com.androidtutorialpoint.androidexpandablelistviewtutorial;
import java.util.ArrayList;
import java.util.LinkedHashMap;
import android.os.Bundle;
import android.support.v7.app.AppCompatActivity;
import android.view.View;
import android.view.View.OnClickListener;
import android.widget.ArrayAdapter;
import android.widget.Button;
import android.widget.EditText;
import android.widget.ExpandableListView;
import android.widget.Spinner;
import android.widget.Toast;
import android.widget.ExpandableListView.OnChildClickListener;
import android.widget.ExpandableListView.OnGroupClickListener;
public class MainActivity extends AppCompatActivity implements OnClickListener {
private LinkedHashMap<String, HeaderInfo> mySection = new LinkedHashMap<>();
private ArrayList<HeaderInfo> SectionList = new ArrayList<>();
private MyListAdapter listAdapter;
private ExpandableListView expandableListView;
@Override
public void onCreate(Bundle savedInstanceState) {
super.onCreate(savedInstanceState);
setContentView(R.layout.activity_main);
Spinner spinner = (Spinner) findViewById(R.id.department);
ArrayAdapter<CharSequence> adapter = ArrayAdapter.createFromResource(this,
R.array.dept_array, android.R.layout.simple_spinner_item);
adapter.setDropDownViewResource(android.R.layout.simple_spinner_dropdown_item);
spinner.setAdapter(adapter);
AddProduct();
expandableListView = (ExpandableListView) findViewById(R.id.myList);
listAdapter = new MyListAdapter(MainActivity.this, SectionList);
expandableListView.setAdapter(listAdapter);
expandAll();
Button add = (Button) findViewById(R.id.add);
add.setOnClickListener(this);
expandableListView.setOnChildClickListener(myListItemClicked);
expandableListView.setOnGroupClickListener(myListGroupClicked);
}
public void onClick(View v) {
switch (v.getId()) {
case R.id.add:
Spinner spinner = (Spinner) findViewById(R.id.department);
String department = spinner.getSelectedItem().toString();
EditText editText = (EditText) findViewById(R.id.product);
String product = editText.getText().toString();
editText.setText("");
int groupPosition = addProduct(department,product);
listAdapter.notifyDataSetChanged();
collapseAll();
expandableListView.expandGroup(groupPosition);
expandableListView.setSelectedGroup(groupPosition);
break;
}
}
private void expandAll() {
int count = listAdapter.getGroupCount();
for (int i = 0; i < count; i++){
expandableListView.expandGroup(i);
}
}
private void collapseAll() {
int count = listAdapter.getGroupCount();
for (int i = 0; i < count; i++){
expandableListView.collapseGroup(i);
}
}
private void AddProduct(){
addProduct("Vegetable","Potato");
addProduct("Vegetable","Cabbage");
addProduct("Vegetable","Onion");
addProduct("Fruits","Apple");
addProduct("Fruits","Orange");
}
private OnChildClickListener myListItemClicked = new OnChildClickListener() {
public boolean onChildClick(ExpandableListView parent, View v,
int groupPosition, int childPosition, long id) {
HeaderInfo headerInfo = SectionList.get(groupPosition);
DetailInfo detailInfo = headerInfo.getProductList().get(childPosition);
Toast.makeText(getBaseContext(), "Clicked on Detail " + headerInfo.getName()
+ "/" + detailInfo.getName(), Toast.LENGTH_LONG).show();
return false;
}
};
private OnGroupClickListener myListGroupClicked = new OnGroupClickListener() {
public boolean onGroupClick(ExpandableListView parent, View v,
int groupPosition, long id) {
HeaderInfo headerInfo = SectionList.get(groupPosition);
Toast.makeText(getBaseContext(), "Child on Header " + headerInfo.getName(),
Toast.LENGTH_LONG).show();
return false;
}
};
private int addProduct(String department, String product){
int groupPosition = 0;
HeaderInfo headerInfo = mySection.get(department);
if(headerInfo == null){
headerInfo = new HeaderInfo();
headerInfo.setName(department);
mySection.put(department, headerInfo);
SectionList.add(headerInfo);
}
ArrayList<DetailInfo> productList = headerInfo.getProductList();
int listSize = productList.size();
listSize++;
DetailInfo detailInfo = new DetailInfo();
detailInfo.setSequence(String.valueOf(listSize));
detailInfo.setName(product);
productList.add(detailInfo);
headerInfo.setProductList(productList);
groupPosition = SectionList.indexOf(headerInfo);
return groupPosition;
}
}
In the above code, we are first creating a spinner to add category in our list and associating it with an ArrayAdapter. This ArrayAdapter is filled with items as defined in Strings.xml as string-array. After filling Spinner, we are adding products one by one in Expandable list view through addProduct(). In the addProduct(), we are first checking if product is already present. If it's not, then it is added to the corresponding category. Also, this function is returning position of the product in that category which is utilized in onClick(). After adding initial products, we attached MyListAdapter with the expandable list view. This adapter will be responsible for adding and updating data in the list view. Finally, listeners are added for button such that whenever button is clicked, onClick() will be called and new item is added into the list.
Let us tell you how this expandable list Android example is working overall. First of all, some items will be added automatically through AddProduct(). Now if a user wants to add a new category and product in ExpandableListView, then Button Add will come into the picture. On clicking Add button, products will be added through groupPosition = addProduct(department,product) and ExpandableListView will be updated through listAdapter.notifyDataSetChanged() so that changes can take effect.
So finally our Android ExpandablelistView Tutorial is complete. Run this App and add new categories and products in ExpandablelistView as you want. You can also refer to the demo of Android ExpandablelistView Tutorial given at the start of the tutorial.
