In this instalment of my blog post series on Continuous Delivery with TFS / VSTS, we configure a sample application to work with Git in Visual Studio 2015 and perform our first commit. This post assumes that nothing has changed since the last post in the series.
Configure Git in Visual Studio 2015
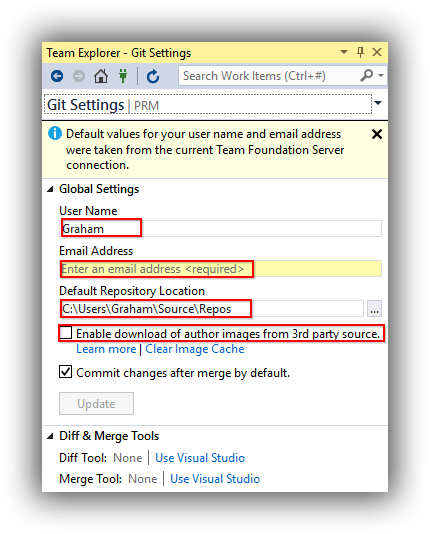
In order to start working with Git in Visual Studio, there are some essential and non-essential settings to configure. From the Team Explorer – Home page, choose Settings > Git > Global Settings. Visual Studio will have filled in as many settings as possible and the panel will look similar to this:

Complete the form as you see fit. The one change I make is to trim Repos from the Default Repository Location (to try and reduce max filepath issues) and then from Windows Explorer, create the Source folder with child folders named GitHub, TFS and VSTS. This way, I can keep repositories from the different Git hosts separate and avoid name clashes if I have a repository named the same in different hosts.
Clone the Repository
In the previous post, we created ContosoUniversity (the name of the sample application we’ll be working with) repositories in both TFS and VSTS. Before we go any further, we need to clone the ContosoUniversity repository to our development workstation.
If you are working with TFS, we finished-up last time with the Team Explorer – Home page advising that we must clone the repository. However, at the time of writing, Visual Studio 2015 1 seemed to have bug (TFS only) where it was still remembering the PRM repository that we deleted and wasn’t allowing the ContosoUniversity repository to be cloned. Frustratingly, after going down several blind avenues, the only way I found to fix this was to temporarily recreate the PRM repository from the Web Portal. With this done, clicking on the Manage Connections icon on the Team Explorer toolbar now shows the ContosoUniversity repository:

Double-click the repository which will return you to the Team Explorer home page with links to clone the repository. Clicking one of these links now shows the Clone Repository details with the correct remote settings:

Make sure you change the local settings to the correct folder structure (if you are following my convention, this will be …\Source\TFS\ContosoUniversity) and click on Clone. Finally, return to the Web Portal and delete the PRM repository.
The procedure for cloning the ContosoUniversity repository if you are working with VSTS is similar but without the bug. However in the previous post, we hadn’t got as far as connecting VSTS to Visual Studio. The procedure for doing this is the same as for TFS, however when you get to the Add Team Foundation Server dialog, you need to supply the URI for your VSTS subscription rather than the TFS instance name:

With your VSTS subscription added, you will eventually end up back at the Team Explorer – Home page where you can clone the repository as for TFS but with a local path of …\Source\VSTS\ContosoUniversity.
Add the Contoso University Sample Application
The Contoso University sample application I use is an ASP.NET MVC application backed by a SQL Server database. Its origins are the MVC Getting Started area of Microsoft’s www.asp.net site, however I’ve made a few changes in particular to how the database side of things is managed. I’ll be explaining a bit more about all this in a later post but for now, you can download the source code from my GitHub repository here using the Download ZIP button. Once downloaded, unblock the file and extract the contents.
One of the key things about version control – and Git in particular – is that you want to avoid polluting it with files that are not actually part of the application (such as Visual Studio settings files) or files that can be recreated from the source code (such as binaries). There can be lots of this stuff but handily Git provides a solution by way of the .gitignore file and Microsoft adds icing to the cake by providing a version specifically tailored to Visual Studio. Although the sample code from my GitHub repository contains a .gitignore, I’ve observed odd behaviours if this file isn’t part of the repository before an existing Visual Studio solution is added, so my technique is to add it first. From Team Explorer – Home navigate to Settings > Git > Repository Settings. From there, click on the Add links to add an ignore file and an attributes file:

Switch back to Team Explorer – Home and click on Changes. These two files should appear under Included Changes. Supply a commit message and from the Commit dropdown choose Commit and Sync:

Now switch back to Windows Explorer and the extracted Contoso University, and drill down to the folder that contains ContosoUniversity.sln. Delete .gitattributes and .gitignore and then copy the contents of this folder to …\Source\TFS\ContosoUniversity or …\Source\VSTS\ContosoUniversity depending on which system you are using. You should end up with ContosoUniversity.sln in the same folder as .gitattributes and .gitignore.
Back over to Visual Studio and the Team Explorer – Changes panel and you should see that there are Untracked Files:

Click on Add All and then Commit and Sync these changes as per the procedure described above.
That’s it for this post. Next time, we open up the Contoso University solution and get it configured to run.
Cheers – Graham
The post Continuous Delivery with TFS / VSTS – Configuring a Sample Application for Git in Visual Studio 2015 appeared first on Please Release Me.
