Introduction
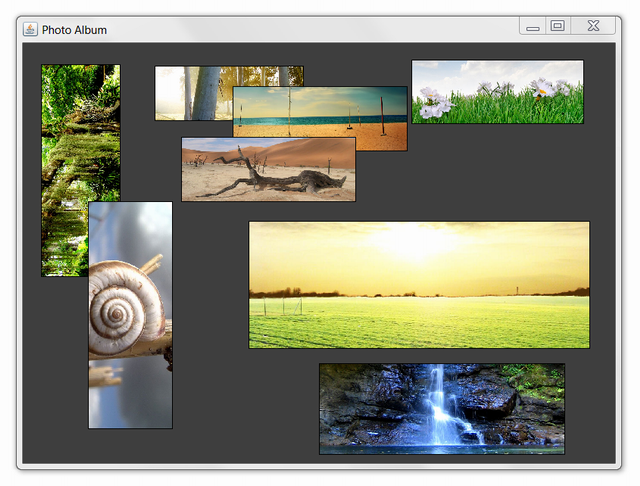
For an attractive presentation of work, I show you this image:

This is the target. A visual photo manager, with draggable photos. Obviously this is a useless application, but it is been displayed here to demonstrate the power of Swings.
Background
The base element of our treatment is JComponent.
This component is the graphic base element of Swing framework for our purpose. In this graph, we will examine the workflow of development:

Workflow is left to right, but inheritance is right to left. So we first have to develop a Draggable Component from a JComponent with drag&drop features, a simple feature at first glance, but a little bit more complex when viewed deeply. So we can develop a custom Draggable Component like an Image Component for this specific scope.
Draggable Component
We can start with properties and constructor:
public class DraggableComponent extends JComponent {
private boolean draggable = true;
protected Point anchorPoint;
protected Cursor draggingCursor = Cursor.getPredefinedCursor(Cursor.HAND_CURSOR);
protected boolean overbearing = false;
public DraggableComponent() {
addDragListeners();
setOpaque(true);
setBackground(new Color(240,240,240));
}
The properties are self explanatory with comments. Pay attention to anchorPoint that is the point where we pinch object with the mouse. Overbearing is a custom way say to Drag.Comp. to change its z-index to overlap on each other.
The constructor is simple. The only word is for addDragListerner method that we see below:
private void addDragListeners() {
final DraggableComponent handle = this;
addMouseMotionListener(new MouseAdapter() {
@Override
public void mouseMoved(MouseEvent e) {
anchorPoint = e.getPoint();
setCursor(Cursor.getPredefinedCursor(Cursor.HAND_CURSOR));
}
@Override
public void mouseDragged(MouseEvent e) {
int anchorX = anchorPoint.x;
int anchorY = anchorPoint.y;
Point parentOnScreen = getParent().getLocationOnScreen();
Point mouseOnScreen = e.getLocationOnScreen();
Point position = new Point(mouseOnScreen.x - parentOnScreen.x -
anchorX, mouseOnScreen.y - parentOnScreen.y - anchorY);
setLocation(position);
if (overbearing) {
getParent().setComponentZOrder(handle, 0);
repaint();
}
}
});
}
This method adds a listener to MouseMotion on object. He has to override two events. MouseMoved is used for keeping every time the relative coordinates mouse-component. MouseDragged instead is used to drag object (is MouseDown + MouseMove event). It uses a particular vector calculus to retrieve from anchorPoint (see above) the Position (left,top) of that component while dragging. If we use a simple Mouse coordinate to set position of component, there is a bad flicker effect. Below is a representation of calculus if you are interested (trust me otherwise:).

The last two important methods are:
@Override
   protected void paintComponent(Graphics g) {
       super.paintComponent(g);
       if (isOpaque()) {
           g.setColor(getBackground());
           g.fillRect(0, 0, getWidth(), getHeight());
       }
   }

private void removeDragListeners() {
       for (MouseMotionListener listener : this.getMouseMotionListeners()) {
           removeMouseMotionListener(listener);
       }
       setCursor(Cursor.getDefaultCursor());
   }
The first is only for painting a coloured box if isOpaque = true, because this component is a phantom component otherwise. The second one is for removing listeners when we decide that this component has to freeze.
Draggable Image Component
As always, we start from the beginning:
public class DraggableImageComponent
	extends DraggableComponent implements ImageObserver {

    protected Image image;
    private boolean autoSize = false;
    private Dimension autoSizeDimension = new Dimension(0, 0);

    public DraggableImageComponent() {
        super();
        setLayout(null);
        setBackground(Color.black);
    }
We have less properties. Image is the picture to display in component, autoSize is TRUE if component display image with original ratio and autoSizeDimension is used for this purpose. We extend DraggableComponent because we want a draggable image item, but calling setDraggable(false) we have a simple static Image Component. It implements ImageObserver because it has to implement a callback method called when some images have been loaded. The application creates threads to load external data like images, because it can take more time, so we have a callback when the loading is finished.
Next:
@Override
   protected void paintComponent(Graphics g) {
       Graphics2D g2d = (Graphics2D) g;
       g2d.clearRect(0, 0, getWidth(), getHeight());
       if (image != null) {
           setAutoSizeDimension();
           g2d.drawImage(image, 0, 0, getWidth(), getHeight(), this);
       } else {
           g2d.setColor(getBackground());
           g2d.fillRect(0, 0, getWidth(), getHeight());
       }
   }
This is the core for an ImageComponent because here it paints the selected image. It avoids calling father corresponding method because it doesn't matter. However it is very simple to understand.
Methods for image resizing:
private void setAutoSizeDimension() {
private Dimension adaptDimension(Dimension source, Dimension dest) {
They are not very important for our discussion, however they are simple ways to resize image preserving w/h ratio. If you want further explanation on that, message me.
Important, how I said above, is create a callback for image loading.
public boolean imageUpdate(Image img, int infoflags, int x, int y, int w, int h) {
       if (infoflags == ALLBITS) {
           repaint();
           setAutoSizeDimension();
           return false;
       }
       return true;
   }
This is the overridden method of ImageObserver implementation. InfoFlags can have multiple values, when it is equal to ImageObserver.ALLBITS the image is been loaded. If you don't create a callback image is loaded after first repaint(), so you can't see image, but only a black box or void box.
FooPhotoAlbum.JAR
This is the application of the first screenshot. It is a simple foo application to explain the use of these components. I don't post pieces of code here because it is too dispersive. However you can read it in the source - Main.Java file with comments to understand the workflow. It is very simple: create a container for DraggableImageComponents and dynamically put images on it. You can see that you can do that with really few lines of code.
Conclusions
As always, the two main components are fully reusable. You can use them everywhere, and you can customize them. With few code lines, you can create a draggable component, like a draggable panel for several scopes. For example, if you think of a visual editor, like e.g. OpenOffice Draw, the base is just a set of draggable items. Another feature is RESIZE of a component. We can simply do that by inserting another level of inheritance, before or after DraggableComponent, so we can extend an XXXComponent fully draggable and resizable. If you are interested on this, please vote! So I'll find your need. :)
