Introduction
In a scenario of cloud migration of existing applications or deployment of newly developed applications into Azure we come up with a deployment architecture that includes considerable number resources (VM,Websites,DBs etc..) to be created and deployed in to the cloud environment. Creating the resources manually one by one is not only time consuming but also add to manpower utilization cost. We can think of an alternate approach so as to optimize the process and reduce the cost. This article describes how to deploy azure resources and configure Azure Environment, manage azure resources using Azure Resource Manager and PowerShell.
Background
Azure Resource Manager
This article walks you through the deployment of a resource in Azure using Azure Resource manager Template and PowerShell commandlets. We'll start with creating a ARM template to create and deploy Virtual Machine. Then, we'll walk you through how to view and delete the resources in Azure Environment.
What is Azure Resource Manager?
ARM is a Rest API that enables to deploy, manage, and monitor all the resources as a group using different tools and allows automating the deployment and configuration of hybrid infrastructure in Azure. It can repeatedly deploy the solution throughout the development lifecycle and ensure that resources are deployed in a consistent state. ARM Provides security, auditing, and tagging features to help you manage your resources after deployment. It apply access control to all services in your resource group because Role-Based Access Control (RBAC) is natively integrated into the management platform .We use a template for deployment and that template can work for different environments such as testing, staging, and production.
ARM provides a consistent management layer for the tasks you perform through Azure using tools like PowerShell, Azure CLI, Azure portal, REST API, and Visual Studio .Using ARM template we can deploy the complete dev, test or prod environment as a group or solution and manage the resources.ARM supports the creation of the automation account, runbooks, credentials and variables the same way as for example VMs. Each-time you run your template these resources are created or modified.
Using the code
Create ARM Template:
- VM Creation Template : VirtualMachineTemplate.json
{

  "$schema": "http://schema.management.azure.com/schemas/2014-04-01-preview/deploymentTemplate.json#",
  "contentVersion": "1.0.0.0",
  "parameters": {
    "newStorageAccountName": {
      "type": "string",
      "metadata": {
        "Description": "The name of the storage account where the VM disk is stored."
      }
    },
    "adminUsername": {
      "type": "string",
      "metadata": {
        "Description": "The name of the administrator account on the VM."
      }
    },
    "adminPassword": {
      "type": "securestring",
      "metadata": {
        "Description": "The administrator account password on the VM."
      }
      },

      "dnsNameForPublicIP": {
        "type": "string",
        "metadata": {
          "Description": "The name of the public IP address used to access the VM."
        }
      }
    },
    "variables": {
      "location": "Central US",
      "imagePublisher": "MicrosoftWindowsServer",
      "imageOffer": "WindowsServer",
      "windowsOSVersion": "2012-R2-Datacenter",
      "OSDiskName": "osdisk1",
      "nicName": "myvmnic",
      "addressPrefix": "10.0.0.0/16",
      "subnetName": "sn1",
      "subnetPrefix": "10.0.0.0/24",
      "storageAccountType": "Standard_LRS",
      "publicIPAddressName": "mypublicip",
      "publicIPAddressType": "Dynamic",
      "vmStorageAccountContainerName": "vhds",
      "vmName": "MyWindowsVM",
      "vmSize": "Standard_A0",
      "virtualNetworkName": "myvnet",
      "vnetID": "[resourceId('Microsoft.Network/virtualNetworks',variables('virtualNetworkName'))]",
      "subnetRef": "[concat(variables('vnetID'),'/subnets/',variables('subnetName'))]"
    },
    "resources": [
      {
        "type": "Microsoft.Storage/storageAccounts",
        "name": "[parameters('newStorageAccountName')]",
        "apiVersion": "2015-06-15",
        "location": "[variables('location')]",
        "properties": {
          "accountType": "[variables('storageAccountType')]"
        }
      },      {

        "apiVersion": "2016-03-30",
        "type": "Microsoft.Network/publicIPAddresses",
        "name": "[variables('publicIPAddressName')]",
        "location": "[variables('location')]",
        "properties": {
          "publicIPAllocationMethod": "[variables('publicIPAddressType')]",
          "dnsSettings": {
            "domainNameLabel": "[parameters('dnsNameForPublicIP')]"
          }}},
      {
        "apiVersion": "2016-03-30",
        "type": "Microsoft.Network/virtualNetworks",
        "name": "[variables('virtualNetworkName')]",
        "location": "[variables('location')]",
        "properties": {
          "addressSpace": {
            "addressPrefixes": [
              "[variables('addressPrefix')]"
            ]},
          "subnets": [
            {
              "name": "[variables('subnetName')]",
              "properties": {
                "addressPrefix": "[variables('subnetPrefix')]"
              } } ] }
      },
      {
        "apiVersion": "2016-03-30",
        "type": "Microsoft.Network/networkInterfaces",
        "name": "[variables('nicName')]",
        "location": "[variables('location')]",
        "dependsOn": [
          "[concat('Microsoft.Network/publicIPAddresses/', variables('publicIPAddressName'))]",
          "[concat('Microsoft.Network/virtualNetworks/', variables('virtualNetworkName'))]"
        ],
        "properties": {
          "ipConfigurations": [
            {
              "name": "ipconfig1",
              "properties": {
                "privateIPAllocationMethod": "Dynamic",
                "publicIPAddress": {
                  "id": "[resourceId('Microsoft.Network/publicIPAddresses',variables('publicIPAddressName'))]"
                },
                "subnet": {
                  "id": "[variables('subnetRef')]"
                } } } ] }
      },
      {
        "apiVersion": "2015-06-15",
        "type": "Microsoft.Compute/virtualMachines",
        "name": "[variables('vmName')]",
        "location": "[variables('location')]",
        "dependsOn": [
          "[concat('Microsoft.Storage/storageAccounts/', parameters('newStorageAccountName'))]",
          "[concat('Microsoft.Network/networkInterfaces/', variables('nicName'))]"
        ],
        "properties": {
          "hardwareProfile": {
            "vmSize": "[variables('vmSize')]"
          },
          "osProfile": {
            "computername": "[variables('vmName')]",
            "adminUsername": "[parameters('adminUsername')]",
            "adminPassword": "[parameters('adminPassword')]"
          },
          "storageProfile": {
            "imageReference": {
              "publisher": "[variables('imagePublisher')]",
              "offer": "[variables('imageOffer')]",
              "sku": "[variables('windowsOSVersion')]",
              "version": "latest"
            },
            "osDisk": {
              "name": "osdisk",
              "vhd": {
                "uri": "[concat('http://',parameters('newStorageAccountName'),'.blob.core.windows.net/',variables('vmStorageAccountContainerName'),'/',variables('OSDiskName'),'.vhd')]"
              },
              "caching": "ReadWrite",
              "createOption": "FromImage"
            }
          },
          "networkProfile": {
            "networkInterfaces": [
              {
                "id": "[resourceId('Microsoft.Network/networkInterfaces',variables('nicName'))]"
              } ] } } } ]}
2.VM Parameter Template: Parameter.json
param(
    {
  "$schema": "https://schema.management.azure.com/schemas/2015-01-01/deploymentTemplate.json",
  "contentVersion": "1.0.0.0",
  "parameters": {
    "newStorageAccountName": {
      "value": "xxxxxxxxxxx"
    },
    "adminUserName": {
      "value": "xxxxxxxxx"
    },
    "adminPassword": {
      "value": "xxxxxxxxxxx"
    },
    "dnsNameForPublicIP": {
      "value": "xxxxxxxxxxx"
    }
  }
}
3.Save theses templates to locale path which needs to be passed as parameter to the PowerShell cmdlet.
Prerequisites to Execute PowerShell Cmdlets:
To execute ARM PowerShell cmdlets below are the system pre-requisites
- DotNet Framework version 4.5 and above
- PowerShell version 4.0 and above
Azure Power Shell
Deploy Azure Resources Using PowerShell
- LogIn To Azure : Open “Windows PowerShell” command prompt and login to Azure platform using the below cmdlet.
LogIn-AzureRmAccount or Add-AzureRmAccount

On enter the above command will prompt login screen to authenticate the end user.We need to provide Azure Subscription ID and Password.
2.Create a Resource Group: A Azure Resource Group is a Logical Container that holds resources that you want to manage as a group.
New-AzureRmResourceGroup -Name TestRG1 -Location "South Central US"
The output is in the following format:
ResourceGroupName : TestRG1
Location          : southcentralus
ProvisioningState : Succeeded
Tags              :
ResourceId        : /subscriptions/{guid}/resourceGroups/TestRG1
3.Deploy Resource in Azure Portal:
The below cmdlet is used to deploy the resource in Azure
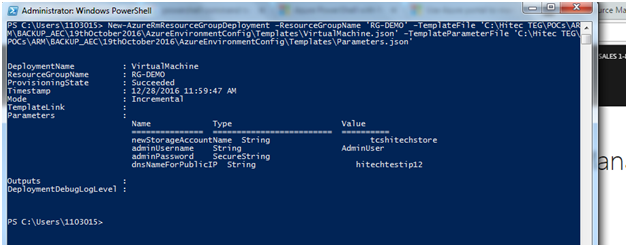
New-AzureRmResourceGroupDeployment –ResourceGroupName ‘NameOfResourceGroup’ –TemplateFile ‘PathOfVMTemplateFile’ –TemplateParameterFile ‘PathOfVmParametersTemplateFile’
Once deployed successfully the below message will be displayed in PowerShell screen.

We can modify the json template to extend the no of resource and can deploy multiple resources by executing a single cmdlet.
When we login to azure environment we could see the resources up and running.

4.Create multiple resources using single ARM Template :
The below ARM Template can be re-used to create multiple VM Azure at one go.
{
  "$schema": "http://schema.management.azure.com/schemas/2014-04-01-preview/deploymentTemplate.json#",
  "contentVersion": "1.0.0.0",
  "parameters": {
    "newStorageAccountName": {
      "type": "string",
      "defaultValue": "newstorageacfortest",
      "metadata": {
        "Description": "The name of the storage account where the VM disk is stored."
      }
    },
    "adminUsername": {
      "type": "string",
      "defaultValue": "TestAdminUser",
      "metadata": {
        "Description": "The name of the administrator account on the VM."
      }
    },
    "adminPassword": {
      "type": "securestring",
      "defaultValue": "Priyadarshini12#",
      "metadata": {
        "Description": "The administrator account password on the VM."
      }
    },
    "numberOfInstances": {
      "type": "int",
      "defaultValue": 3,
      "metadata": {
        "description": "Number of VMs to deploy"
      }
    },
    "multipleVMNames": {
      "type": "array",
      "defaultValue": [
        "27WindowsVM",
        "WebSite",
        "TestApi"
      ],
      "metadata": {
        "description": "Multiple VM Names array"
      }
    },
    "dnsNameForPublicIP": {
      "type": "string",
      "defaultValue": "dnsnameforiptest",
      "metadata": {
        "Description": "The name of the public IP address used to access the VM."
      }
   }
  },
  "variables": {
    "location": "Japan East",
    "imagePublisher": "MicrosoftWindowsServer",
    "imageOffer": "WindowsServer",
    "windowsOSVersion": "2012-R2-Datacenter",
    "OSDiskName": "osdisk1",
    "nicName": "8myvmnic",
    "addressPrefix": "10.0.0.0/16",
    "subnetName": "sn1",
    "subnetPrefix": "10.0.0.0/24",
    "storageAccountType": "Standard_LRS",
    "publicIPAddressName": "8mypublicip",
    "publicIPAddressType": "Dynamic",
    "vmStorageAccountContainerName": "vhds",
    "vmName": "27WindowsVM,WebSite,TestApi",
    "vmSize": "Standard_A0",
    "virtualNetworkName": "myvnet8",
    "vnetID": "[resourceId('Microsoft.Network/virtualNetworks',variables('virtualNetworkName'))]",
    "subnetRef": "[concat(variables('vnetID'),'/subnets/',variables('subnetName'))]"
  },
  "resources": [
    {
      "type": "Microsoft.Storage/storageAccounts",
      "name": "[parameters('newStorageAccountName')]",
      "apiVersion": "2015-06-15",
      "location": "[variables('location')]",
      "properties": {
        "accountType": "[variables('storageAccountType')]"
      }
    },
    {
      "apiVersion": "2016-03-30",
      "type": "Microsoft.Network/publicIPAddresses",
      "name": "[concat(variables('publicIPAddressName'), copyindex())]",
      "location": "[variables('location')]",
      "copy": {
        "name": "ipLoop",
        "count": "[parameters('numberOfInstances')]"
      },
      "properties": {
        "publicIPAllocationMethod": "[variables('publicIPAddressType')]",
        "dnsSettings": {
          "domainNameLabel": "[concat(parameters('dnsNameForPublicIP'),copyindex())]"
        }
      }
    },
    {
      "apiVersion": "2016-03-30",
      "type": "Microsoft.Network/virtualNetworks",
      "name": "[variables('virtualNetworkName')]",
      "location": "[variables('location')]",
      "properties": {
        "addressSpace": {
          "addressPrefixes": [
            "[variables('addressPrefix')]"
          ]
        },
        "subnets": [
          {
            "name": "[variables('subnetName')]",
            "properties": {
              "addressPrefix": "[variables('subnetPrefix')]"
            } } ]}
    },
    {
      "apiVersion": "2016-03-30",
      "type": "Microsoft.Network/networkInterfaces",
      "name": "[concat(variables('nicName'), copyindex())]",
      "location": "[variables('location')]",
      "copy": {
        "name": "nicLoop",
        "count": "[parameters('numberOfInstances')]"
      },
      "dependsOn": [
        "[concat('Microsoft.Network/virtualNetworks/', variables('virtualNetworkName'))]"
      ],
      "properties": {
        "ipConfigurations": [
          {
            "name": "ipconfig1",
            "properties": {
              "privateIPAllocationMethod": "Dynamic",
              "subnet": {
                "id": "[variables('subnetRef')]"
              } }} ]}
    },
    {
      "apiVersion": "2015-06-15",
      "type": "Microsoft.Compute/virtualMachines",
      "name": "[parameters('multipleVMNames')[copyIndex()]]",
      "location": "[variables('location')]",
      "copy": {
        "name": "vmLoop",
        "count": "[parameters('numberOfInstances')]"
      },
      "dependsOn": [
        "[concat('Microsoft.Storage/storageAccounts/', parameters('newStorageAccountName'))]",
        "[concat('Microsoft.Network/networkInterfaces/', variables('nicName'), copyindex())]"
      ],
      "properties": {
        "hardwareProfile": {
          "vmSize": "[variables('vmSize')]"
        },
        "osProfile": {
          "computerName": "[parameters('multipleVMNames')[copyIndex()]]",
          "adminUsername": "[parameters('adminUsername')]",
          "adminPassword": "[parameters('adminPassword')]"
        },
        "storageProfile": {
          "imageReference": {
            "publisher": "[variables('imagePublisher')]",
            "offer": "[variables('imageOffer')]",
            "sku": "[variables('windowsOSVersion')]",
            "version": "latest"
          },
          "osDisk": {
            "name": "osdisk",
            "vhd": {
              "uri": "[concat('http://',parameters('newStorageAccountName'),'.blob.core.windows.net/',variables('vmStorageAccountContainerName'),'/',variables('OSDiskName'), copyIndex() ,'.vhd')]"
            },
            "caching": "ReadWrite",
            "createOption": "FromImage"
          }
        },
        "networkProfile": {
          "networkInterfaces": [
            {
              "id": "[resourceId('Microsoft.Network/networkInterfaces',concat(variables('nicName'), copyindex()))]"
            }] } } } ]
}
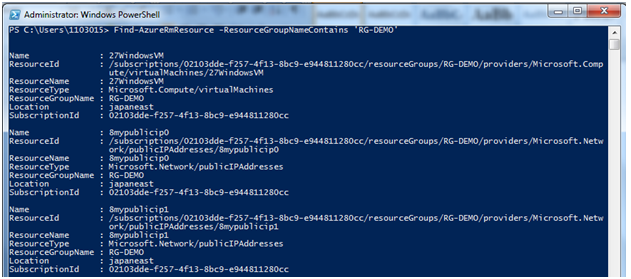
Find Resources in Resource Group:
Cmdlet to find resources in a Resource Group :
Find-AzureRmResource –ResourceGroupNameContains ‘XXXXXXXX’

Delete Resources using PowerShell
Cmdlet to delete resources from azure:
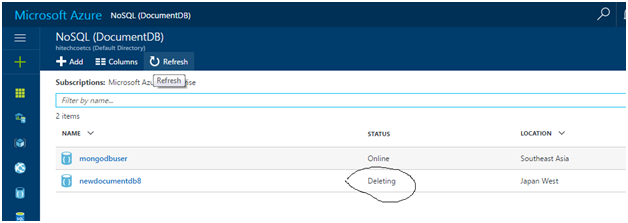
Remove-AzureRmResource –Name ‘XXXXXXXXX’ –ResourceGroupName ‘XXXXXXXX’ –ResourceType ‘XXXXXXXXXXXXX’
We can Check the status of delete operation in Azure portal.

Conclusion: ARM is a very effective API to deploy and manage resources. We can configure and manage resources of our Azure Environment using the ARM templates and PowerShell cmdlets. We can not only execute them repetitively in different phases of SDLC but also deploy azure resources in different environments like Dev,Test,Production thereby reducing cost and time.
