Click here to Skip to main content
65,938 articles
CodeProject is changing. Read more.
Articles / artificial-intelligence / big-data

Hadoop Beginners Guide - How To Setup Developer Environment

5.00/5 (2 votes)
13 Feb 2017CPOL2 min read 16.8K  
Step by step procedure to install NetBeans on Ubuntu 16.04 operating system with Hadoop 2.7.3 version. This may work for any other versions of Hadoop and Ubuntu.

Introduction

Developers could use different programming languages to write program for Hadoop. Since Hadoop itself is developed in Java, I would prefer Java as Hadoop Programming language and NetBeans as the IDE. Here in this article, I will show you how to install NetBeans on Ubuntu 16.04 operating system and configure it to write Hadoop program in Java.

Background

I hope you have read my related articles already:

Install NetBeans IDE 8.2

Here are the steps:

  • Download NetBeans IDE 8.2 here

https://netbeans.org/downloads/
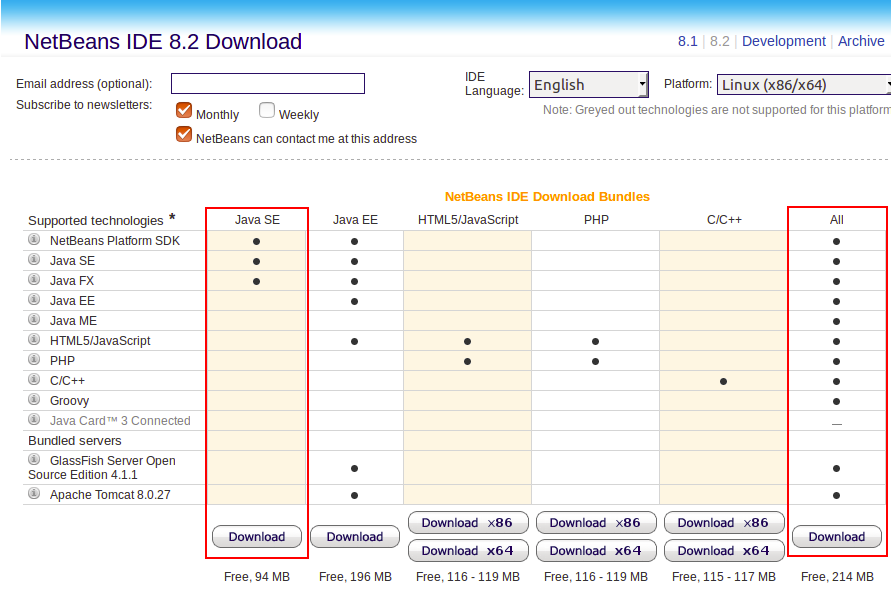
Image 1

You can choose Java SE only or choose All and then customize the installer later. I downloaded All components.

  • The installer will be downloaded to your download folder by default.
  • Open terminal by pressing Ctrl+Alt+T.
  • Execute the following command to go to download folder:
    cd Downloads/
  • Run the command below to make the installer executable:
    chmod +x <DOWNLOADED FILE NAME>

    In my case:

    chmod +x netbeans-8.2-linux.sh
  • Run the command below to start the installer:
    ./<DOWNLOADED FILE NAME>

    In my case:

    ./netbeans-8.2-linux.sh
  • Here is the screenshot of all commands above:

    Image 2

  • This will start the installer.

    Image 3

  • Click on “Customize” to select the components you would like to install.

    Image 4

  • Select the components and click OK button.

    Image 5

  • Click on Next. Accept terms and click on Next button.
  • Locate JDK path. In my case, it is “/usr/lib/jvm/java-8-openjdk-amd64”. If you don’t have JDK installed, you can follow my previous article to install it. Here is how to check if JDK is installed or not:
    • Run the command below:
      java -version
      javac -version
    • This will display the version of JDK. Similar to this:

      Image 6

    • If you have JDK installed and want to know where it is located, run the command below:
      update-alternatives --config java
    • This will display the path of JDK.
  • Copy the path and set it on the screen below:

    Image 7

  • Click on “Next” button. Select “Check for Updates” and click on “Install” button.

    Image 8

  • This will start installing NetBeans IDE 8.2.

Get NetBeans Ready for Hadoop Programming

  • Start NetBeans IDE.
  • Create a new Project from File-->New Project menu or pressing Alt+F+W.
  • Choose “Java Application” as project type from the following screen and click on Next button:

    Image 9

  • Enter the project name and click on Finish.

    Image 10

  • In project explorer on left side, right click on Libraries and click on “Add JAR/Folder”:
  • Add “hadoop-common-2.7.3.jar” file from this location. The location might be different in your installation. You have to browse the location where hadoop is installed and then get into “share/hadoop/common” directory. In my case:
  • /home/fazlur/hadoop-2.7.3/share/hadoop/common/hadoop-common-2.7.3.jar

    Image 11

  • Add "hadoop-mapreduce-client-app-2.7.3.jar" "hadoop-mapreduce-client-common-2.7.3.jar" "hadoop-mapreduce-client-core-2.7.3.jar" files from “share/hadoop/mapreduce/” directory. Press Ctrl and click on the files to select multiple files.

    Image 12

  • It will look like this at the end:

    Image 13

Conclusion

Hope you enjoyed reading my article and get a successful environment for Hadoop Programming. In my consecutive articles, I will explain different components of Hadoop and how to program.

Thanks for reading my article and keep in touch.

History

  • 14th February, 2017: Initial version

License

This article, along with any associated source code and files, is licensed under The Code Project Open License (CPOL)