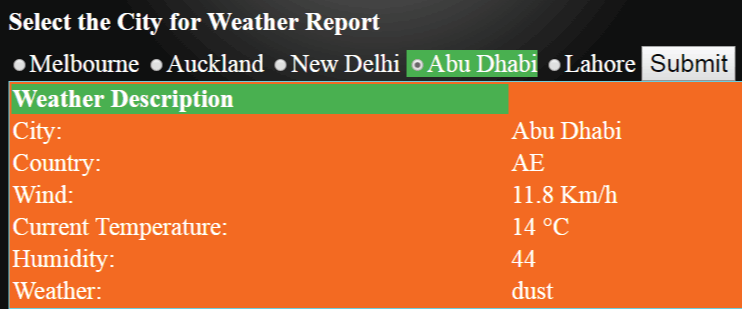
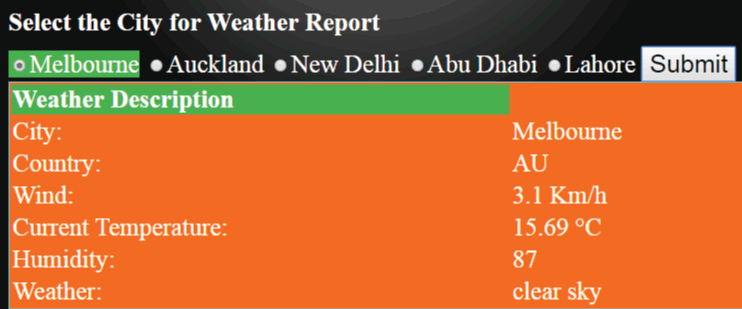
Introduction
OpenWeatherMap API is a great way to get the real time weather reports of any city of the world. You can use this API free of charge in your application. In order to use OpenWeatherMap API, you need to create your API key from here.
Here in this article, I will implement this API in an ASP.NET MVC website.
Who will Benefit from this Article
This article will benefit all programmers who wish to learn how to implement an API. Programmers who are in the learning stages of ASP.NET MVC will also be benefited as I will explain to you in steps about working in ASP.NET MVC.
Background
The API calls are made to this URL:
http://api.openweathermap.org/data/2.5/weather?id=CITYIDappid=APIKEY&units=metric
You can clearly see that you need to pass the CITYID and APIKEY to this URL.
The CITYID of every city of the world is available from here.
OpenWeatherMap API Response JSON
The OpenWeatherMap API response is in JSON whose format is:
{"coord":{"lon":139,"lat":35},
"sys":{"country":"JP","sunrise":1369769524,"sunset":1369821049},
"weather":[{"id":804,"main":"clouds",
"description":"overcast clouds","icon":"04n"}],
"main":{"temp":289.5,"humidity":89,
"pressure":1013,"temp_min":287.04,"temp_max":292.04},
"wind":{"speed":7.31,"deg":187.002},
"rain":{"3h":0},
"clouds":{"all":92},
"dt":1369824698,
"id":1851632,
"name":"Shuzenji",
"cod":200}
The Application Summary

This application is a single page built in ASP.NET MVC 6 platform. There is one Controller, one View, a model and few helper classes for Serializing API response JSON.

Creating the MVC Application
Let us build this application in a step by step manner.
STEP 1 – Add Model
In MVC, the Model is a class that resides inside the Models folder and does the communication between Controller and View.
So, right click the Models folder and add a new class. Name that class OpenWeatherMap and add the below code to it:
public class OpenWeatherMap
{
    public string apiResponse { get; set; }

    public Dictionary<string, string=""> cities
    {
        get; set;
    }
}
This model has 2 properties – a string and another dictionary.
The string property (apiResponse) will contain the API response. Actually, I will serialize the response JSON and convert it to HTML (in the controller) before setting it in this property.
In the dictionary property, I will add the city name and their ids. These are:
| Melbourne | 7839805 |
| Auckland | 2193734 |
| New Delhi | 1261481 |
| Abu Dhabi | 292968 |
| Lahore | 1172451 |
STEP 2: Add Helper Classes
Create a new folder in your application and name it Class. Now add the below helper classes to it.
public class Coord
{
    public double lon { get; set; }
    public double lat { get; set; }
}

public class Weather
{
    public int id { get; set; }
    public string main { get; set; }
    public string description { get; set; }
    public string icon { get; set; }
}

public class Main
{
    public double temp { get; set; }
    public int pressure { get; set; }
    public int humidity { get; set; }
    public int temp_min { get; set; }
    public int temp_max { get; set; }
}

public class Wind
{
    public double speed { get; set; }
    public int deg { get; set; }
}

public class Clouds
{
    public int all { get; set; }
}

public class Sys
{
    public int type { get; set; }
    public int id { get; set; }
    public double message { get; set; }
    public string country { get; set; }
    public int sunrise { get; set; }
    public int sunset { get; set; }
}

public class ResponseWeather
{
    public Coord coord { get; set; }
    public List<Weather> weather { get; set; }
    public string @base { get; set; }
    public Main main { get; set; }
    public int visibility { get; set; }
    public Wind wind { get; set; }
    public Clouds clouds { get; set; }
    public int dt { get; set; }
    public Sys sys { get; set; }
    public int id { get; set; }
    public string name { get; set; }
    public int cod { get; set; }
}
The work of these classes is to serialize the JSON response. Let me tell you creating these classes for a JSON is very hard and lengthy, but fortunately, I create these classes within seconds using an online tool json2csharp. You can use this tool to create these classes for any JSON you have. All you have to do is to add your JSON and click the generate button.
STEP 3: Create a Controller
In MVC, controller is the brain of the application where you create your logic. All controllers are placed inside the Controllers folder.
So, right click the Controllers folder and add a new controller to it. Name this controller OpenWeatherMapMvcController.
STEP 4: Add a Function to the Controller
Add a new function to the controller and name it FillCity(). The work of this function is to add the city names and their ids to the dictionary property of the Model.
The code of FillCity() function is:
public OpenWeatherMap FillCity()
{
    OpenWeatherMap openWeatherMap = new OpenWeatherMap();
    openWeatherMap.cities = new Dictionary<string, string>();
    openWeatherMap.cities.Add("Melbourne", "7839805");
    openWeatherMap.cities.Add("Auckland", "2193734");
    openWeatherMap.cities.Add("New Delhi", "1261481");
    openWeatherMap.cities.Add("Abu Dhabi", "292968");
    openWeatherMap.cities.Add("Lahore", "1172451");
    return openWeatherMap;
}
STEP 5: Add Code to Get ActionResult Index
The controller will already contain the Get ActionResult Index. So just change the code inside it to the one below:
public ActionResult Index()
{
    OpenWeatherMap openWeatherMap = FillCity();
    return View(openWeatherMap);
}
Let me explain that the Get ActionResult Index will be called whenever the Index view will load (and not reload when button is clicked).
In this, I am calling the FillCity() method to add city names and their ids to the dictionary property of the model.
Finally, I return this model. This returns the model (and its values) to the index view.
STEP 6: Add Post ActionResult Index
The Post ActionResult Index will be called whenever the page is postback (through the button click).
Actually in my View, I will have cities that a user can select in radio input control, and a button which when clicked should do the API call and fetch the selected city’s weather.
So this means on clicking the button, this Post ActionResult will be called.
Add the below code to your Controller.
[HttpPost]
public ActionResult Index(OpenWeatherMap openWeatherMap, string cities)
{
openWeatherMap = FillCity();
if (cities != null)
{
string apiKey = "Your API KEY";
HttpWebRequest apiRequest =
WebRequest.Create("http://api.openweathermap.org/data/2.5/weather?id=" +
cities + "&appid=" + apiKey + "&units=metric") as HttpWebRequest;
string apiResponse = "";
using (HttpWebResponse response = apiRequest.GetResponse() as HttpWebResponse)
{
streamReader reader = new StreamReader(response.GetResponseStream());
apiResponse = reader.ReadToEnd();
}
ResponseWeather rootObject = JsonConvert.DeserializeObject<ResponseWeather>(apiResponse);
StringBuilder sb = new StringBuilder();
sb.Append("<table><tr><th>Weather Description</th></tr>");
sb.Append("<tr><td>City:</td><td>" +
rootObject.name + "</td></tr>");
sb.Append("<tr><td>Country:</td><td>" +
rootObject.sys.country + "</td></tr>");
sb.Append("<tr><td>Wind:</td><td>" +
rootObject.wind.speed + " Km/h</td></tr>");
sb.Append("<tr><td>Current Temperature:</td><td>" +
rootObject.main.temp + " °C</td></tr>");
sb.Append("<tr><td>Humidity:</td><td>" +
rootObject.main.humidity + "</td></tr>");
sb.Append("<tr><td>Weather:</td><td>" +
rootObject.weather[0].description + "</td></tr>");
sb.Append("</table>");
openWeatherMap.apiResponse = sb.ToString();
}
else
{
if (Request.Form["submit"] != null)
{
openWeatherMap.apiResponse = "► Select City";
}
}
return View(openWeatherMap);
}
Explanation – This ActionResult has 1 parameters string cities. That means the cities Parameter will get me the city Id of the selected city from the view (on button click, of course).
Next, I am making the OpenWeatherMap API call using C# classes, HttpWebRequest & HttpWebResponse. You need to add the namespace using System.Net; to your controller on the top.
I am also using StreamReader class (namespace System.IO) to read the response (JSON).
I now have the JSON so let us serialize it. The serialization is done by the JsonConvert class. You can add the reference to this from NuGet Package Manager – see here.
My this line of code (ResponseWeather rootObject = JsonConvert.DeserializeObject<responseweather>(apiResponse);) I will fetch values from the JSON and add them to my Helper class. All this in 1 line of code and that purely due to the magic of JsonConvert class.
Next, I am creating an HTML Table that contains the city weather details using StringBuilder (namespace System.Text). The StingBuilder value is added to model apiResponse property.
Explanation of the if Condition
I check, if cities is not null, only then I call the API. This is done so that user is bound to select at least one city radio input.
The If statement code that does this work is:
if (cities != null)
{
}
else
{
if (Request.Form["submit"] != null)
{
openWeatherMap.apiResponse = "► Select City";
}
}
I also have 2 buttons – one submit button and another reset button. Click of both buttons will call the post ActionResult.
To know if the submit button is clicked, I used the if condition (if (Request.Form["submit"] != null)).
If cities value is null and button submit is clicked (when a user does not selects any city and clicks submit button), I put “"► Select City” text inside the apiResponse property of the modal.
In the view, I will show that message to the user.
STEP 7: Add Index View
A view forms the UI of MVC application. To add the index view, right click the Get ActionResult Index in the Controller and select Add View.
Add the following code to your View:
@model demo.MVC.Models.OpenWeatherMap
<style>
    #apiDiv {
        padding-left: 20px;
    }

        #apiDiv select, #apiDiv button {
            font-size: 25px;
        }

        #apiDiv h4 {
            margin: 10px 0;
        }

        #apiDiv #message table {
            width: 100%;
            border: double 1px #00ffff;
            background: #ff6a00;
        }

            #apiDiv #message table th {
                text-align: left;
                background: #4CAF50;
            }
</style>
<h1>Implement OpenWeatherMap API in ASP.NET MVC</h1>
@using (Html.BeginForm())
{<button id="reset" name="reset">Reset »</button>}
<div id="apiDiv">
    <h4>Select the City for Weather Report</h4>
    @using (Html.BeginForm())
    {
        foreach (var city in Model.cities)
        {
            <span>
                @Html.RadioButtonFor(m => m.cities, city.Value) @city.Key
            </span>
        }

        <button name="submit">Submit</button>
    }
    <div id="message">@(new HtmlString(Model.apiResponse))</div>
</div>
<script src="https://ajax.googleapis.com/ajax/libs/jquery/3.1.0/jquery.min.js"></script>
<script>
    $(document).ready(function () {
        $("input[id='cities']").change(function () {
            $(this).parents("#apiDiv").find
            ("span").css("background", "none");
            $(this).parent().css("background", "#4CAF50");
        });
    });
</script>
Explanation – Starting with the first line, I added the reference to the Model class @model demo.MVC.Models.OpenWeatherMap. This is because the model class will transfer values from the controller to the view.
Next, there are some CSS codes to make the design of this view look good.
Explanation of Html.BeginForm
Below the CSS, you will find this code:
@using (Html.BeginForm())
{<button id="reset" name="reset">Reset »</button>}</h2>
This code is for creating a form and inside it, adding my reset button. In MVC, form is created with Html.BeginForm().
Note that in MVC when the form contains a button, only then the button will causes the postback.
Explanation of the Creation of City Radio Input Controls:
Next, I create the apiDiv div and inside it, I created another form that contains the city radio input controls and a submit button.
To create the city radio button, I am looping through the dictionary property of the model (cities). Then I am creating them using an MVC premade function - Html.RadioButtonFor(m => m.cities, city.Value).
@city.Key will show the city names on the view.
The code:
@(new HtmlString(Model.apiResponse))
will show the HTML table or text “► Select City” inside the message div.
That means the message div will show the weather details of the selected city to the users.
Explanation of jQuery Code
I did add few lines of jQuery code:
<script src="https://ajax.googleapis.com/ajax/libs/jquery/3.1.0/jquery.min.js"></script>
<script>
$(document).ready(function () {
    $("input[id='cities']").change(function () {
        $(this).parents("#apiDiv").find("span").css("background", "none");
        $(this).parent().css("background", "#4CAF50");
    });
});
</script>
The work of this code is to show green background color around the selected city radio control.
Conclusion
The OpenWeather API application is finally completed. I hope you like and enjoy my explanation to all areas of the code.
I created the same application in HTML page using only jQuery. Do check this article too - OpenWeatherMap API using jQuery Post.
If you have any confusion regarding any line of code – please ask me through the comments section below.
