Introduction
Comet technology – allows sending arbitrary messages to client through server initiative.
CppComet is an open source comet server with AGPL license. It is written in C++ and uses mysql to store data. Using CppComet, we can deliver message from server (for example, from PHP code) by websockets and receive them in JavaScript.
It's easier than it might seem from the beginning. In this article, we will create a simple chat on PHP and CppComet.
Background
Build from Source
Recommended Installing to Ubuntu, Debian or Centos. We will be using Ubuntu.
apt-get update
apt-get install cmake make cpp gcc libssl-dev g++ nginx
        libmysqlclient-dev mysql-server mysql-client flex mailutils uuid-dev
git clone https://github.com/Levhav/comet-server
cd comet-server
cmake .
make
Creating Database
CppComet uses mysql database for storage of users credentials for authorization on server. And to store the time when the user was online. And for storing temporary data, such as undelivered messages and other data.
Create a database in mysql based on db.sql file. In comet.conf file, set the details to access the database.
Run Server
Run in console mode:
./cpp_comet
Running in daemon mode:
systemctl start comet.service
Add to Startup
cp ./comet.service /etc/systemd/system
systemctl daemon-reload
systemctl enable comet.service
After successes, run server, we can begin create chat. If you get error on this step, create issue in github repository.
Scheme of Chat
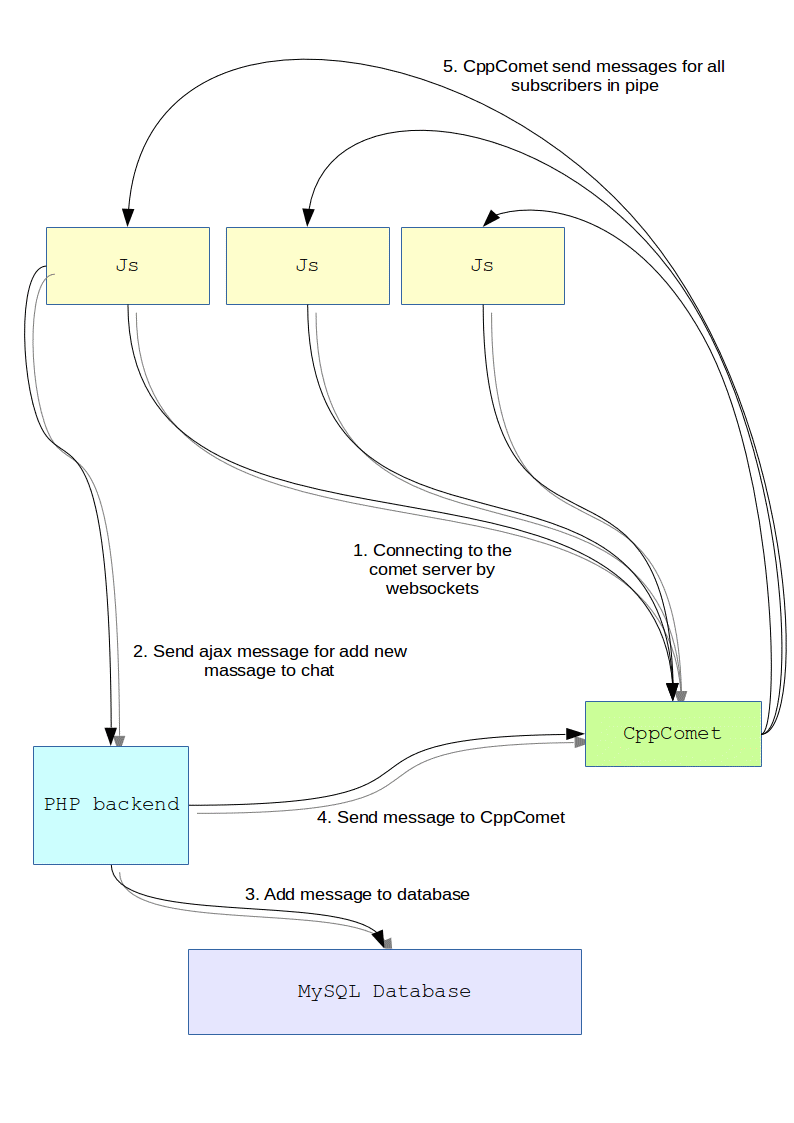
Tipycal scheme of chat:

- Connecting to the comet server by websockets
- Send Ajax message for add new massage to chat
- Add message to database
- Send message to
CppComet CppComet sends messages for all subscribers in pipe
Step 1. Connecting to the Comet Server from JavaScript API
CppComet has cloud saas alternative that can be used for testing and demo access. In the following examples, I will use demonstration access from https://comet-server.com for those who could not or were too lazy to deploy the server on their vps.
Login: 15
Password:lPXBFPqNg3f661JcegBY0N0dPXqUBdHXqj2cHf04PZgLHxT6z55e20ozojvMRvB8
Host: app.comet-server.ru
For connecting to the comet server from JavaScript API, use this command:
cometApi.start({node:"app.comet-server.ru", dev_id:15})
- in parameter
node - set hostname of your own server - parameter
dev_id - use only if you use saas service comet-server.com
Step 2.1 Send Message to Server
Send Ajax query to PHP back-end:
function sendMessage(name, text)
{
   $.ajax({
        url: "http://comet-server.org/doc/CppComet/chat-example/chat.php",
        type: "POST",
        data:"text="+encodeURIComponent(text)+"&name="+encodeURIComponent(name)
   });
}
Step 2.2 Send CometQL Query for Comet Server
CometQL - It’s an API for work with comet server through MySQL protocol. (more info about CometQL).
Advantages of CometQL:
- Unified API for more than 12 programming languages
- Simple and intelligible query view
- PHP includes resources for maintaining persistent connections with MySQL and now, you can use it for co-working with comet server.
Connecting to comet server through MySQL protocol:
$host = "app.comet-server.ru";
$user = "15";
$password = "lPXBFPqNg3f661JcegBY0N0dPXqUBdHXqj2cHf04PZgLHxT6z55e20ozojvMRvB8";
$comet = mysqli_connect($host, $user, $password, "CometQL_v1");
if(mysqli_errno($comet))
{
echo "Error:".mysqli_error($link);
}
Send CometQL query for comet server for send message to other users:
$msg = Array( "name" => $_POST["name"], "text" => $_POST["text"] );
$msg = json_encode($msg);
$msg = mysqli_real_escape_string($comet, $msg);
$query = "INSERT INTO pipes_messages (name, event, message)" .
"VALUES('simplechat', 'newMessage', '".$msg."')";
mysqli_query($comet, $query);
if(mysqli_errno($comet))
{
echo "Error:".mysqli_error($comet);
}
else
{
echo "ok";
}
Step 3. Receive Message From Comet Server
Subscription code to the pipe on comet server. This callback will be called when somebody sends message into channel simplechat with event name newMessage.
cometApi.subscription("simplechat.newMessage", function(event){
    $("#web_chat").append('<b>'+HtmlEncode(event.data.name)+'</b>')
    $("#web_chat").append('<i>'+HtmlEncode(event.data.text)+'</i>')
    $("#web_chat").append('<br>')
})
Code for filtration received data:
function HtmlEncode(s)
{
  var el = document.createElement("div");
  el.innerText = el.textContent = s;
  s = el.innerHTML;
  return s;
}
Summary
In this article, I told you about using CppComet to create a simple chat. I hope it was interesting.
The CppComet project has many functions that we have not used in this article. It is:
- Authorization on comet server
- Getting time when user was online
- Tracking users status from JavaScript API in real time
- Sending message from JavaScript API
- Sending private message for user by his id
- And other functions
History
- 13th April, 2017: Initial version
