This article illustrates how to call a web service using SQL Server Integration Services (SSIS), store the XML results in a SQL Server database table, then query the XML using XQuery.
Introduction
Often enough, there is a huge benefit in knowing how to leverage SQL Server Integration Services to accomplish a data task that depends on a remote data source. This is a tutorial about a seemingly simple problem and solution that involves calling a web service from a SQL Server Integration Services package, storing the XML in an XML typed column in a SQL Server database table, then extracting the data using XQuery. Note that web services may also return JSON, which I'll explain and write a tutorial about later. This simple process and solution can be repeated to gather information from virtually any public web service. Use this method with care and purpose.
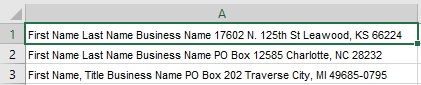
The problem I needed to solve was getting the city and state from incomplete address data where the only consistent information was the presence of a postal code. Parsing the string for the city and state was quickly ruled out because a city name can consist of two words, such as "Traverse City, MI". Of course, the postal codes were extracted from the string, which was simply because that data was at the end of every address and it was either 5 digits or 5 digits plus another 4 separated by a hyphen.
This tutorial is intended for intermediate to advanced database or SSIS developers. I include links to fundamental concepts that you should already know.
Here's an example of a few rows of data that came from an Excel worksheet sent to me by a business person. The actual contact and business names, as well as addresses, have been changed for confidentiality reasons.
Steps
- Import the address data from Excel into a new or existing table.
- Add a column to that table or a new one to hold the postal codes. Go to Step 3.
- Create a stored procedure to store the XML from the web service call. Go to Step 4.
- Create a WSDL file. Go to Step 5.
- Build and run the SSIS package. Go to Step 6.
- Query the XML data using XQuery. Go to Step 7.
Get Started
Step 1. Import the Address Data Into a Table
Unless you intend to save and reuse this component, simply use SQL Server Management Studio's Import and Export Wizard. For brevity, the detailed steps to accomplish this task are not included.

Figure 2. SQL Server Import and Export Wizard
Step 2. Add Columns to That Table or Another to Hold the Postal Codes and XML
Add a column to that table or a new one to hold the postal codes and XML returned from the web service call. For more information about the XML data type, see Implementing XML in SQL Server for more information.
Figure 3. Create table dbo.CityData to store postal codes
Figure 4. Create table dbo.WebServiceData to store XML
Step 3. Create a Stored Procedure to Get All of the Postal Codes
It's a best practice to use stored procedures so make it a habit if it isn't already.
Figure 5. Create a stored procedure to get all of the postal codes
Step 4. Create a Stored Procedure to Store the XML From the Web Service Call
There are a number ways to check for an existing row first before attempting to insert one. The MERGE statement is great and can be written in such a way that performs exceptionally! Read more about the MERGE statement here: MERGE (Transact-SQL). Considering that I will not be saving this code for repeat use in a production environment, for simplicity, I used IF NOT EXISTS ...
Figure 6. Create a stored procedure to store the XML
Step 5. Create a WSDL File
For instance, create an empty WSDL file named getcitybypostalcode.wsdl. This file will be used by the SSIS package in Step 7. See Understanding WSDL for more information about Web Service Definition Description (WSDL) files.
In your working directory, right click, click "New" then click "Text Document". Name the file according (i.e., getcitybypostalcode.wsdl).
Figure 7. Empty WSDL file
Step 6. Build and Run the SSIS Package
Step 6.1
For this project, I am using Visual Studio 2015 with Update 3 installed. Create a new Integration Services project and name it "Call Web Service".
Figure 8. Create a new Integration Services Project in Visual Studio 2015
Step 6.2
Add a new connection manager to connect to your SQL Server instance and database. For various reasons that are not explained here, I've chosen to use the ADO.NET Connection Manager. OLE DB has been deprecated since SQL Server 2012. There are some great blog posts comparing the ODBC, OLE DB and ADO.NET connection managers. Here's one if you're interested in further reading on that topic: Click here.
Figure 9. Create a new connection manager (ADO.NET Connection Manager)
Step 6.3
Add package variables city, postalCode and postalCodes with the following data types.
Figure 10. Create package variables
Step 6.4
Configure an Execute SQL Task to call the dbo.pr_GetPostalCodes stored procedure.
Figure 11. Configure an Execute SQL Task
Step 6.5
Map the Execute SQL Task Result Set to the postalCode variable. Set the Result Name to zero ("0") as shown in figure 12.
Figure 12. Map the Execute SQL Task Result Set to a variable
Step 6.6
Add a Foreach Loop Container, then configure the Collection and Variable Mappings.
Figure 13. Foreach Loop Container
Step 6.7
Configure the Collection settings for the Foreach Loop Container.
Figure 14. Foreach Loop Container Collection Settings
Step 6.8
Configure the Variable Mappings for the Foreach Loop Container. Use postalCode (singular) for each postal code in the postalCodes object.
Figure 15. Foreach Loop Container Variable Mappings
Next, add the Web Service Task that will be configured to call the GetInfoByZip web service for each postal code. The XML result for each call will be stored in the database. Let's take a look at the web service.
Step 6.9
Review and try out the public web service GetInfoByZip, which at the time of this writing is a free and public web service that returns the State Code, City, Area Code, Time Zone, and Zip Code by Zip Code as XML. There are several other methods available.
Figure 16. Public web service GetInfoByZip
Figure 17. Try out GetInfoByZip
Step 6.10
Create a new HTTP Connection Manager.
- Right click in the Connection Managers pane and click New Connection… and select HTTP.
- Click Add…
- Enter the Server URL to obtain the WSDL for the web service: http://webservicex.net/uszip.asmx?WSDL and click OK.
Figure 18. Add an HTTP Connection Manager
Step 6.11
Add a Web Service Task to the Foreach Loop Container. In the following steps, you're going to download and save the WSDL file and configure the Input and Output settings of the Web Service Task.
- On the General tab, for the
HttpConnection property, select the HTTP Connection Manager created in the previous step. - For the
WSDLFile, click the ellipsis button and browse to the file created in step 5. - Set the
OverwriteWSDLFile property to True. - Click the Download WSDL button. You should be prompted with a message box that reads, "
The specified Web Services Description Language (WSDL) file was downloaded successfully." (See Figure 19 below.)
Figure 19. Web Service Task
Figure 20. Download WSDL file
Step 6.12
Configure the Input and Output properties for the Web Service Task.
- On the Input tab, set the Service property to
USZip. - Set the Method property to
GetInfoByZip. - Clicking the
checkbox in the Variable column will switch the Value column to a dropdown list. - Select
User::postalCode. - On the Output tab, using the dropdown list, set the OutputType to
Variable. - Using the dropdown list, set the Variable to
User::city and click OK.
Figure 21. Configure Input properties of the Web Service Task
Step 6.13
Add another Execute SQL Task and configure it to call the dbo.pr_AddCity stored procedure. Configure the sequence between the Web Service Task and the Execute SQL Task accordingly.
Figure 22. Add an Execute SQL Task to the Foreach Loop Container
Step 6.14
Configure the General tab of the Execute SQL Task.
Figure 23. Configure General properties of the Execute SQL Task
Step 6.15
Configure the Parameter Mapping properties of the Execute SQL Task. This is the last step before running the package. Then we'll query the data using XQuery.
- Click the Add button.
- Select
User::city from the Variable Name dropdown list. - Select XML as the Data Type.
- Type "
city" without the quotation marks as the Parameter Name and click OK.
Figure 24. Configure Parameter Mapping properties of the Execute SQL Task
Figure 25. Finished SSIS Package
Step 6.16
Before running the package, to see the package complete quickly, I recommend returning just 10 rows from the dbo.pr_GetPostalCodes stored procedure. Run the package.
Figure 26. Running SSIS Package
Step 7. Query the XML Data using XQuery
Examine the results of the web service calls in table dbo.WebServiceData. Click on any row to see the XML in another tab as shown in figure 27.
Figure 27. Contents of table dbo.WebServiceData
Figure 28. XML returned from GetInfoByZip
Now, use XQuery to extract the data from its elements! Here are a couple of different XQuery methods.
Figure 29. Using XQuery #1 Query all rows
Figure 30. Using XQuery #1 results
Figure 30. Using XQuery #2 Query an individual XML data type
Back to Top
Outcome
While writing this tutorial, I realized how ingrained the information becomes when you focus on teaching it. This is my very first tutorial! As of 2017, I have been a Microsoft SQL Server guy for just over 17 years. Prior to SQL Server, I spent about 5 years developing databases using Microsoft Access. If you're reading this, I encourage you to write about something that interests you. The process makes you better at whatever that is.
History
- 17th April, 2017: Initial version

