Modern CI/CD process especially in an agile/scrum environment often includes a deployment step so the automated and manual testing can be done. Depending on specifics of the development process, it can be implemented in a variety of ways, but for a .NET Web Application, the most convenient way is to call the MSBuild to publish a package to a target machine running IIS and instrumented with the Web Deploy.
Most of the .NET developers are familiar with the publishing capability of the Visual Studio. Exactly the same result can be achieved from a command line using MSBuild which can be easily implemented in most of the modern build systems like VSTS, TFS, TeamCity, etc.
This article assumes familiarity with the Visual Studio, Web Deploy and all the necessary configuration procedures to make the deployment to a remote machine work.
Let's start from refreshing how the Visual Studio publishing feature works so we understand the mechanics behind the scenes and the main concept of using MSBuild for publishing.

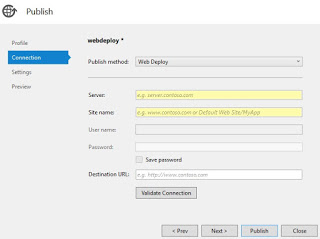
A web project can be easily published from Visual Studio using a publishing wizard that collects a number of parameters and then executes the publishing command.
First, fill in all the parameters that represent our deployment environment, namely, Server: a target machine DNS name or IP, Site name: an IIS web site name, User name, Password: an IIS user's name and password that has access to the above web site. Then, click publish and the Visual Studio will try and connect to a target machine using the Web Deploy protocol, authenticate with a given user name and password, and command the Web Deploy agent to deploy a package to the given IIS web site.
If the publishing was successful (because all values are correct and the configuration is right), we would save the set of parameters as a publish profile XML file that we could easily use in the future. Let's examine the content of the publish profile file. It could be pretty elaborated but we are only interested in the most important part of that file that describes the deployment parameters that we entered in the publishing wizard.
="1.0"="utf-8"
<Project ToolsVersion="4.0"
xmlns="http://schemas.microsoft.com/developer/msbuild/2003">
<PropertyGroup>
<WebPublishMethod>MSDeploy</WebPublishMethod>
<MSDeployPublishMethod>WMSVC</MSDeployPublishMethod>
<MSDeployServiceURL>server.contoso.com</MSDeployServiceURL>
<DeployIisAppPath>www.contoso.com</DeployIisAppPath>
<UserName>user_name</UserName>
<LaunchSiteAfterPublish>False</LaunchSiteAfterPublish>
<ExcludeApp_Data>False</ExcludeApp_Data>
<SkipExtraFilesOnServer>True</SkipExtraFilesOnServer>
<EnableMSDeployBackup>False</EnableMSDeployBackup>
</Project>
The first two lines in the PropertyGroup define the publishing method: MSDeploy and WMSVC. If you are familiar with the Web Deploy, you understand that MSDeploy is the command line utility and the WMSVC is a Web Management service that runs on a target machine. That basically defines a communication protocol. Further, there are deployment target attributes and some parameters that define the Web Deploy's behavior. The only one thing we don't see is the user's password, but if it was there, it would be wrapped in the "Password" tag.
The important conclusion from this observation is this: we know the names of the parameters for all our values and we can try and map them to the MSBuild command line.
MSBuild command line syntax allows passing a various number of random parameters like this:
msbuild /p:name=value
so we could combine a command line that looks like this:
msbuild /p:WebPublishMethod=MSDeploy /p:MSDeployPublishMethod=WMSVC
/p:MSDeployServiceUrl=server.contoso.com /p:UserName=user_name /p:Password=password
/p:DeployIISAppPath=www.contoso.com /p:SkipExtraFilesOnServer=True ...
Basically, we just map the XML file tags to the names and assign the corresponding values. This is going to work but we also need to add some important additional parameters for the MSBuild itself, so the final version will look like this:
msbuild /p:DeployOnBuild=True /p:AllowUntrustedCertificate=True
/p:CreatePackageOnPublish=True /p:WebPublishMethod=MSDeploy /p:MSDeployPublishMethod=WMSVC
/p:MSDeployServiceUrl=server.contoso.com /p:UserName=user_name /p:Password=password
/p:DeployIISAppPath=www.contoso.com /p:SkipExtraFilesOnServer=True
Finally, let's mention that when using this command line with a build system like VSTS or TeamCity, it's recommended to replace values like URLs, names and passwords with the parameters that are defined in a separate scope. The publish command line adapted for VSTS or TFS would look like this:
msbuild /p:DeployOnBuild=True /p:AllowUntrustedCertificate=True
/p:CreatePackageOnPublish=True /p:WebPublishMethod=MSDeploy /p:MSDeployPublishMethod=WMSVC
/p:MSDeployServiceUrl=$(IisHost) /p:UserName=$(IisUser) /p:$(IisPassword)
/p:DeployIISAppPath=$(IisSite) /p:SkipExtraFilesOnServer=True
