Introduction
Model view controller (MVC) is a software architectural pattern for developing web applications. It divides a given application into three interconnected parts.
Model - The model represents the data. The model does not depend on the controller or the view.It is a virtual representation of data used to perform any opperaton in the project.
View - This is responsible for displaying the UI to the user.
Controller - It mainly handle the incomming request coming from browser and process these requests to implement View.
The MVC design pattern decouples these major components allowing us for code reusability and parallel development.
In this pattern Controller receives all incomming requests from browser and then works with the Model to identify the data used to create a view. The View then uses the data and generate a final presentable UI.
Here in this article we will learn how to create a real time project using MVC architecture.
Table of contents
Creating multi-layer MVC project
- Setting up project layers.
- creating UI,BLL,DAL for the project.
- Understanding the flow between the layers.
Dynamic Home Page Design for the Project
- Creating Master page for the project
- A slider in the Homepage.
- Dynamicly data to populate in Home page.
Working with Database
- Creating Sample Table Structure,
- Writting multi-purpose Store procedure.
Master Details Entry for the Project
- Creating a form for Patient Entry.
- Displaying the patient entry using a MVC web grid.
- Template entry of for the project.
- Displaying all template with(Searching,Sorting) using Jquery DataTable.
Setting Up Project Layers
Before setting up project layer let me tell you all what a layer exactly in a project.
Layers refer to the internal architecture of a project,For ex: You divide your project into different layers like Data access layer, Business logic layer,User Interface layer etc.. So they are internal to the project, and these layers interact with each other internally to form the entire working component.
The main benefits of the layered architectural style are:
Abstraction,Isolation,Reusability, Testability.
while creating project layers please make focus on following things-
- Beware of Circular Dependency
- Each layer should have their own Responsibility(SRP).
- The layers which are commonly used try to make these layers as parallel dependant.
So lets see what exactly Circular dependency is and how it will affect the project architecture .


If you try to reference two class libraries with each other,then Visual Studio throws circular referance error.So while working on project please avoid this scenario.
If we have 2 layers in the project,The Layer-1 is referance to the Layer-2 ,that mean some resources of layer-2 will be consumed by Layer-1, similarly at any point of time Layer-2 wants any resources from Layer-1 then we need to referance it to layer-1.
If we will do this a Circular dependency error will arise,so to overcome it we need to create an intermediate module between the 2 layers.This will be clearly describe while start working on project.
Here is how our project flow look alike.


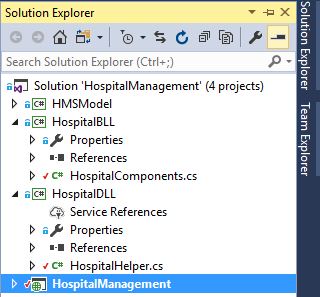
So as per the above sketch diagram i have added the projects layer as shown below.


In this diagram you can find out how the project layers are related with each other,

Here is the UI or MVC layer of the application.In this you will find a Template Folder which basically contain a template a Home Page for this project.If you want there are several templates available in internet which you can download and use as for your project.


I have a BussinessLogicLayer called (HospitalBLL).This Layer is the intermediate layer between the main Project and the DataAccess Layer(HospitalDLL).The BussinessLogicLayer contains all the Bussiness rules, The business logic layer (BLL) contains logic specific to the business domain. Also Business logic is used to maximize reuse opportunities.

As it is very specific to the bussiness we will work on it as per our requirement.Here in this diagram i have shown the bussiness component.We will start coading on it while interacting with the project.
I have added a class as HospitalComponent.cs, but basically the BLL should be based on mainly Controller requirement.A single controller can have one BLL or may be 2-3 controllers have one BLL component.
Now Lets check what is this Data Access Layer.Data Access Layer is mainly used to interact with the DB,so its contains all the opperation related to the DataBase.

using System;
using System.Collections.Generic;
using System.Linq;
using System.Text;
using System.Threading.Tasks;
using System.Data;
using System.Data.SqlClient;
using System.Configuration;
using HMSMODEL;

namespace HospitalDLL
{
    public class HospitalHelper
    {

        SqlCommand cmd;
        DataTable dt;
        SqlDataAdapter ad;
        public static SqlConnection connect()
        {

            string myconnection = ConfigurationManager.ConnectionStrings["connectHMS"].ToString();
            SqlConnection connection = new SqlConnection(myconnection);
            if(connection.State==ConnectionState.Open)
            {
                connection.Close();
            }
            else
            {
                connection.Open();
            }
            return connection;


        }

        public DataTable getData( string str)
        {
            ad = new SqlDataAdapter(str, HospitalHelper.connect());
            dt = new DataTable();
            ad.Fill(dt);
            return dt;
        }

        public bool DML(SqlCommand cmd)
        {
            int result = 0;
            using (connect())
            {

                using (cmd)
                {
                    cmd.Connection = connect();

                    result = cmd.ExecuteNonQuery();

                }
            }

           if(result>0)
            {
                return true;

            }
           else
            {
                return false;
            }


        }


        public DataTable GetALL(SqlCommand cmd)
        {
            ad = new SqlDataAdapter();
            DataTable dt = new DataTable();

            using (connect())
            {

                using (cmd)
                {
                    cmd.Connection = connect();
                    ad.SelectCommand = cmd;

                    ad.Fill(dt);

                }
            }

            return dt;


        }


    }
}
Project Description:
Iclinic is a platform which bridges the gap between the doctors,patients and clinic. This platform is concerned about end to end consultation between the doctors and patients via the medium of digitating clinical Ticketing system.
In order to achive this facility we have provided a portal where a patient can register his symptoms,get a online ticket, later can consult with any of the collabarated clinic.During his/her visit to clinic they need to quote the registration id which will be later process by doctor.
Here in this article we will mainly focus on creating Home page,Master entry forms,etc. Here we have a dynamic Home Page where we have(Slider,dynamic content update,etc).
Let us see the creating of Home Page with Slider.

Lets check the steps to create a Carousal slider.
A carousal slider actually contains 3 parts.
- The Banners
- The Indecators
- The Controls

Indecators are specific circular Icons which the sliding/fading kind of effects inside the banner.These are represented as a floating content over the banner images.Indecators are represented in a ordered list manner.We need to fix the first list item as active,thus making the slidding effect to be started from the first image and later slidded to second,third and soon.
           <ol class="carousel-indicators">
                        <li data-target="#responsive-slider" data-slide-to="0" class="active"></li>
                        <li data-target="#responsive-slider" data-slide-to="1"></li>
                        <li data-target="#responsive-slider" data-slide-to="2"></li>
                        <li data-target="#responsive-slider" data-slide-to="3"></li>
                         <li data-target="#responsive-slider" data-slide-to="4></li>

                    </ol>
As we have thought to fit 3 images in banner for that purpose we have created 3 indecators,the process of which is described above.
The Banner area contains a set of images which will be shown to the users with an animated effect.We can give as much images as we want for the banner area, which will be later processed by indecators.The process is shown below.
<div class="slides" data-group="slides">
                        <ul>
                            <li>
                                <div class="slide-body" data-group="slide">
                                    <img src="~/Template/img/2.jpg" alt="">
                                    <div class="caption header" data-animate="slideAppearUpToDown" data-interval="20" data-length="300">

                                </div>
                            </li>
                            <li>
                                <div class="slide-body" data-group="slide">
                                    <img src="~/Template/img/1.jpg" alt="">
                                    <div class="caption header" data-animate="slideAppearDownToUp" data-interval="20" data-length="300">

                                    </div>
                                </div>
                            </li>
                            <li>
                                <div class="slide-body" data-group="slide">
                                    <img src="~/Template/img/10.jpg" alt="">
                                    <div class="caption header" data-animate="slideAppearUpToDown" data-interval="20" data-length="300">

                                    </div>
                                </div>
                            </li>
     <li>                                 <div class="slide-body" data-group="slide">                                     <img src="~/Template/img/10.jpg" alt="">                                     <div class="caption header" data-animate="slideAppearUpToDown" data-interval="20" data-length="300">                                                                         </div>                                 </div>                             </li>

                        </ul>
                    </div>
The first part contain all the slider image with the delay time mentioned in "data-interval".
Here is the image referances inside the project.


The final step is to create controls for the carousel. This can be achived by using a class called "data-slide" with specifically two arguments "previous & next". When being rendered, the content is shown as two indicators over the banner. The process is shown below-
<a class="slider-control left" href="#" data-jump="prev"><i class="fa fa-angle-left fa-2x"></i></a>
<a class="slider-control right" href="#" data-jump="next"><i class="fa fa-angle-right fa-2x"></i></a>
As we can see, two controls as left and right angle icon, are being shown over the banner.
The complete corousel format is being shown below, for further clarification.
<!-- Responsive slider - START -->
    <div class="slider">
        <div class="container">
            <div class="row">
                <div class="responsive-slider" data-spy="responsive-slider" data-autoplay="true">
                    <ol class="carousel-indicators">
                        <li data-target="#responsive-slider" data-slide-to="0" class="active"></li>
                        <li data-target="#responsive-slider" data-slide-to="1"></li>
                        <li data-target="#responsive-slider" data-slide-to="2"></li>
                    </ol>
                    <div class="slides" data-group="slides">
                        <ul>
                            <li>
                                <div class="slide-body" data-group="slide">
                                    <img src="~/Template/img/2.jpg" alt="">
                                    <div class="caption header" data-animate="slideAppearUpToDown" data-interval="20" data-length="300">

                                </div>
                            </li>
                            <li>
                                <div class="slide-body" data-group="slide">
                                    <img src="~/Template/img/1.jpg" alt="">
                                    <div class="caption header" data-animate="slideAppearDownToUp" data-interval="20" data-length="300">

                                    </div>
                                </div>
                            </li>
                            <li>
                                <div class="slide-body" data-group="slide">
                                    <img src="~/Template/img/10.jpg" alt="">
                                    <div class="caption header" data-animate="slideAppearUpToDown" data-interval="20ssssssss" data-length="300">


                                    </div>
                                </div>
                            </li>

                        </ul>
                    </div>

                    <a class="slider-control left" href="#" data-jump="prev"><i class="fa fa-angle-left fa-2x"></i></a>
                    <a class="slider-control right" href="#" data-jump="next"><i class="fa fa-angle-right fa-2x"></i></a>
                </div>
            </div>
        </div>
    </div>
    <!-- Responsive slider - END -->

Actually in this project we have used a template,if you want to use you can download any template and use in your project.
Now our next thing is to create a dynamic notification which will give information to the user in the Home Page.
Here is the table for the above requirements.
USE [HMS]
GO
SET ANSI_NULLS ON
GO
SET QUOTED_IDENTIFIER ON
GO
CREATE TABLE [dbo].[tbl_Template](
[Header] [nchar](250) NOT NULL,
[Status] [bit] NOT NULL,
[id] [int] IDENTITY(1,1) NOT NULL,
[Description] [nvarchar](max) NULL
) ON [PRIMARY] TEXTIMAGE_ON [PRIMARY]
GO
Now create a multipurpose stored procedure to perform all functionality.
USE [HMS]
GO
SET ANSI_NULLS ON
GO
SET QUOTED_IDENTIFIER ON
GO
ALTER procedure [dbo].[sp_SaveTemplates]
(
@Header nvarchar(300),
@Description nvarchar(max),
@status bit
)
AS
Begin
INSERT INTO tbl_Template(Header,Description,Status) VALUES(@Header, @Description,@Status)
End
Template entry Form:- This form is used to dynamically entry and template for the patient and shows there details in Home page.
So now we will have the following form for template entry.Here is the image given below.

Here is the code for the following view.
@model HMSMODEL.Template

@{
    ViewBag.Title = "TemplateEntry";
}


<script src="https://code.jquery.com/jquery-1.11.1.min.js"></script>


<script src="https://cdn.datatables.net/1.10.4/js/jquery.dataTables.min.js"></script>
<link rel="stylesheet" href="https://cdn.datatables.net/1.10.4/css/jquery.dataTables.min.css">

<style type="text/css">
    .textbox {
        width: 600px;
        height: 100px
    }


    .Checkbox {
        width: 20px;
        height: 20px;
        display: block;
        background: url("link_to_image");
    }
</style>
<style type="text/css">
    .panel-body {
        background-color: #C0C0C0;
    }
</style>


@using (Html.BeginForm("TemplateEntry", "Home", FormMethod.Post))
{
    @Html.AntiForgeryToken()


    <div class="panel panel-default">
        <div class="panel-heading">
            <h3 class="panel-title"><b>Template Details Entry Form</b></h3>
        </div>
        <div class="panel-body">

            <div class="row; ba">
                <div class="span6">

                    @Html.ValidationSummary(true)

                    <div class="form-group">
                        @Html.LabelFor(model => model.Header, new { @class = "control-label col-md-2" })
                        <div class="col-md-10">
                            @Html.EditorFor(model => model.Header)
                            @Html.ValidationMessageFor(model => model.Header)
                        </div>
                    </div>

                    <br />
                    <br />

                    <div class="form-group">
                        @Html.LabelFor(model => model.Description, new { @class = "control-label col-md-2" })
                        <div class="col-md-10">

                            @Html.TextAreaFor(model => model.Description, new { @class = "textbox" })

                            @Html.ValidationMessageFor(model => model.Description)
                        </div>
                    </div>
                    <br />
                    <br />
                    <div class="form-group">
                        @Html.LabelFor(model => model.Status, new { @class = "control-label col-md-2" })
                        <div class="col-md-10">
                            @Html.CheckBoxFor(model => model.Status, new { @class = "Checkbox" })

                            @Html.ValidationMessageFor(model => model.Status)
                        </div>
                    </div>

                </div>
                <br />
                <br />
                <br />

                <div class="form-group">
                    <br />
                    <br />
                    <div class="col-md-offset-2 col-md-10">
                        <input type="submit" value="Create" class="btn btn-info" />
                    </div>
                </div>
            </div>


        </div>
    </div>


}


<div>
    @Html.ActionLink("Back to List", "Index")
</div>
Here is the Home controller method where data is posted for saving.
HospitalBLL.HospitalComponents obj = new HospitalBLL.HospitalComponents();
This is the object of our bussiness Logic Layer.
And Here is the Template entry GET and POST Method.
        public ActionResult TemplateEntry()
        {

            return View();

        }
        [HttpPost]
        public ActionResult TemplateEntry(Template temp)
        {
            bool x = obj.tabEntery(temp);
            if(x==true)
            {
                ViewBag.result = "Data Saved Successfully";
                return View();


            }
            else
            {
                return View();
            }


        }
Now here is the HMS Model layer where we have the Template Classs.
using System;
using System.Collections.Generic;
using System.Linq;
using System.Text;
using System.Threading.Tasks;

namespace HMSMODEL
{
    public class Template
    {
        public int id { get; set; }
        public string  Header { get; set; }
        public bool Status { get; set; }
        public string Description { get; set; }
    }
}
Now this is the "tabEntery" method on HospitalBLL.
 public bool tabEntery(Template temp)
        {

            cmd = new SqlCommand("sp_SaveTemplates");
            cmd.CommandType = CommandType.StoredProcedure;
            cmd.Parameters.AddWithValue("@Header", temp.Header);
            cmd.Parameters.AddWithValue("@Description", temp.Description);
            cmd.Parameters.AddWithValue("@Status", temp.Status);
           bool result=  _hospitalhelper.DML(cmd);
            if(result==true)
            {
                return true;

            }

            else
            {
                return false;
            }
        }

Now after creating templates if you want to fetch all template in a dynamic manner,you have the following code.
        HospitalBLL.HospitalComponents obj = new HospitalBLL.HospitalComponents();
        DataTable dt;

         public ActionResult getData()
        {

            dt = new DataTable();

            dt = obj.getTemplateData();


            List<Template> list = new List<Template>();

            for (int i = 0; i < dt.Rows.Count; i++)
            {
                Template temp1 = new Template();
                temp1.id = Convert.ToInt32(dt.Rows[i]["id"]);
                temp1.Header = dt.Rows[i]["Header"].ToString();
                temp1.Description = dt.Rows[i]["Description"].ToString();
                list.Add(temp1);
            }
            var data = list;
            return Json(new { data = data }, JsonRequestBehavior.AllowGet);
        }
now here is how we will design the view to show the Templates in index page.
  @model IEnumerable<HMSMODEL.Template>

@{
    ViewBag.Title = "ViewTemplate";
}


<script src="~/Scripts/jquery-1.10.2.min.js"></script>
<br />

<div style="width:90%; margin:0 auto; background-color:blanchedalmond">
    <table id="myTable">
        <thead>
            <tr>
                <th>ID</th>
                <th>Header</th>
                <th>Description</th>

            </tr>
        </thead>
    </table>
</div>


    @* CSS for the DataTable *@
<link href="//cdn.datatables.net/1.10.9/css/jquery.dataTables.min.css" rel="stylesheet" />


<style>
    tr.even {
        background-color:blueviolet;
    }
</style>
@* Load datatable js *@
@section Scripts{
    <script src="//cdn.datatables.net/1.10.9/js/jquery.dataTables.min.js"></script>
    <script>
        $(document).ready(function () {
            $('#myTable').DataTable({
                "ajax": {
                    "url": "/home/getData",
                    "type": "GET",
                    "datatype": "json"
                },
                "columns" : [
                        { "data": "id", "autoWidth": true },
                        { "data": "Header", "autoWidth": true },
                        { "data": "Description", "autoWidth": true }

                ],
                select: true


            });
        });

    </script>
    }

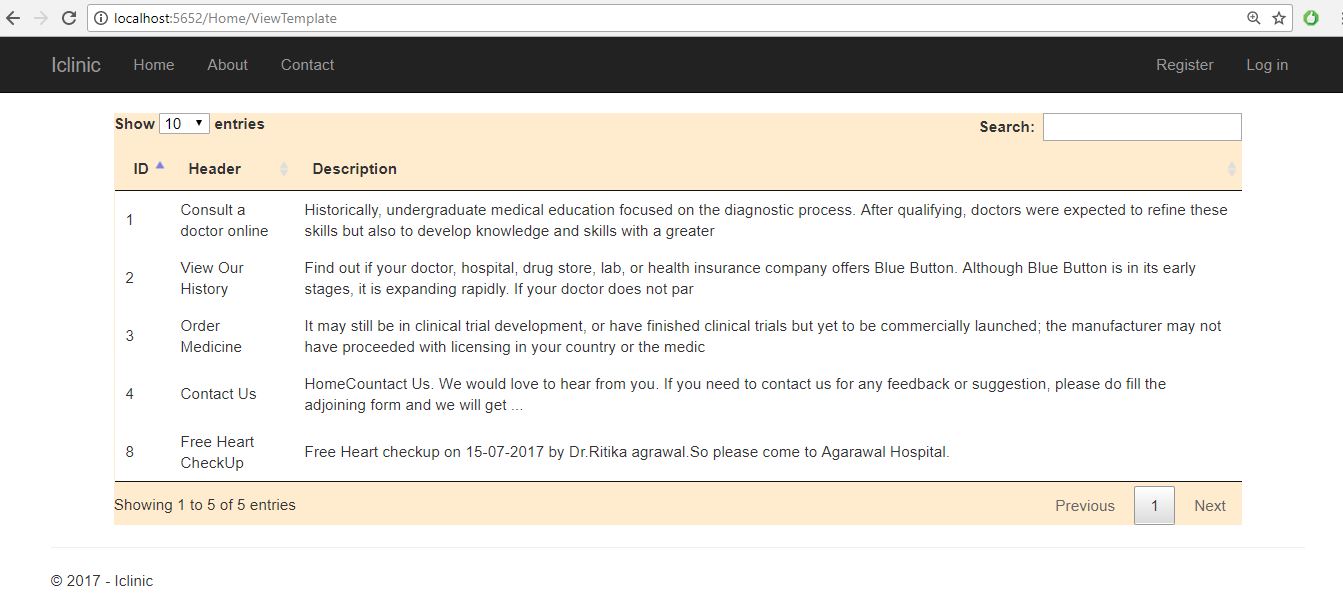
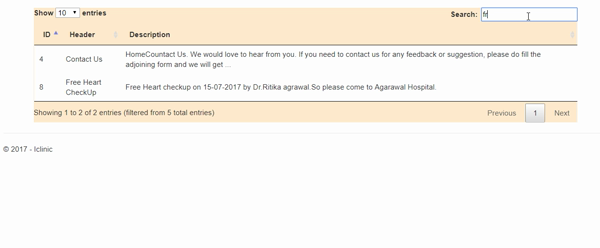
To design this we have used Jquery DataTable.We have enabled paging,sorting,serching functionality as shown below.


patient Entry form:This is the form where patient entry their details to get consulted with a doctor.
Now lets desing a patient Entry form as follow.

Here is the complete View code.
@model HMSMODEL.PatientEntry

@{
    ViewBag.Title = "PatientsEntry";

}


    <!-- Bootstrap -->
    <link href="~/Template/css/bootstrap.min.css" rel="stylesheet" />
<style type="text/css">
    .panel-body {
        background-color:#C0C0C0;
    }
</style>


@{

    if (TempData["alertMessage"]!=null)
    {
        <script type="text/javascript">
            alert("@TempData["alertMessage"]");

        </script>
    }
    else
    {

    }

}


<h4  style="text-align:center;color:aquamarine"></h4>

@using (Html.BeginForm())
{
    @Html.AntiForgeryToken()

    <br />


    <div class="panel panel-default">
        <div class="panel-heading">
            <h3 class="panel-title">Patients Details Entry Form</h3>
        </div>
        <div class="panel-body">

            <div class="row; ba">
                <div class="span6">

                    @Html.ValidationSummary(true)
                    <div class="form-group">
                        @Html.LabelFor(model => model.FirstName, htmlAttributes: new { @class = "control-label col-md-2" })
                        <div class="col-md-10">
                            @Html.EditorFor(model => model.FirstName, new { @class = "form-control", id = "txt_firstname" })
                            @Html.ValidationMessageFor(model => model.FirstName)
                        </div>
                    </div>
                    <br />
                    <br />
                    <div class="form-group">
                        @Html.LabelFor(model => model.LastName, htmlAttributes: new { @class = "control-label col-md-2" })
                        <div class="col-md-10">
                            @Html.EditorFor(model => model.LastName, new { @class = "form-control" })
                            @Html.ValidationMessageFor(model => model.LastName)
                        </div>
                    </div>
                    <br />
                    <div class="form-group">
                        @Html.LabelFor(model => model.Age, htmlAttributes: new { @class = "control-label col-md-2" })
                        <div class="col-md-10">
                            @Html.EditorFor(model => model.Age, new { @class = "form-control" })
                            @Html.ValidationMessageFor(model => model.Age)
                        </div>
                    </div>
                    <br />
                    <div class="form-group">
                        @Html.LabelFor(model => model.Address, htmlAttributes: new { @class = "control-label col-md-2" })
                        <div class="col-md-10">
                            @Html.EditorFor(model => model.Address, new { @class = "form-control" })
                            @Html.ValidationMessageFor(model => model.Address)
                        </div>
                    </div>
                    <br />
                    <div class="form-group">
                        @Html.LabelFor(model => model.Gender, htmlAttributes: new { @class = "control-label col-md-2" })
                        <div class="col-md-10">
                            Male:   @Html.RadioButton("Gender", "Male")
                            Female: @Html.RadioButton("Gender", "Female")
                        </div>
                    </div>
                    <br />
                    <div class="form-group">
                        @Html.LabelFor(model => model.EntryFee, htmlAttributes: new { @class = "control-label col-md-2" })
                        <div class="col-md-10">
                            @Html.EditorFor(model => model.EntryFee, new { @class = "form-control" })
                            @Html.ValidationMessageFor(model => model.EntryFee)
                        </div>
                    </div>
                    <br />

                    <div class="form-group">
                        @Html.LabelFor(model => model.Description, htmlAttributes: new { @class = "control-label col-md-2" })
                        <div class="col-md-10">
                            @Html.TextAreaFor(model => model.Description, new { @class = "form-control"  })
                            @Html.ValidationMessageFor(model => model.Description)
                        </div>
                    </div>
                    <br />
                    <br />

                    <div class="form-group">
                        <br />
                        <div class="col-md-offset-2 col-md-10">
                            <input type="submit" value="SAVE" class="btn btn-info" onclick="location.href='@Url.Action("PatientsEntry", "PatientsEntry")'" />
                            <input type="submit" id="btn_Show" value="SHOW" class="btn btn-info" onclick="location.href='@Url.Action("patientDetails", "PatientsEntry")'" />

                        </div>
                    </div>
                </div>


                </div>
        </div>
    </div>


        }

        <div>
            @Html.ActionLink("Back to List", "Index")
        </div>
Now here is the Patient entry controller for all functions.
using System;
using System.Collections.Generic;
using System.Linq;
using System.Web;
using System.Web.Mvc;
using HMSMODEL;
using System.Data;
namespace HospitalManagement.Controllers
{
public class PatientEntryController : Controller
{
HospitalBLL.HospitalComponents obj = new HospitalBLL.HospitalComponents();
DataTable dt;
public ActionResult PatientsEntry()
{
return View();
}
[HttpPost]
public ActionResult PatientsEntry(PatientEntry patient)
{
if(ModelState.IsValid)
{
bool details = obj.PatientEntry(patient);
if (details == true)
{
TempData["alertMessage"] = "Success!!!";
ModelState.Clear();
return View();
}
else
{
ViewBag.SuccessMessage = "<p>Please try once!!!!!!</p>";
return View();
}
}
else
{
ViewBag.SuccessMessage =null;
return View();
}
}
public ActionResult patientDetails()
{
dt = new DataTable();
dt= obj.GetPatientEntry_onParticularDate();
List<PatientEntry> list = new List<PatientEntry>();
for (int i = 0; i < dt.Rows.Count; i++)
{
PatientEntry patient = new PatientEntry();
patient.ID = dt.Rows[i]["ID"].ToString();
patient.FirstName = dt.Rows[i]["FirstName"].ToString();
patient.LastName = dt.Rows[i]["LastName"].ToString();
patient.Date = Convert.ToDateTime(dt.Rows[i]["date"]);
patient.Address = dt.Rows[i]["Address"].ToString();
patient.Age = Convert.ToInt32(dt.Rows[i]["Age"]);
patient.Description = dt.Rows[i]["Description"].ToString();
list.Add(patient);
}
return View(list);
}
}
}
The model is given here
using System;
using System.Collections.Generic;
using System.Linq;
using System.Text;
using System.Threading.Tasks;

namespace HMSMODEL
{
   public class PatientEntry
    {
        public string ID { get; set; }
        public string FirstName { get; set; }
        public string LastName { get; set; }
        public int Age { get; set; }
        public string Address { get; set; }
        public string Description { get; set; }
        public DateTime Date { get; set; }
        public int EntryFee { get; set; }
        public string Gender { get; set; }
    }
}
Here is the complete Bussiniss Logic for both Template entry and Patient Entry.
using HMSMODEL;
using HospitalDLL;
using System;
using System.Collections.Generic;
using System.Data;
using System.Linq;
using System.Text;
using System.Threading.Tasks;
using System.Data;
using System.Data.SqlClient;


namespace HospitalBLL
{
    public class HospitalComponents
    {

        HospitalHelper _hospitalhelper = new HospitalHelper();
        DataTable dt = new DataTable();
        SqlCommand cmd;


        public DataTable getTemplateData()
        {
            dt = _hospitalhelper.getData("select id ,Header ,LEFT(Description,200) as  Description from dbo.tbl_Template");
            if (dt.Rows.Count > 0)
            {

                return dt;
            }
            else
            {
                return dt;
            }

        }

        public bool tabEntery(Template temp)
        {

            cmd = new SqlCommand("sp_SaveTemplates");
            cmd.CommandType = CommandType.StoredProcedure;
            cmd.Parameters.AddWithValue("@Header", temp.Header);
            cmd.Parameters.AddWithValue("@Description", temp.Description);
            cmd.Parameters.AddWithValue("@Status", temp.Status);
           bool result=  _hospitalhelper.DML(cmd);
            if(result==true)
            {
                return true;

            }

            else
            {
                return false;
            }
        }

        public bool editTemplate(Template temp)
        {
            cmd = new SqlCommand("sp_EditTemplates");
            cmd.CommandType = CommandType.StoredProcedure;
            cmd.Parameters.AddWithValue("@Header", temp.Header);
            cmd.Parameters.AddWithValue("@Description", temp.Description);
            cmd.Parameters.AddWithValue("@Status", temp.Status);
            cmd.Parameters.AddWithValue("@id", temp.id);
            _hospitalhelper.DML(cmd);
            return true;

        }
        public bool PatientEntry(PatientEntry patent)
        {
            patent.ID = Guid.NewGuid().ToString();

            cmd = new SqlCommand("SP_PatientEntry");
            cmd.CommandType = CommandType.StoredProcedure;
            cmd.Parameters.AddWithValue("@EntryId", patent.ID);
            cmd.Parameters.AddWithValue("@FirstName", patent.FirstName);
            cmd.Parameters.AddWithValue("@LastName", patent.LastName);
            cmd.Parameters.AddWithValue("@Age", patent.Age);
            cmd.Parameters.AddWithValue("@Address", patent.Address);
            cmd.Parameters.AddWithValue("@Description", patent.Description);
            cmd.Parameters.AddWithValue("@EntryFee",patent.EntryFee);
            cmd.Parameters.AddWithValue("@Gender",patent.Gender);

            cmd.Parameters.AddWithValue("@Date", DateTime.Today);

            cmd.Parameters.AddWithValue("@Opptype","Save");
           bool result= _hospitalhelper.DML(cmd);
            return result;


        }

        public DataTable GetPatientEntry_onParticularDate()
        {
            dt = new DataTable();
            cmd = new SqlCommand("SP_PatientEntry");
            cmd.CommandType = CommandType.StoredProcedure;
            cmd.Parameters.AddWithValue("@Opptype", "Getall");
            dt = _hospitalhelper.GetALL(cmd);
            return dt;


        }

    }
}
This is the table structure for patient Entry.
USE [HMS]
GO
SET ANSI_NULLS ON
GO
SET QUOTED_IDENTIFIER ON
GO
CREATE TABLE [dbo].[PatientEntry](
[Id] [int] IDENTITY(1,1) NOT NULL,
[EntryId] [nvarchar](150) NOT NULL,
[FirstName] [nvarchar](50) NULL,
[LastName] [nvarchar](50) NULL,
[Age] [int] NULL,
[Address] [nvarchar](350) NULL,
[Description] [nvarchar](max) NULL,
[Date] [date] NULL,
[EntryFee] [int] NULL,
[Gender] [nvarchar](10) NULL,
CONSTRAINT [PK_PatientEntry] PRIMARY KEY CLUSTERED
(
[EntryId] ASC
)WITH (PAD_INDEX = OFF, STATISTICS_NORECOMPUTE = OFF, IGNORE_DUP_KEY = OFF, ALLOW_ROW_LOCKS = ON, ALLOW_PAGE_LOCKS = ON) ON [PRIMARY]
) ON [PRIMARY] TEXTIMAGE_ON [PRIMARY]
GO
Here is the Stored Procedure for all Patient Related opperation.
USE [HMS]
GO
SET ANSI_NULLS ON
GO
SET QUOTED_IDENTIFIER ON
GO
ALTER PROCEDURE [dbo].[SP_PatientEntry]
(
@EntryId as nvarchar(150)=null,
@FirstName as nvarchar(50)=null,
@LastName as nvarchar(50)=null,
@Age as int=null,
@Address as nvarchar(350)=null,
@Description as nvarchar(max)=null,
@Date as Date=null,
@EntryFee as int=null,
@Gender as nvarchar(10)=null,
@Opptype as nvarchar(20)=null
)
AS
BEGIN
if (@opptype='Save')
begin
insert into [dbo].[PatientEntry]([EntryId],[FirstName],[LastName],[Age],[Address],[Description],[Date],[EntryFee],[Gender])
values(@EntryId,@FirstName,@LastName,@Age,@Address,@Description,GETDATE(),@EntryFee,@Gender)
end
if(@Opptype='Getall')
begin
select * from [dbo].[PatientEntry]
end
END
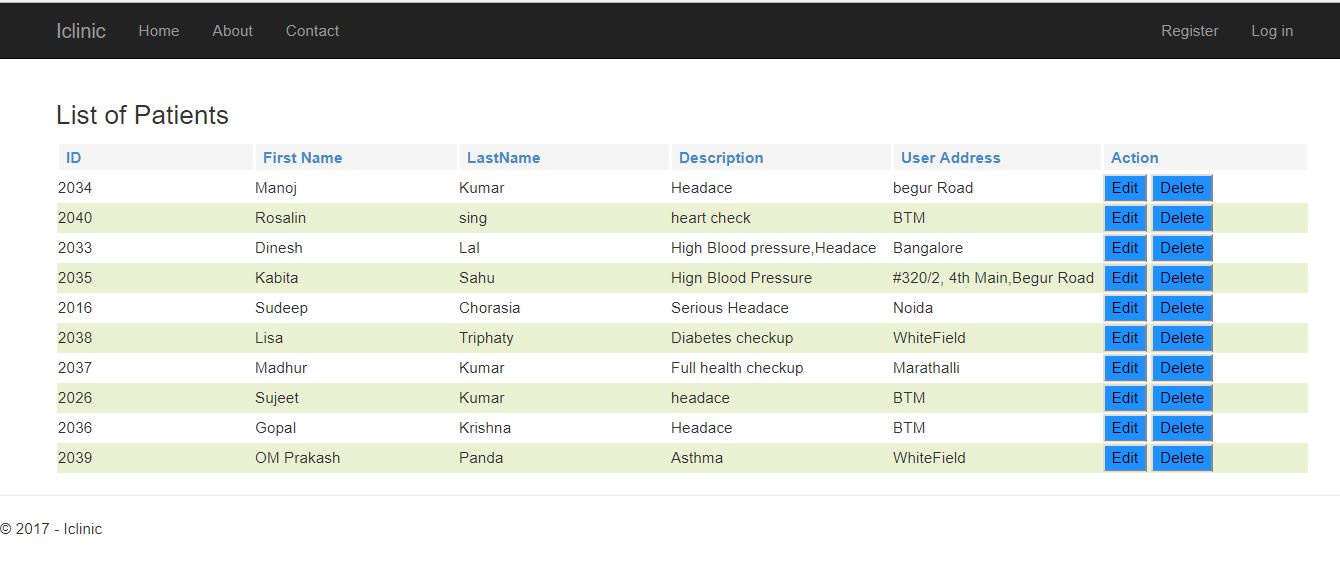
Here is the code for the View.Here we have used HTML Grid to show the data.
@model IEnumerable<HMSMODEL.PatientEntry>

@{
    ViewBag.Title = "patientDetails";

}

<script src="~/Scripts/jquery-1.10.2.min.js"></script>
<script src="~/Scripts/bootstrap.min.js"></script>
<link href="~/Scripts/Calender/calendrical.css" rel="stylesheet" />
<script src="~/Scripts/Calender/jquery.calendrical.js"></script>
<script src="http://ajax.googleapis.com/ajax/libs/jquery/1.11.3/jquery.min.js"></script>

<style type="text/css">
    .webgrid-table {
        font-family: "Trebuchet MS", Arial, Helvetica, sans-serif;
        font-size: 1.2em;
        width: 300px;
        display: table;
        border-collapse: separate;
        border: solid 1px;
        background-color: purple;
    }

        .webgrid-table td, th {
            border: 3px solid;
            padding: 3px 7px 2px;
            width: 230px;
        }

    .webgrid-header {
        background-color: whitesmoke;
        color: #FFFFFF;
        padding-bottom: 4px;
        padding-top: 5px;
        text-align: left;
        width: 20%;
    }

    .webgrid-footer {
    }

    .webgrid-row-style {
        padding: 3px 7px 2px;
    }

    .webgrid-alternating-row {
        background-color: #EAF2D3;
        padding: 3px 7px 2px;
    }
</style>

<script type="text/javascript">


    $(function () {
        $('.edit-mode').hide();
        $('.edit-user, .cancel-user').on('click', function () {
            var tr = $(this).parents('tr:first');
            tr.find('.edit-mode, .display-mode').toggle();
        });
            $.ajax({
                url: '/Home/Update/',
                data: JSON.stringify(UserModel),
                type: 'POST',
                contentType: 'application/json; charset=utf-8',
                success: function (data) {
                    window.location.href = window.location.href;
                }

            });

        });
    })
</script>
<br />


            <div>
                @{
                    var grid = new WebGrid(Model, canPage: true, rowsPerPage: 10);
                    grid.Pager(WebGridPagerModes.All);
                }


            </div>
            <h3>List of Patients</h3>

            <div>
                @grid.GetHtml(
                   headerStyle: "webgrid-header",
                footerStyle: "webgrid-footer",
                alternatingRowStyle: "webgrid-alternating-row",
                selectedRowStyle: "webgrid-selected-row",
                rowStyle: "webgrid-row-style",
                mode: WebGridPagerModes.All,
             columns: grid.Columns(

                grid.Column("ID", format: @<text>  <span class="display-mode">@item.ID </span> <label id="lbl_Empid" class="edit-mode">@item.ID</label> </text>, style: "col1Width"),

                grid.Column(columnName: "FirstName", header: "First Name", format: @<text> <span class="display-mode">@item.FirstName <label id="lblfirstName"></label> </span>  <input type="text" id="txt_firstName" value="@item.FirstName" class="edit-mode" /> </text>, style: "col2Width"),

                grid.Column(columnName: "LastName", header: "LastName", format: @<text> <span class="display-mode">@item.LastName <label id="lbl_lastname"></label> </span>  <input type="text" id="txt_lastName" value="@item.LastName" class="edit-mode" /> </text>, style: "col2Width"),

                grid.Column(columnName: "Description", header: "Description", format: @<text> <span class="display-mode">@item.Description <label id="lbl_desc"></label> </span>  <input type="text" id="txt_desc" value="@item.Description" class="edit-mode" /> </text>, style: "col2Width"),


                  grid.Column(columnName: "Address", header: "User Address", format: @<text> <span class="display-mode">@item.Address <label id="lbladdress"></label> </span>  <input type="text" id="txt_address" value="@item.Address" class="edit-mode" /> </text>, style: "col2Width"),

                  grid.Column("Action", format: @<text>

                    <button class="edit-user display-mode" style="background-color: #1E90FF; border-bottom-style: groove">Edit</button>
                    <button class="save-user edit-mode" style="background-color: #FF5733; border-bottom-style: groove">Save</button>
                    <button class="cancel-user edit-mode" style="background-color: #FF5733; border-bottom-style: groove">Cancel</button>
                    <button class="Delete-user display-mode" style="background-color: #1E90FF; border-bottom-style: groove">Delete</button>
                </text>, style: "col3Width", canSort: true)))


            </div>


        </div>

So in this way we can create a simple MVC multilayer project.This is a small part of our iclinic project , we will upload next screen in our part-2 of this project. A special thanks to Sujeet Tiwary and Sandeep Roy who is helping to make this application.
In the part-2 of this project we will see how to generate Ticket for patient(Using Crystal Report),work on Doctor Profile,Total patient checkup by a specific doctor and his income from a particular clinic.
History
Version-1.0.0.0
