In this article, you will see the steps to deploy persistent storage volumes in Kubernetes on Azure.
Introduction
In the previous article in this Devops series, we looked at deploying a production ready Kubernetes cluster on Azure using the 'KubeSpray' project. Having set that up, the next step is to make some data storage resources available to the cluster. We do this by creating an Azure file storage resource, and then linking it to the Kubernetes cluster using 'Secrets'. This article is a walk-through of the process.
Background
I can't really think of any reasonable project I've been involved in that didn't have the use of some data storage facility. When you head into the world of cloud, and containers, having a handy C:\ or D:z\ drive at your fingertips gets elusive. You start having to think of things like persistent volumes and cloud based blob storage and the like. Using Kubernetes, we can set up a data volume that appears to our container resources just like another large remote drive. This is a key piece of the puzzle when pulling different technologies together in an orchestrated manner like we are doing in this series of articles.
Setting Up a Kubernetes Data Volume on Azure
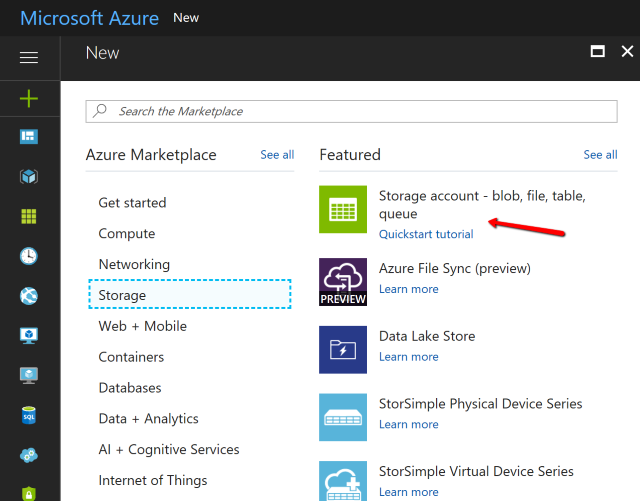
- In your control panel, from NEW action, select general storage resource:

- Give the resource a new unique name (lowercase), and use the same resource group as your main Kubernetes cluster:

- The new resource will become available in the resource group - select it for editing:

- In the details page, select the 'file' share section:

- In the file share page, click add-new, give the share a unique name, and specify the size of file storage you require (in GB):

After saving, you should see the newly created share available for use.

- Next, we need to get some security keys from the storage account.
Go back to the main resource group list where the account is located and select it.

- Once in the storage account, we then need to navigate to the 'Access keys' section and copy out the first key and the resource name.

- We can't use these keys directly in Kubernetes and need to convert them using
Base64. We can do this by taking each one of the items we copied and encoding. In this example, we use the online resource www.base64encode.org.

- We now need to take this information and give it to Kubernetes in a Yaml file.
SSH into the main Kubernetes master machine, and issue the following commands:
sudo su -
apt-get update
apt-get install -y cifs-utils

Now use nano to create a new yaml file:
nano azure-secret.yaml
Into this file, add the following contents, *replacing* the value for accountname and accountkey with the base64 encoded values of each (be careful with indenting/spacing in yaml files):
apiVersion: v1
kind: Secret
metadata:
  name: azure-secret
type: Opaque
data:
  azurestorageaccountname: <your encoded account name>
  azurestorageaccountkey: <your encoded key>

After making the changes, use CTRL + O <Enter> to write the file, then CTRL + X to exit:

This has set up the 'key secret' file, now we need to set up the main instruction file. In this case, it has been called 'azure.yaml' but it can be given any name.
The contents of this file are as follows:
apiVersion: v1
kind: Pod
metadata:
 name: shareddatastore
spec:
 containers:
  - image: kubernetes/pause
    name: azure
    volumeMounts:
      - name: azure
        mountPath: /mnt/azure
 volumes:
      - name: azure
        azureFile:
          secretName: azure-secret
          shareName: kubedatashare
          readOnly: false
- The important parts that you need to change are:
volumeMounts - given name of 'azure' and an internal virtual mount path. The name should match the name of the volume (next step/file-entry)volumes → name → this has been set to a default name of 'azure'. The next entry is 'azureFile' (defines the type of storage volume to Kubernetes). The 'secretName' refers to the data in the 'azure-secret.yaml' file we created earlier, and the shareName is the name we gave to the file share we created in step (5). Setting readOnly to false makes the volume available as read/write.
- We now need to pass the secret key to Kubernetes and then set the volume running.
At the command line, send in the following command:
kubectl create -f azure-secret.yaml
Once that has completed, the secret has been set, so we can send in the command to setup the volume itself.
kubectl create -f azure.yaml
Once that completes, we can then test that everything has been setup correctly by examining available pods:
kubectl get po
This will show an output like the following:

Finally, we can examine how the volume has been implemented to confirm it is as specified:
kubectl describe po azure
Looking at the output of 'describe', you can see important information such as the node (VM) the containers is hosted on, the fact that it is a 'secret based' volume, and that it is connected to an Azure file service.

- The volume can now be directly accessed by any container... we will cover how to do this in detail in a later article.
If you need them, I have put a shortened version of the instructions in a zip attached to the top of this article. Finally, as usual, if you found the article useful, please give it a vote!
Links of Interest
History
- 7th December, 2017 - Version 1
