↵
Background
Compared with Spring MVC built web applications, there are many differences in Spring Boot applications. But the most visible difference is that Spring Boot allows a package to include an embedded container to serve the web requests from a JAR file. This note is intended to answer the following questions.
- What are the minimum Maven dependencies to build a JAR file for a Spring Boot application
- How to start the Spring Boot application
- How to add a controller to the Spring Boot application
- How to add configurations to the Spring Boot application
- How to serve static content and package the static content into the JAR file
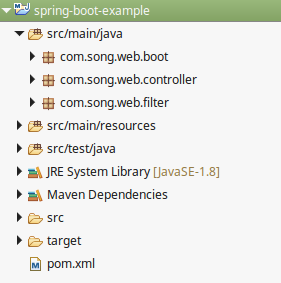
The attached is a Maven project. I have tested it in an Eclipse Java EE IDE for web developers and please feel free to try it by yourself.

The Minimum Maven Dependencies
The attached Maven project has the following POM.xml file, which I believe to have the minimum Maven dependencies to build and package a Spring Boot application.
<project xmlns="http://maven.apache.org/POM/4.0.0"
    xmlns:xsi="http://www.w3.org/2001/XMLSchema-instance"
    xsi:schemaLocation="http://maven.apache.org/POM/4.0.0
    http://maven.apache.org/xsd/maven-4.0.0.xsd">

    <modelVersion>4.0.0</modelVersion>
    <groupId>com.song.example</groupId>
    <artifactId>spring-boot-example</artifactId>
    <version>0.0.1-SNAPSHOT</version>
    <packaging>jar</packaging>

    <properties>
        <spring-boot.version>1.5.7.RELEASE</spring-boot.version>
    </properties>

    <dependencies>
        <dependency>
            <groupId>org.springframework.boot</groupId>
            <artifactId>spring-boot-starter-web</artifactId>
            <version>${spring-boot.version}</version>
        </dependency>
    </dependencies>

    <build>
        <finalName>${project.artifactId}</finalName>
        <plugins>
            <plugin>
                <artifactId>maven-compiler-plugin</artifactId>
                <configuration><source>1.8</source><target>1.8</target></configuration>
            </plugin>

            <plugin>
                <groupId>org.springframework.boot</groupId>
                <artifactId>spring-boot-maven-plugin</artifactId>
                <version>${spring-boot.version}</version>
                <executions>
                  <execution>
                    <goals><goal>repackage</goal></goals>
                    <configuration>
                        <finalName>${artifactId}-${version}</finalName>
                          <mainClass>${start-class}</mainClass>
                          <addResources>true</addResources>
                    </configuration>
                  </execution>
                </executions>
            </plugin>

        </plugins>
    </build>
</project>
Some tutorials recommend to make the Spring Boot application a child application of the parent POM spring-boot-starter-parent. But a Maven project supports only one parent POM and I may want to give the application my own parent POM for other purposes, so I chose to create the example application a stand-alone application without the parent POM spring-boot-starter-parent. At least for the features touched by this note, I did not see any problems.
The Static Main in a Spring Boot Application

To start a Spring Boot application, you can create a class that extends the SpringBootServletInitializer and annotate it with @SpringBootApplication.
package com.song.web.boot;

import org.springframework.boot.SpringApplication;
import org.springframework.boot.autoconfigure.SpringBootApplication;
import org.springframework.boot.web.support.SpringBootServletInitializer;
import org.springframework.context.annotation.ComponentScan;


@SpringBootApplication
@ComponentScan({"com.song.web.boot", "com.song.web.controller"})
public class ApplicationStart extends SpringBootServletInitializer {

    public static void main (String[] args) {
        SpringApplication.run(ApplicationStart.class, args);
    }
}
The @ComponentScan annotation tells the Spring Boot the packages to scan for Spring components and controllers.
How to Add a Controller

A typical Spring MVC controller works well in Spring Boot. The controller class needs to be in the @ComponentScan path. If you take a look at the ApplicationStart class, you will notice that we have added the com.song.web.controller package to the @ComponentScan path.
package com.song.web.controller;

import java.util.HashMap;

import org.springframework.stereotype.Controller;
import org.springframework.web.bind.annotation.RequestMapping;
import org.springframework.web.bind.annotation.RequestMethod;
import org.springframework.web.bind.annotation.ResponseBody;

@Controller
public class ExampleController {

    @RequestMapping(value = "/getAJson", method=RequestMethod.GET)
    @ResponseBody
    public HashMap<String, String> getAJson() {
        HashMap<String, String> map = new HashMap<String, String>();

        map.put("Sprint", "boot");
        return map;
    }
}
In this example controller, we implemented a simple REST service that will respond a HashMap upon a GET request.
How to Add Configurations

package com.song.web.boot;

import javax.servlet.Filter;

import org.springframework.boot.context.embedded.EmbeddedServletContainerCustomizer;
import org.springframework.boot.web.servlet.FilterRegistrationBean;
import org.springframework.context.annotation.Bean;
import org.springframework.context.annotation.Configuration;

import com.song.web.filter.NocacheFilter;

@Configuration
public class ServletConfig {
    @Bean
    public EmbeddedServletContainerCustomizer portCustomizer() {
        return (container -> { container.setPort(8090); });
    }

    @Bean
    public FilterRegistrationBean noCacheFilter() {
        Filter filter = new NocacheFilter();

        FilterRegistrationBean registration = new FilterRegistrationBean();
        registration.setFilter(filter);
        registration.setOrder(1);

        return registration;
    }
}
To configure a Spring Boot application, we can create a class that is annotated by @Configuration and each @Bean method in the class provides a configuration entry.
- The
portCustomizer() tells the application to listen to the 8090 port; - The
noCacheFilter() tells the application to apply a filter to the web requests.
The NocacheFilter class is implemented as the following to disable the caching for all the web requests.
package com.song.web.filter;

import java.io.IOException;

import javax.servlet.Filter;
import javax.servlet.FilterChain;
import javax.servlet.FilterConfig;
import javax.servlet.ServletException;
import javax.servlet.ServletRequest;
import javax.servlet.ServletResponse;
import javax.servlet.annotation.WebFilter;
import javax.servlet.http.HttpServletResponse;

@WebFilter(urlPatterns = {"/*" })
public class NocacheFilter implements Filter {

    public void doFilter(ServletRequest request,
            ServletResponse response,
            FilterChain chain) throws IOException, ServletException {

        HttpServletResponse httpResponse = (HttpServletResponse)response;
        httpResponse.setHeader("Cache-Control", "no-cache, no-store, must-revalidate");
        httpResponse.setHeader("Pragma", "no-cache");
        httpResponse.setDateHeader("Expires", 0);

        chain.doFilter(request, response);
    }

    public void destroy() {}
    public void init(FilterConfig fConfig) throws ServletException {}
}
How to Serve Static Content

To serve static content from a Spring Boot application, you can add the static contents in the src/main/resources/static folder. In this example, I borrowed all the HTML/CSS/JAVASCRIPT files from one of my early postings to save my some time.
<plugin>
    <groupId>org.springframework.boot</groupId>
    <artifactId>spring-boot-maven-plugin</artifactId>
    <version>${spring-boot.version}</version>
    <executions>
        <execution>
            <goals><goal>repackage</goal></goals>
            <configuration>
                <finalName>${artifactId}-${version}</finalName>
                <mainClass>${start-class}</mainClass>
                <addResources>true</addResources>
            </configuration>
        </execution>
    </executions>
</plugin>
In order that the static content is packaged into the JAR file, we need to make sure the <addResources>true</addResources> is added to the spring-boot-maven-plugin in the POM.xml.
Build & Run
To build the application, you can issue the following command:
mvn clean install
You can actually directly launch the application by the following command:
mvn spring-boot:run
If you import the Maven project into Eclipse, you can run or debug it in Eclipse as a Java application.

You can also run the JAR file by the following command:
java -jar target/spring-boot-example-0.0.1-SNAPSHOT.jar
Regardless how you start the application, if it is started successfully, you can test it through a browser.


Points of Interest
- This is a note on Spring Boot and JAR deployment;
- I hope you like my posts and I hope this note can help you one way or the other.
History
- 25th November, 2017: First revision
