Ever wondered how to automate tasks in Visual Studio such as auto fill forms, paste into multiple locations or even print all open documents? Well with the use of VS Macros, it will be possible and the possibilities are endless only restricted by your imagination. VS Macros is a very powerful tool within Visual Studio and most probably, most developers don’t use this or what's worse, they might have bought a third party solution to automate some tasks in Visual Studio.
Having said that, this article is to show you how to develop a simple macro to get you started. This macro that I will run through is how to make a shortcut for commenting within Visual Studio Text Editor, that comment will include the current time the comment was made and username who commented it, which is useful specially if you are working with other developers as well.
So let's get started.
1. Open the Macro Explorer
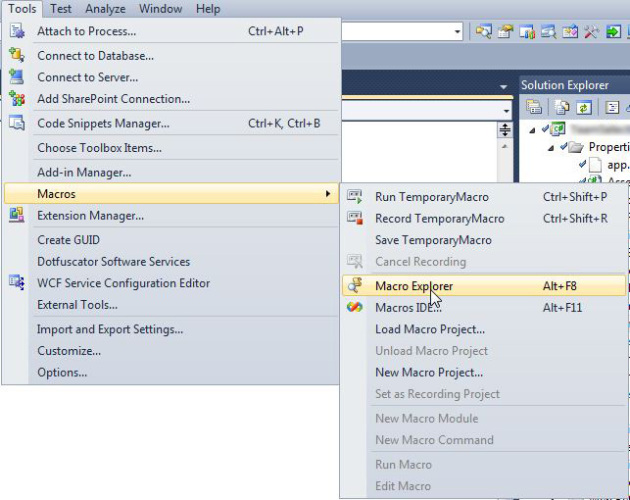
First, you have to go to macro explorer and check whether the macro you want to make is already available as there are some built in macros that come with Visual Studio. You can do that by going to Tools -> Macros -> Macro Explorer. On the Macro Explorer view, you can see that there is a Sample Project, browse through that and check whether the solution you want to develop is available, if not, proceed to step 2.

2. Create a New Macro Project
If the one you need is not on the Sample Macros, then start developing your own. You can create your own project, use the MyMacros that is already in there or even the Samples, it's all up to you. For this sample, we use “MyMacros”.

3. Create a New Module
Now right click on the “MyMacros” project and choose “New module”...

...and give it a useful name. For this sample, I will use “MyCustomModule”.

4. Create a New Macro
Now right click on that new module you just created and select “New macro”, you will now be presented with the Marco Editor. Now you have a new Sub which is “Macro1″, rename it to what you want, in this sample, I will use “BetterComments”.

5. Start Developing
The one we want to achieve here is to create a better comment, use the code below as a sample.
If you notice there is a function there called LineOrientedCommentStart, this was just copied in the sample macros and it adds that comment character in front of the text comment, it also checks for the document extension to place the proper comment characters, you can extend this to use other file types as well.
Importsss System
Imports EnvDTE
Imports EnvDTE80
Imports EnvDTE90
Imports EnvDTE90a
Imports EnvDTE100
Imports System.Diagnostics

Public Module MyCustomModule
    Sub BetterComments()
        Dim textSelection As EnvDTE.TextSelection

        textSelection = DTE.ActiveWindow.Selection

        textSelection.NewLine()
        textSelection.Insert(LineOrientedCommentStart())
        textSelection.Insert(" ---------------------------------------------------")

        textSelection.NewLine()
        textSelection.Insert(LineOrientedCommentStart())
        textSelection.Insert_
        (" " + Date.Now + " - " + System.Environment.UserDomainName +
            "\" + System.Environment.UserName())

        textSelection.NewLine()
        textSelection.Insert(LineOrientedCommentStart())
        textSelection.Insert(" ")

        textSelection.NewLine()
        textSelection.Insert(LineOrientedCommentStart())
        textSelection.Insert(" ---------------------------------------------------")
    End Sub

    Function LineOrientedCommentStart(Optional ByVal document As Document = Nothing) As String
        Dim extension As String

        If (document Is Nothing) Then
            document = DTE.ActiveDocument
        End If

        extension = document.Name
        If (extension.EndsWith(".cs") _
        Or extension.EndsWith(".cpp") Or extension.EndsWith(
            ".h") Or extension.EndsWith(".idl") _
            Or extension.EndsWith(".jsl")) Then
            Return "//"
        ElseIf (extension.EndsWith(".vb")) Then
            Return "'"
        Else
            Throw New Exception(
            "Unrecognized file type. You can add this file type by modifying the function
            Utilities.LineOrientedCommentStart to include the extension of this file.")
        End If
    End Function
End Module
6. Assign a Keyboard Shortcut
Now you're done developing you macro, save it and assign a keyboard shortcut. Go to Tools -> Options and the dialog below will show. Type the name of your macro in the “Show commands containing” text box to view your newly developed macro and assign shortcut keys using “Text Editor” only (you don't want to activate that macro in Class Diagram or UML Designer). In this sample, we use Alt + Insert.

7. Use Your Macro
Now on text editor, press Alt + Insert and you should see your new comment now.
