Introduction
At this project targeted to Raspberry Pi with Linux, the API First Design strategy is used to develop an ASP.NET Core Web Server automatically generated by Swagger Hub. The availability of Visual Studio running at a speedy x64 cpus with Windows 10 are the key advantages of this starter kit. Previous studies were done before this project, please see links below:
Background
For more details about IoT Starter, please see articles and repos below:
IoT API for Raspberry Pi
Starting from a Swagger API definition, an ASP.NET Core Web API is developed using SwaggerHub. The code is automatically generated and pushed to github. Then it is loaded by a Windows x64 machine and upgraded to ASP.NET Core 2.0, using Visual Studio 2017.
A multi-stage docker image build is accomplished at the speedy Windows x64 machine, generating code for the linux-arm. The same VS solution include separated projects for the web server and web UI. Both docker images are pushed to the cloud and then pulled back into a Raspberry Pi with Raspbian 9.1 stretch installed.
Following is the expected workflow for this project, that will cycle activities for modeling, programming and development, deployment and testing. The main objectives are summarized below.
Modeling
- API is designed at SwaggerHub, check the file here
- Web service stub is automatically generated by SwaggerHub
- SwaggerHub connects directly with GitHub repository
- SwaggerHub is configured to push code to 'swag' branch at Github
Development at x64 with Windows 10
-
Install Docker
Web Service
- Pull Swaggerhub generated code from github
- Upgrade to .NET Core 2 framework and Docker support
- Merge code from swag branch to master
- Create multi-stage docker build for web service
- Compiles at x64 machine for linux-arm framework
- Push Docker image to cloud: home-web
Web UI
- Generate another project based on default razor pages app
- Add multi-stage docker build for web ui
- Push Docker image to cloud: home-ui
Deployment at Raspberry Pi with Linux
- Raspbian GNU/Linux 9.1 (stretch)
- Install Docker
- Run both Docker images for home-web and home-ui
Testing
- Go back to x64 machine
- Access home-web and home-ui via any browser
Running Both Images at Raspberry Pi
A Raspberry Pi with Raspbian 9.1 stretch is connected in the same LAN of x64 machine. Docker is installed and commands shown below activate the home-ui and home-web images. They start to listen on ports 80 and 5010 respectively.
The commands start clearing all docker containers and images:
root@lumi:~# docker stop $(docker ps -a -q)
d687099cc4df
05a351957bda
eb9a76c7c834
root@lumi:~# docker rm $(docker ps -a -q)
d687099cc4df
05a351957bda
eb9a76c7c834
root@lumi:~# docker rmi --force $(docker images -q)
Untagged: josemottalopes/home-web:latest
Untagged: josemottalopes/home-web@sha256:74aec90ed6a11f567aa8d62ffaea640fbdeb17704e474a9c000bb96ae72ceca6
Deleted: sha256:88f48c67c247db06f555014f5bdbd0fec76418f99d8e3a6d9402574ddf67edfc
Deleted: sha256:975185cce94e4c6195cf1977d1dccfac4300d10a7d9b3d784146ddaf7cc3f00a
Deleted: sha256:40c2b44171227ea087362888d4762791b2c15a18000c914e8f340bf98dc8cc51
Untagged: josemottalopes/home-ui:latest
Untagged: josemottalopes/home-ui@sha256:ecc1fa65c4d88f23794c528e669631ff2a4d03a8be3327608317d16453b78143
Deleted: sha256:7eb1d110bcc4047eae1d76b32dff1277d3d56244dc41bf79073819be5b7a5b56
Deleted: sha256:623da47a649523f1ddd665a729004b95acf2d492c3febbaa9bad6c606b3a5c88
Deleted: sha256:82526805c29cbe6512e8fcf184e6743c2c71d806df016af30ef2ec1e34178eac
Untagged: josemottalopes/home-web@sha256:cb36cf1b6b7bceb45f0889bae614bcbbf19f6c4445f51f185622b7e5e4dd86be
Deleted: sha256:032d614f3fc0f6bd656de95c50333e2d21ac34db30f91ed771e228f4f439c00a
Deleted: sha256:96fe25beadd9cb5d8addf865649b3fed6f14df768f233c49cb1f678c857a9f58
Deleted: sha256:8f5f132e4fc566d4a0ac7e941c5b0c384ee9afd010d233882b0be97b81d0d149
Untagged: josemottalopes/home-web@sha256:5a87e73708e2ac67b3560defe65595694a9e5e49a23595c5a08482ea1faad577
Deleted: sha256:5a774d2f95f6fa473e1d341a0af3f42ce9265385d9a5b30d125eaf9a5b3cdede
Deleted: sha256:8d183a855f79509984b3bf808a525249cb88d4cfeff27959dfb231387460ea44
Deleted: sha256:89bd29e762daf375f4d73c7d231dbef9650845f98d77dc4e50a3f8a0f62b4a54
Deleted: sha256:50224a368775f0d05c4539350d6d692018c32627df45b13e43b68f42e4be445b
Deleted: sha256:cd6fedc1173aade60448959776c946bc28de703afef26adb61d296e88bfe6b2f
Deleted: sha256:f96ade99e9d01f22ce8fc2d4371da8e3b1ae01fe4a1654748f32338224341dc2
Deleted: sha256:ccd48fa5ba354572eff0c0cf514f83187f859b2199ebcb8bf02573642f8186cb
Then all projects are started, downloading images from DockerHub to Raspberry Pi. You can notice the home-ui project share four images with home-web project and they don't need to be downloaded again.
root@lumi:~# alias
alias yhomeui='docker run --privileged -p 80:80 -d josemottalopes/home-ui:latest'
alias yhomeweb='docker run --privileged -p 5010:5010 -d josemottalopes/home-web:latest'
root@lumi:~# yhomeweb
Unable to find image 'josemottalopes/home-web:latest' locally
latest: Pulling from josemottalopes/home-web
0d9fbbfaa2cd: Pull complete
b015fdc7d33a: Pull complete
60aaa226f085: Pull complete
01963091a185: Pull complete
6f687f698add: Pull complete
7523740b666e: Pull complete
Digest: sha256:74aec90ed6a11f567aa8d62ffaea640fbdeb17704e474a9c000bb96ae72ceca6
Status: Downloaded newer image for josemottalopes/home-web:latest
73780b8675a51c3eb7e1b5485934fe6060e05d7a4144c33e4ba873a0dc92972d
root@lumi:~# yhomeui
Unable to find image 'josemottalopes/home-ui:latest' locally
latest: Pulling from josemottalopes/home-ui
0d9fbbfaa2cd: Already exists
b015fdc7d33a: Already exists
60aaa226f085: Already exists
01963091a185: Already exists
9ba45e81e264: Pull complete
2e769f6ed072: Pull complete
Digest: sha256:ecc1fa65c4d88f23794c528e669631ff2a4d03a8be3327608317d16453b78143
Status: Downloaded newer image for josemottalopes/home-ui:latest
f43b25bff7ba4d0c52d5d5a3be6d3e294757ed3d2cc8157ee5fe81e710051a41
The docker images and running containers are shown below:
<font size="1">
root@lumi:~# docker ps
CONTAINER ID        IMAGE                            COMMAND                  CREATED              STATUS              PORTS                            NAMES
f43b25bff7ba        josemottalopes/home-ui:latest    "dotnet Home.UI.dll"     12 seconds ago       Up 8 seconds        0.0.0.0:80->80/tcp               sleepy_mayer
73780b8675a5        josemottalopes/home-web:latest   "dotnet IO.Swagger..."   About a minute ago   Up About a minute   80/tcp, 0.0.0.0:5010->5010/tcp   goofy_bassi
root@lumi:~# docker images
REPOSITORY                TAG                 IMAGE ID            CREATED             SIZE
josemottalopes/home-web   latest              88f48c67c247        21 hours ago        235MB
josemottalopes/home-ui    latest              7eb1d110bcc4        21 hours ago        233MB
</font>
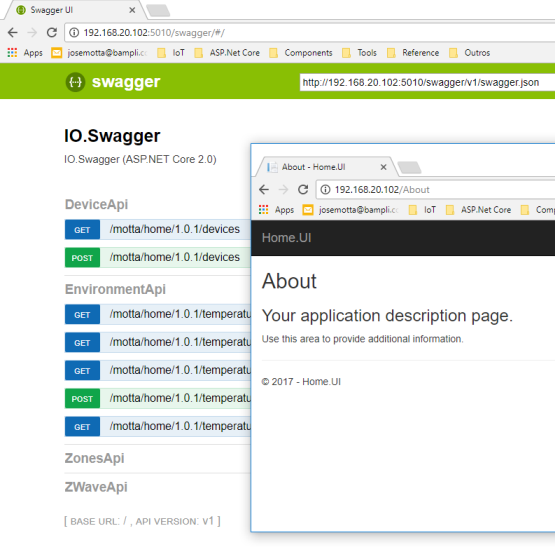
Checking at the browser, we see both home-web and home-ui projects running at Raspberry Pi with Linux.

Upgrading the API
Changes to API are done editing the API master file at Swaggerhub. In order to smoothly update the project, the following configuration should be done, selecting the proper repo and a new branch "swag" to store the changes.

Please note that it is necessary to allow full control over some folders, including models, controllers and wwwroot, as shown below.

The generated files may include some garbage that should be cleaned properly, including some .json and .sln files from previous Visual Studio versions.
From time to time, some breaking changes may happen at Swaggerhub generated code. In these cases, conversion to ASP.NET Core 2.0 maybe done automatically by Visual Studio, I used Community 2017 Preview2. Change the Output Folder at Swaggerhub Integration to "home2", and allow VS to adjust automatically the solution files, libraries, etc. Then bring the changes to "home" in another safe step.
Use the Visual Studio to setup Docker, apply menu "Add Docker support" for the solution. Then docker-compose and dockerfile maybe adjusted, properly pulling the strings for a smooth operation at Windows x64 machine.
Conclusion
This starter kit may improve or establish connections to the huge amount of work already done at Linux platform. Projects like LIRC, the Linux Infrared Remote Control for Raspberry Pi, will be explored soon.
For now, have fun with this project!
History
