Introduction
Recently, I developed an interest in IOT and Raspberry Pi. Since I'm a .NET developer, I started to explore .NET Core on Linux stack. The reason was simple - because Linux stack is cheap and can run everywhere, I built my website in .NET Core that runs on Ubuntu on Linode for $5/month, next I started exploring Raspberry Pi that runs on Linux distribution flavour Raspbian. My first project is to build a web crawler in C# that runs on Raspberry Pi to get the latest shopping deals from popular sites such as Amazon or Bestbuy, then it posts data to WebApi to feed my site, http://www.fairnet.com/deal.
Prerequisites
Visual Studio 2017 with the ".NET Core cross-platform development" workload installed. You can download the community edition which is free.
Using the Code
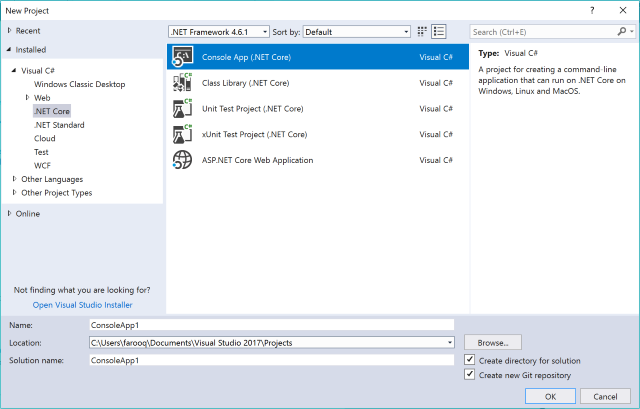
Launch Visual Studio 2017. Select File > New > Project from the menu bar. In the New Project* dialog, select the Visual C# node followed by the .NET Core node. Then select the Console App (.NET Core) project template.

Install HtmlAgilityPack, and Newtonsoft.Json NuGet packages.

HtmlAgilityPack is an agile HTML parser that builds a read/write DOM and supports plain XPATH or XSLT.
Here is the request to the website to get all HTML pages:
HttpClient client = new HttpClient();
using (var response = await client.GetAsync(url))
   {
       using (var content = response.Content)
       {
           var result = await content.ReadAsStringAsync();
           var document = new HtmlDocument();
           document.LoadHtml(result);
           var nodes = document.DocumentNode.SelectNodes
                       ("//div[@class='item-inner clearfix']");
           var storeData = new List<store>();
           foreach (var node in nodes)
           {
               Store _store = ParseHtml(node);
               storeData.Add(_store);
           }

           HttpResponseMessage resp = await client.PostAsJsonAsync<list<store>>
                                      (@"/api/stores", storeData);
       }
   }
I post the parsed data to webApi, where it gets saved in MongoDB.
HttpResponseMessage resp = await client.PostAsJsonAsync >(@"/api/stores", storeData);
Here is the ParseHtml method to parse useful data.
private static Store ParseHtml(HtmlNode node)
   {
       var _store = new Store();

       _store.Image = node.Descendants("img").ElementAt(imgIndex).OuterHtml;
       _store.Link = node.Descendants("a").Select
                     (s => s.GetAttributeValue
                     ("href", "not found")).FirstOrDefault();
       _store.Title = node.Descendants("a").ElementAt(titIndex).InnerText;
       _store.Price = node.Descendants("span").ElementAt(pricIndex).InnerText;
       _store.RetailPrice = node.Descendants("span").
                            ElementAt(retpricIndex).InnerText;

       return _store;
 }
Next, I need to setup Raspberry Pi so that .NET code can run on it.
Supplies required:
- Raspberry Pi 3 Model B
- HDMI cable
- USB mouse / keyboard
- SD card
- 2 Amp USB power supply
Setup Raspberry Pi
- The recommended OS is called Raspbian. Download it from https://www.raspberrypi.org/downloads/raspbian/
- Install .NET Core 2 onto the Raspberry Pi
- Deploy this application to your Pi running Raspbian
Once Raspbian has been installed, configure Raspberry Pi to connect from the development machine.
Enabled SSH from Raspberry Pi Configuration screen.

Next, we need to find the IP address of the Raspberry Pi.
Open a terminal on your Pi and type:
hostname -I
Next, install PUTTY to connect from your development machine.

The default username and password for Raspbian is “pi” and “raspberry“:

Install .NET Core 2 onto the Raspberry Pi.
# Update the Raspbian install
sudo apt-get -y update

# Install the packages necessary for .NET Core
sudo apt-get -y install libunwind8 gettext

# Download the nightly binaries for .NET Core 2
wget https://dotnetcli.blob.core.windows.net/dotnet/Runtime/release/2.0.0/
     dotnet-runtime-latest-linux-arm.tar.gz

# Create a folder to hold the .NET Core 2 installation
sudo mkdir /opt/dotnet

# Unzip the dotnet zip into the dotnet installation folder
sudo tar -xvf dotnet-runtime-latest-linux-arm.tar.gz -C /opt/dotnet

# set up a symbolic link to a directory on the path so we can call dotnet
sudo ln -s /opt/dotnet/dotnet /usr/local/bin
Run dotnet --info command to see the version installed on Raspbian.

Create .NET deployment release build for linux-arm:
dotnet publish -c release -r linux-arm
Now, create a folder for webcrawler, and transfer project files using FTP. then, run dotnet webcrawler.
dotnet webcrawler.dll
Points of Interest
I’ll be blogging more in the future on developing IoT applications to this platform.
History
- 16th December, 2017: Initial version
