Workflows are a real poweful tool built-in in Sharepoint since 2007 version as you can design it to add logic to your site or application without any custom coding! This can be anything from automating business processes, sending notifications or even as simple as creating tasks. There are a lot of possibilities which are only limited by your imagination.
This article will discuss how easy it is to develop your own workflow in Sharepoint 2010, you don't even have to be a developer as you will not write any custom codes and all you have to do is just a series of mouse point and clicks. To get started, we need an entry point in the workflow, this will act as a trigger to start the process and one good example that we can use is when someone adds an item to a list. So in this sample solution, we will be developing a workflow to trigger from a list and based on the selection on one of the list column values, it will trigger an email to be sent and update the items status. Using this example, I guess we will be tackling most of the important aspects of workflows such as steps, conditions and actions.
So let's start!
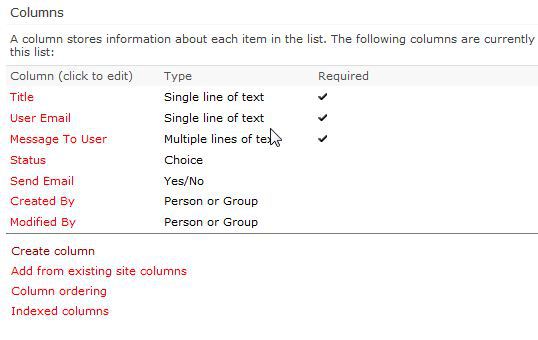
Let's start by creating a list and here is the structure.

Now for a bit of explanation, here is what each field does:
- Title - That will be the subject of the email you will be sending
- User Email - The recipient email address
- Message To user – The message in the email
- Status - What's the status of this item (choice between
Started, Email Sent, Processing, Resolved) - Send Email - A flag whether email will be sent to recipient.
Once you created the list, fire up Sharepoint Designer and start creating your workflow. First, go to List and Libraries:

Choose your list and go to the Workflow section, then create new:

It will ask you to define a Workflow name and description:

Now, the workflow designer shows:
 .
.
Now if you notice on the ribbon, there is a Condition and Action Button, there are the key elements for designing the workflow, examine the items inside and these as it will list all the possibilities you can do.
Workflow Action Items

Workflow Condition Items

On your Step 1, we choose “Email users” (this means when the workflow starts, it will email a certain user of your choice).

Now define the Email Message:

On the “To” section, choose users. At this point, we choose the email address stored on the list item.

We select that “User Email” column you created on your list.

Now on the CC, you will add the one who added the list item.

For the title, we will get it from the “Title” column in your list:

And for the body, you choose the “Message to user” column in your list as well as the “Modified by” field:

Congratulations! You are done with your first action, now let's add a condition on that action.
Click on the top of the first action you had created:

Add a common condition “If any value equals value” which means if a certain column in that current item falls in a value that you declare, an action will be triggered:

Now the condition appears on top of your first action:

Now modify the values to what you want, since you want an action to happen when “Send Email” field has a value of “Yes”, then define as such.


If you had noticed the First action you created was not on the IF block, so you need to move it up, to do that, choose the drop down on the side and choose move action up.

This will then place it inside the IF block:

Now in this scenario, let's say you also want to update the field “Status” to “Email Sent” when the email sent. To do that, add another action by choosing the “Set Field in Current Item”. Make sure that you also click below your first action so that when you add a new action, it will be placed there.

Now set the field and value properties:

Now for your ELSE block, choose the “Else-If Branch” from the ribbon:

Now do the same action above but this time set the “Status” to “Processing”:

Now you are all done! Save and publish your workflow:

Then, wait while it's validating:

But wait, you need a trigger on when the workflow will start. Do that by going to the Workflow objects, choose your workflow and configure it on the start options:

Now all you have to do is test, create a list item to trigger conditions you built:

Then wait for the results:


That's it! It's that easy, no coding required!
