Background
Note: Auto-pulled from my blog: http://raddev.us/arduino^
I only recently bought an Arduino Uno knock-off board because they finally became inexpensive enough (less than $12 USD). I'm very cheap.
Originally, when I started with the Arduino (really the AVR ATmega328p-pu), I wanted to be closer to the metal because I thought it would allow me to learn more about what was going on.
I read the book, AVR Programming: Learning to Write Software for Hardware 1st Edition[^] by Elliott Williams. That book describes how to program the ATmega328 (and ATmega168) chips directly.
A Lot of Work
It shows you how to hook up an AVR ISP programmer to a breadboard and how to use a text editor and AVR-GCC. You write all your programs in straight C.
It's actually a lot of work. It's a lot more work than you have to do when using the nice Arduino IDE that does everything for you.
You Learn A Lot
However, I also learned a lot about what was going on. I also learned how to flash a HEX file (AVR machine language file) directly to the ATmega microcontroller using AVRDude.
It was all great information because it put me in a place where I was less dependent upon the Arduino infrastructure.
Arduino Uno Built-in Headers
Of course, the Arduino UNO has those nice built-in headers that make it so easy to wire in your additional components. For your first Blink program, you can literally stick an LED directly into the headers without any other wiring -- yes, the 5V is a little high and will overdrive the LED but as an easy first experiment, it is nice.
The Arduino Uno even goes one step further and offers shields you can just plug in directly into it.
What Are Arduino Shields?
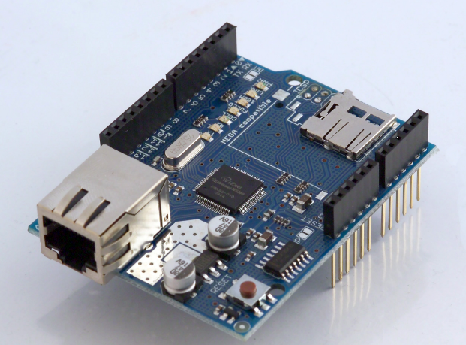
If you haven't seen these shields before, they are prefabricated extensions you can just plug directly into your Uno that provide functionality.
Here's a good example of one that provides Internet connectivity to your Arduino.

Image from Arduino.cc
Plug It In And Go
You can easily just plug that board into your Arduino Uno's headers and go. That is really great for prototyping. However, it is not so great for building out your final product.
Why Shields Aren't Great
Shields aren't great for your final product for a few reasons:
- Larger footprint: They make your final product much larger than they would necessarily be. That's because there is quite a bit more hardware here and it is spread out for ease of use. Your final product could be far smaller with just the ATmega chip as I showed in my previous article.
- Cost: They make your final product cost more. The ATmega328p-pu only costs about $2. However, the Arduino Uno will cost you anywhere from $12 - $20. That's a huge difference in price.
Prototype Shields Take This Idea Even Further
Prototyping shields allow you to build your own circuit on a shield that you can easily plug into your Arduino Uno.

As you can see, you can build your custom circuit on the prototype shield and plug it into your Uno. However, this means your final project will require that you commit your Uno (which you are really using to provide a programming interface to your ATmega chip) as a part of your project, never to be used in other projects again.
Break Out Your ATmega Chip
If you'll learn to break out your ATmega chip to the breadboard, then you won't have to do this and you'll save money and space.
Here is a great example of a very interesting music synthesizer project that is far larger and far more expensive because it is built around the Arduino Uno and a prototype shield. Imagine how much smaller and cheaper that project would've been.
Design Considerations
All of this works into things that we have to think about whenever we design a project.
- Footprint - how much space will the final project take up (smaller the better)
- Cost - again, the lower the cost, the lower price we can sell the final product
- Time - The less time it takes to build, the better. The shield may save us time up front and if you are simply trying to get to a prototype, it may be a great idea. But later, you may spend quite a bit of time reverse engineering it into a basic circuit that has a lower cost.
Keep on building, keep on learning.
~ Roger Deutsch
CodeProject
