Introduction
This article explains how to include an Sqlite database in your Universal Windows Platform (UWP) C# application.
Background
Sqlite is a free database program that can be used for “light” database applications. It supports both transactions and SQL calls and is relatively easy to use. Integration of Sqlite into a UWP application is quick and easy; the steps used to include Sqlite in your C# UWP application are listed below. Some publicly available classes that simplify Sqlite use are also included and described, as well as some sample code showing how to use those classes. Finally, links are included for useful downloads and further information .
Adding Sqlite to your Solution
Note: This works for both Visual Studio 2015 and 2017.
The Sqlite UWP library should be added to your solution using NuGet.
- Click on Tools|Nuget Package Manager|Manage NuGet Packages for Solution… and select Browse.
- Search for
Sqlite.UWP.Native. When found, install it in the solution.
Using the Sqlite UWP Library
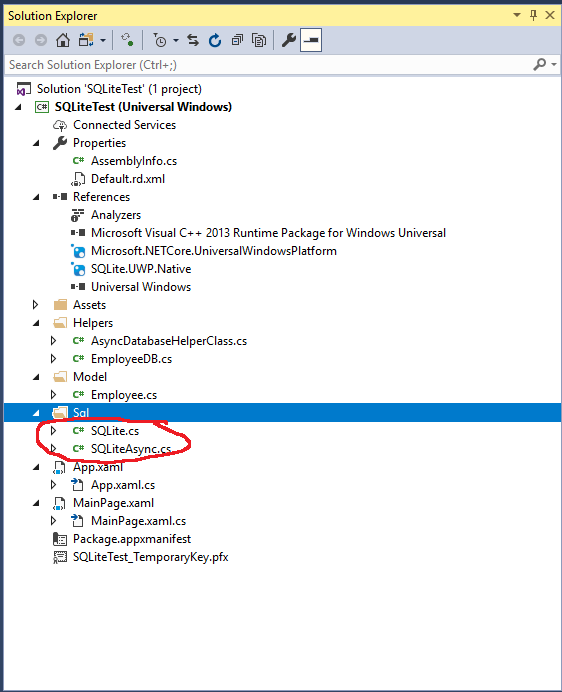
Two files named Sqlite.cs and SqliteAsync.cs are available to provide a simple C# interface to the Sqlite UWP library. They can be downloaded from here:
This site also contains the detailed documentation for the interface.
The Sqlite.cs file contains a class named SqlConnection which can be used to create and manipulate an Sqlite database. SqliteAsync.cs contains a class named SqliteAsyncConnection for asynchronous database routines. Either one or both these files should be added to your solution, depending on whether you are using the async or non-async model.

Both classes have methods for connecting and disconnecting to/from a database, creating a database, and adding, deleting, and updating database records. In addition, these classes may be used to execute raw SQL scripts.
For example, the attached files contain the classes that call on the SqlConnection routines to store and manipulate a small amount of information on an employee. The files use the non-async model, but the async class can be used in a similar fashion.
The employee class would look like this:
public class <code>Employee</code>
{
[SQLite.PrimaryKey, SQLite.AutoIncrement]
public int Id { get; set; }
public string LastName
{
get; set;
}
public string FirstName
{
get; set;
}
public DateTime DOB
{
get;set;
}
}
The connection to the database is created using the SQLiteConnection constructor with the path to the database table as the parameter.
public static string DB_PATH =
Path.Combine(Path.Combine(ApplicationData.Current.LocalFolder.Path,
"SQLiteTest.sqlite"));
public bool Initialize(string path = null)
{
bool retVal = false;
this.dbPath = path ?? DB_PATH;
if (this.dbPath != null)
{
dbConn = new SQLiteConnection(dbPath);
retVal = (DbConn != null);
if (retVal)
{
retVal = DbConn.CreateTable<Employee>() >= 0;
}
}
return retVal;
}
You can use the interface to select, update, add, and delete records.
public ObservableCollection<Employee> RetrieveEmployees()
{
List<Employee> audioList = DbConn.Table<Employee>().ToList<Employee>();
ObservableCollection<Employee> EmployeeList =
new ObservableCollection<Employee>(audioList);
return EmployeeList;
}
public void UpdateEmployee(Employee newRecord)
{
var existingAudioNote = DbConn.Query<Employee>
("select * from Employee where Id =" + newRecord.Id).FirstOrDefault();
if (existingAudioNote != null)
{
existingAudioNote.LastName = newRecord.LastName;
existingAudioNote.FirstName = newRecord.FirstName;
existingAudioNote.DOB = newRecord.DOB;
DbConn.RunInTransaction(() =>
{
DbConn.Update(existingAudioNote);
});
}
}
public void Insert(Employee newEmployee)
{
DbConn.RunInTransaction(() =>
{
DbConn.Insert(newEmployee);
});
}
public void Delete(int Id)
{
var existingEmployee = DbConn.Query<Employee>
("select * from Employee where Id =" + Id).FirstOrDefault();
if (existingEmployee != null)
{
DbConn.RunInTransaction(() =>
{
DbConn.Delete(existingEmployee);
});
}
}
Finally, you can "clean up" after you are done using the interface.
public void Dispose()
{
if (DbConn != null)
{
dbConn.Close();
dbConn.Dispose();
dbConn = null;
}
}
Browsing the Database using a Visual Browser
A visual browser for Sqlite may be downloaded from http://sqlitebrowser.org. This is useful for both testing and verifying a database under development.
Conclusion
This article shows how to get started with Sqlite. Sqlite can handle much more complex operations than are shown here, including commit, rollback, and multi-table operations. Consult the reference below for more details.
History
- 21st August, 2018: Initial version
