Introduction
In Clipping Plane in WPF 3D, Part 1, I demonstrated how an infinite clipping plane can "slice" a model, removing the rectangles on one side of the clipping plane (that is, "behind" it). In this Part 2, I will demonstrate a finite clipping plane that only removes rectangles whose center point projection lies on the finite clipping plane (and behind it). In addition, I made some other changes I've listed below.
- Finite Clipping Plane
- The Wireframe key will toggle the Sponge in solid or wireframe. If you have a texture selected, setting wireframe on removes the texture.
- I added Microsoft's 3D Tools library (.NET 3.5).
- If the Clipping Plane is hidden (by using the Clipping Plane Toggle Key), the sliders for rotation, translation, and stretching are disabled.
- The Axes toggle on/off key is now A instead of X as I plan on using X for a different purpose on the next version.
- The sense of the left and right arrow keys has been reversed, that is, the right arrow key rotates the camera clockwise, and the left arrow rotates the camera counter-clockwise. The compass direction the camera is looking is now displayed as well as the number of degrees.
- A Background consisting of a box made up of 6 rectangles showing North, South, East and West, as well as Floor and Ceiling can be displayed by using the Background toggle key.
- The settings file now includes the clipping plane's stretch values, whether the sponge is wireframe or solid and whether the the background is on or no.
Download and Build
Download the MengerSpongeClipping.zip file and extract it. Open the MengerSpongeClipping solution with Visual Studio. It consists of two projects: the MengerSpongeClipping WPF application and the Microsoft 3DTools library. Modify app.config to point to the image files as described below. Build the solution by pressing F6; it should build successfully with no errors. Press F5 to run the MengerSpongeClipping project in debug mode.
Using the code
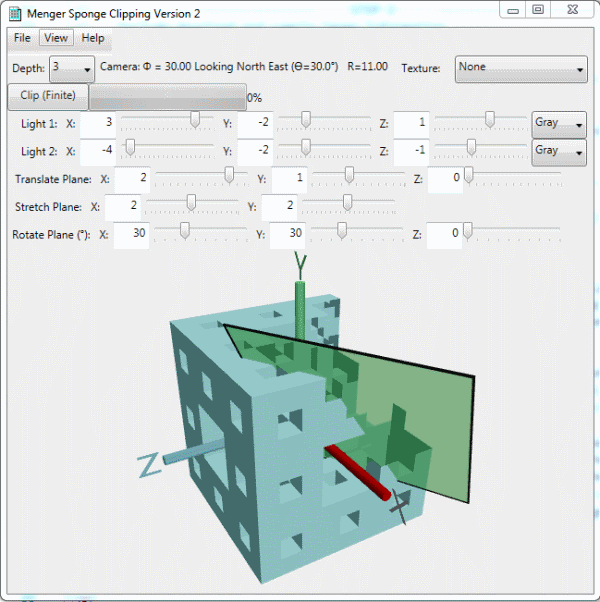
To clip the Menger Sponge, simply click the "Clip" button. You can orient the clipping plane using the sliders as illustrated in the above image. You can rotate the clipping plane about the x, y, or z axes using the "Rotate Plane" Sliders, and you can translate it along the x, y, or z axes using "Translate Plane" sliders.
With this Version 2, the Clipping Plane is initially assumed to be infinite in all directions by default, but when you press the "I" key (Infinite Clipping Plane toggle), the Clipping Plane foreground and background colors lighten a little, and a black border (see AddBorder()) is drawn to give a visual cue that the plane is finite, as shown in the above image. In addition, the Clipping Plane X and Y "Stretch" sliders are enabled to allow you to stretch or shrink the plane. When you Clip the Sponge with the finite clipping plane, only the rectangles with center points that would project onto the plane (and are behind it) are removed. You can also use the View menu to select either the Finite ore Infinite Clipping Plane.
Clipping Plane
In order to implement the finite clipping plane, I added a method called bool IsPointOnPlane(Point3D point) which returns true if a given point's projection lies with a plane defined by two triangles. The details of the algorithm were kindly provided by Håkon Hægland. Using IsPointOnPlane, rectangles that are "outside" the finite clipping plane are ignored, and for all the remaining planes, as with Version 1, the distance from the plane to each rectangle center is computed, and rectangles with distance values less than zero (that is, behind the opaque blue side) are discarded.
Microsoft's 3D Tools Library allows you to use the mouse to rotate and zoom the model (thanks to Ivan Krivyakov for his demo). Hold the left mouse button down and move the mouse to rotate; hold the right button down and move the mouse up and down to zoom. Unfortunately there does not seem to be a way to undo the mouse movements, that is, there is no "reset" in the library. (Nor is there a way I can discern to to get the values to update the camera position). To get around the no reset issue, I modified the OnMouseDown event handler to detect a mouse click in the upper left hand corner of the 3D viewport to undo the rotations and zooming to reset the model. See TrackballDecorator.cs for details. Pressing the Esc key resets camera movements set by using the arrow keys.
Since the 3D Tools Library allows you to rotate and zoom very quickly, it is easy to become disoriented. To help maintain spatial awareness, I added a DrawBackground() method which creates a box consisting of four walls, a floor and a ceiling. The walls are labelled North, South, East and West. The six background rectangles use textures, and therefore six image files are used. As explained in Part 1, you need to modify app.config to point to the image files, for example:
<setting name="ImageFileLocation" serializeAs="String">
	<value>C:\MyProjects\MengerSponge\MengerSpongeClipping\MengerSpongeClipping\Images\</value>
</setting>
The background is off by default, but can be toggled on and off using the Background Toggle Key as shown below where I have zoomed out and turned the background on:

History
Version 2.0.0.0
