What is Azure Storage?
Azure storage is a cloud storage offering from Azure, which provides storage of binary, text, structured and unstructured data, messages, etc. which is exposed via REST API so that you can access anywhere.
Abstraction or Types/Options of Azure Storage
- Blob
- Queue
- Table
- File Storage
Blob - Unstructured data like images, documents, audio files, video files, etc.
Queue - Used for sending and receiving messages just like publisher and subscriber
Table - Schema less and no relationship but a structured data (no SQL Database storage) stored in the form of tables
File storage - Mapping a storage network drive from Azure to VMs created in Azure, similar to our shared network drive
Let's Talk about Azure Blob Storage in this Article
What is Azure Blob Storage?
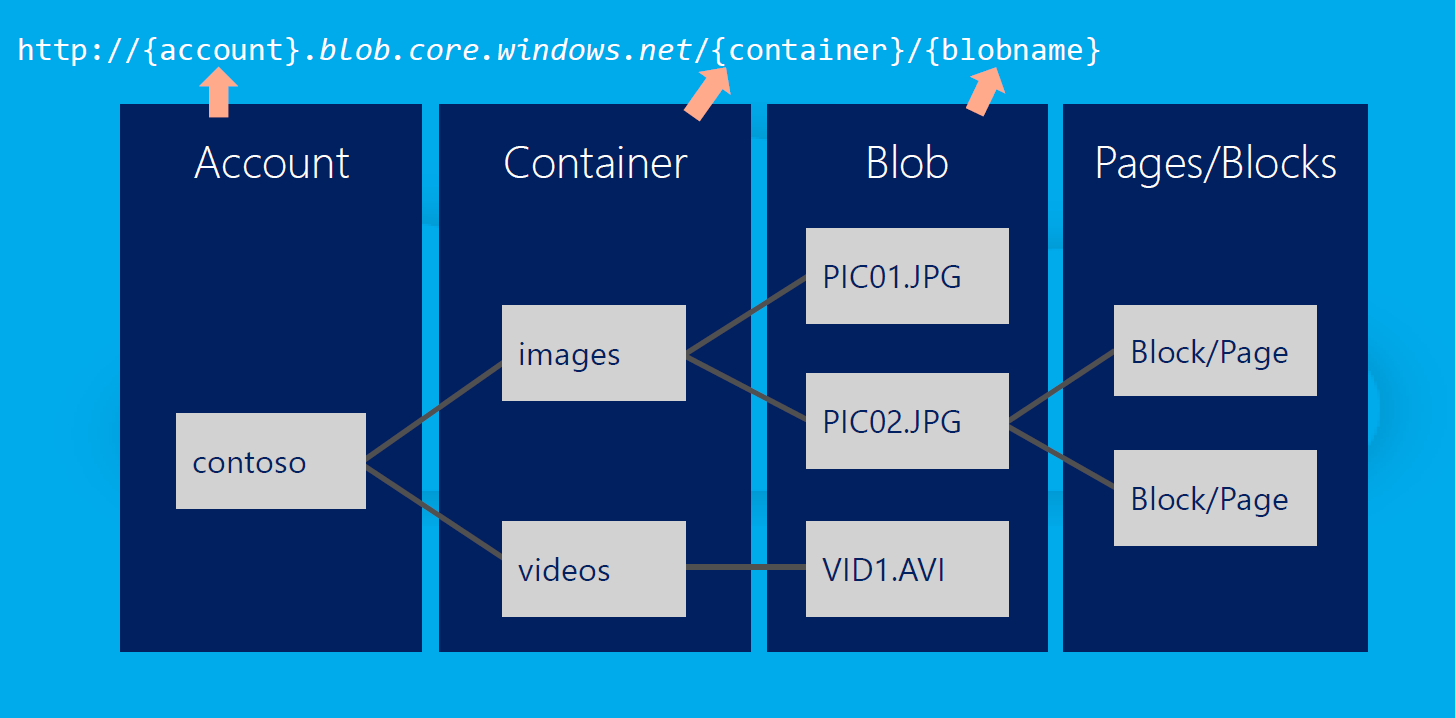
Blob storage is a service (which falls under Azure storage) which stores unstructured data in cloud as objects and serves them directly to browser.
Common uses of blob storage include:
- Storing data for analysis
- To perform secure back up
- Streaming video and audio
- Storing files for distributed access
Different Types of Blobs
Page Blob - Generally used to store VHD files whose limit is upto 1TB
Block Blob - Generally used to store text and binary data files whose limit is upto 200GB

How to Create a Blob Storage?
Step 1
Go to your Azure portal and create a storage account.

Name: Name of your storage account (Name should be unique and small characters)
Deployment model: Resource manger - new portal, Classic - Old portal
Account Kind: General purpose (which includes Tables, Blobs, Queues and File storage) or Blob Storage Designed to store only blobs.
Note: Just hover on the small icon "i" you will get to know what are the categories.
Once Storage Account is created, it will look like this:

Step 2
Now click on Blobs and click on add container, give the name of container and the access levels and click create. Once created, it will look like this:

Step 3
Now click on the storage account and go to settings under it and click on keys. You can see 2 keys and their respective connection strings, copy one of those. We will be using them in code.

Now let's do our coding part and store a blob from the our code, retrieve it and check its URI. So start creating it with me.
Step 4
Go to Visual Studio and create an empty console application.
Go to App.config and add this under <appSettings>.
<add key="StorageConnectionString" value="DefaultEndpointsProtocol=https;
AccountName=commonfilestorage;
AccountKey=T1y7Rb1R/QJ/3NE6oSO94wRkQZcJjl8LP5UgoYuJwBJzMbN1EOZfuptwyD3L2CBe2rqi/IyjBYxxAqc/XOsy4w==;
EndpointSuffix=core.windows.net" />
Note: The connection string given here is the one which got generated when i created a storage account so please use your connection string, this storage account will be deleted and no longer available by the time you read the article.
Step 5
Right click on project and click on Manage nuget packages and browse WindowsAzure.Storage and add it to the project.
Step 6
Open Program.cs and add these namespaces at the beginning:
using Microsoft.WindowsAzure;
using Microsoft.WindowsAzure.Storage;
using Microsoft.WindowsAzure.Storage.Blob;
using Microsoft.Azure;
Step 7
Now let's write some code to add blobs to our container.
CloudStorageAccount storageAccount =
CloudStorageAccount.Parse(CloudConfigurationManager.GetSetting("StorageConnectionString"));
CloudBlobClient blobClient = storageAccount.CreateCloudBlobClient();
CloudBlobContainer container = blobClient.GetContainerReference("doccontainer");
container.CreateIfNotExists();
container.SetPermissions(new BlobContainerPermissions
{ PublicAccess = BlobContainerPublicAccessType.Blob });
CloudBlockBlob blockBlob = container.GetBlockBlobReference("myblob.doc");
using (var fileStream = System.IO.File.OpenRead
    (@"C:\Users\sanath.js\Documents\Abhinandana S_Resume.docx"))
{
Console.WriteLine
("******************************* Uploading Blob **********************************************");
blockBlob.UploadFromStream(fileStream);
Console.WriteLine
("******************************* Successfully Uploaded Blob
**********************************************");
Console.ReadLine();
}
Note: Replace the blob you want to upload in this line.
using (var fileStream = System.IO.File.OpenRead
(@"C:\Users\sanath.js\Documents\Abhinandana S_Resume.docx"))
That's it! Run the application, now you will be able to upload the blob to cloud, try with some images, txt files as well. Now go to your container in Azure portal, you will be able to see your blob there.

Step 8
To download a blob from container, add the following code:
using (var fileStream = System.IO.File.OpenWrite(@"C:\Users\sanath.js\Desktop\check.docx"))
{
Console.WriteLine("******************************* Downloading Blob
**********************************************");
blockBlob.DownloadToStream(fileStream);
Console.WriteLine("******************************* Downloaded Blob
**********************************************");
Console.ReadLine();
}
When you run the application, you will be able to see a check.docx file in your desktop which is the blob which we uploaded earlier.
Step 9
To see the URI of Blob, use this code:
foreach (IListBlobItem blob in container.ListBlobs())
{
if (blob.GetType() == typeof(CloudBlockBlob))
Console.WriteLine(blob.Uri);
Console.ReadLine();
}

You can clearly see our storage account and container name in the URI when you copy the link and hit that from browser, your blob will be downloaded.
That's it! Now you are familiar to start using Azure blob storage.
