By Dante Sblendorio
Like most things open source, Python provides many different options for doing the same thing. There are lots of ways in which you can set up a Python programming environment.
For my money, however, I prefer to use Jupyter Notebooks as my interface of choice for programming in Python. Below, we walk through setting up a Jupyter Notebook.
Anaconda comes with several other options, such as Spyder or Jupyter Lab. Each has certain advantages, but for the most part, it is only a matter of aesthetics. In this article, I assume you will use Jupyter Notebooks as well. If you choose to use a different interface, the Python code will be identical, but the installation procedures may be slightly different. In any case, there are ample resources within the Python community to access when installation problems arise—It’s part of the fun!
One of the advantages of using Anaconda is that it comes with many of the more useful Python packages. pandas is included with the SciPy stack, which contains many of the packages you need as a data scientist. pandas is an open source data analysis package that is easy to use, efficient, and convenient for real-world, practical data analysis. More information on pandas can be found here. To confirm the installation, run:
pip freeze
This will list the packages that have been installed in the tensorflow environment. If you do not see it, or don’t use Anaconda, you can install pandas by running:
pip install pandas
pandas is designed for tabular datasets (similar to those used in SQL or Excel) that contain observational data. It makes cleaning data and extracting statistical significance relatively easy. Additionally, pandas allows you to merge, filter, group, order, and join with simple, intuitive syntax. One resource that I find extremely useful, especially when learning pandas, is the cheat sheet (found here). It contains most of the basic functions and the corresponding syntax. As a data scientist, this makes your life a lot easier, because there is no need to memorize everything. As you become more familiar with pandas, the intuitive structure will become more apparent.
We need to complete one more task before we can start coding: the installation of jupyter notebooks within our tensorflow environment, and one additional package. To do this, run:
conda install jupyter notebook
And then:
conda install scikit-learn
Sci-kit learn is another useful package for doing machine learning with Python. We only need to use one function from the package, but it has many other learning algorithms that are useful.
Finally, to open a jupyter notebook, run:
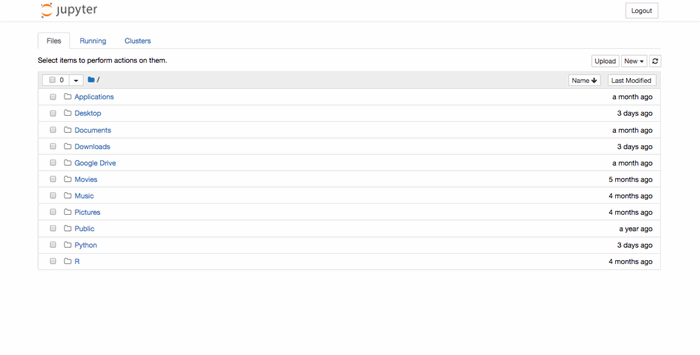
jupyter notebook
A window should appear in your browser that looks something like this:

In the top right, click the New button, and open a Python 3 notebook.
In the code cell that appears, enter the following code:
import sys

member_number = 12345678

print(int(member_number / 10) * sys.version_info.major)
and replace 12345678 with your CodeProject member number. Next, click the play button to run the code. The number that is printed will be your entry code for Challenge 2. Once you’ve obtained your contest entry code, you can erase the Python you wrote to generate it.
Please click here to enter the contest entry code.
