Introduction
Recently, we got our first docker container working in DEV. There are lots of fantastic articles already written on CodeProject, which helped me lot, but I wanted to expand slightly from a developer perspective.
Pre-requisites
- Docker DevCloud VM
- Admin Access to your new VM - Note if you do have an issue with sudo privileges, you can use "
su -" command and password abc123 or Cloud123 to access root - Download Cygwin - please note that you can "install under an unprivileged account just for your own usage, run setup*.exe with the
<tt>--no-admin</tt> option." - Download Docker Tools - From Enterprise Artifact Repository - download docker-1.8.1 (latest at this time)
Configuring Cygwin
- Pick Install from Internet
- Use Default Directory but select 'All Users'
- Use Default Package
- Pick Use System Proxy Settings
- Pick top URL for Download Sites
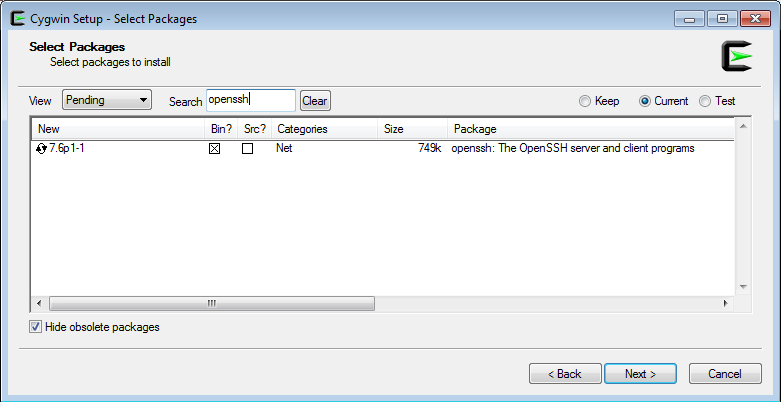
- In Select Packages - search for and select '
openssh', 'curl' and 'socat' and select their binaries - Click Next to complete install
- Select option to create desktop icon (when done, a shortcut for cygwin terminal should appear on your desktop):

Configuring Docker
- Rename downloaded file to be Docker.exe
- Place file in a folder (not in c:\program files or c:\program files(x86))
- Update
path environment variable to reference folder where Docker.exe exists:
- Compute Properties, Advanced System Settings, Environment Variable Button, add to User Path Variable
- From command prompt, type '
docker version' and you should see a response from the client but no server / host response.

Connecting Docker Client to VM
For reference (securely access docker API remotely section):
- Start Cygwin terminal
- Type '
ssh-keygen' - leave default location and passphrase alone - Have admin of your BYO Docker Devcloud VM add your public key to the authorized_keys2 file (if your admin is unfamiliar, there are instructions at the bottom for them)
-
Once VM admin has updated authorized_keys2, verify the key is working from cygwin by entering the following 2 commands:
MYBYO=vmname
	ssh root@$MYBYO id
- If this works, you should receive a response like this one:
uid=0(root) gid=0(root) groups=0(root) context=unconfined_u:unconfined_r:unconfined_t:s0-s0:c0.c1023 - Create a script called
docker-tunnel, from cygwin type:
-
cat > docker-tunnel
- Paste the following text (from step 4 of securely accessing docker instructions)
if [[ ! "$1" ]]; then
echo "Usage: $0 hostname"
else
socat \
"TCP-LISTEN:2375,reuseaddr,fork,range=127.0.0.1/32" \
"EXEC:'ssh -kTax root@$1 socat STDIO UNIX-CONNECT\:/var/run/docker.sock'" &
sleep 1
fi
- ctr-c to exit edit
chmod +x ./docker-tunnel
Test Connection
- From cygwin type
- Open up browser and go to the following address, you get a json file download response
- Json file contents should look similar to the following:
{
  "Os" : "linux",
  "Version" : "1.10.3",
  "Arch" : "amd64",
  "ApiVersion" : "1.22",
  "GitCommit" : "7ffc8ee-unsupported",
  "KernelVersion" : "3.10.0-327.36.3.el7.x86_64",
  "BuildTime" : "2016-06-17T15:27:21.818932147-04:00",
  "PkgVersion" : "docker-common-1.10.3-44.el7.x86_64",
  "GoVersion" : "go1.4.2"
}
Final Connection Piece
- From cygwin type
- Exit cygwin and open a command prompt and type
- You should now see the host section as well as the client section completed:

For VM Admin How to Login and Update Authorized_keys2
For reference (logging into your VM section):
- Start Cygwin terminal
- Type '
ssh -l soeid vm-computer-name' - Pick yes to any prompts - if this is your first time, you will encounter an error concerning no home folder has been setup
- Change directory to /etc/ssh/keys/root
- View contents of
authorized_keys2 by typing 'cat authorized_keys2' - Edit
authorized_keys 2 by using vim, command 'vi authorized_keys2' - sudoHow edit with vim - Editing files with vi — Guide to Linux for Beginners
Hope this article will help you to Use Developer Docker tool to use BYOD VM as your Docker Machine, and Configuration required for the same.
History
- 18th October, 2018: Initial version
