A Technical Blog article.
View entire blog here.
Contents
- Introduction
- Store Image
- Display Image in Image Control, GridView and DataList
- From Database
- From Folder
- Creating Thumbnails
- Adding Watermark Text on Image
- Adding Image as Watermark
Introduction
In this article, I am going to explain how to handle images in ASP.NET. I have seen a lot of questions regarding "How to save and display image from database in ASP.NET" in different .NET discussing forums. I think it must be helpful for beginners to solve their problems regarding images in ASP.NET.
Store Images
We can store images in database and project folders. If it is in database, the datatype of image data is "image", now we can check the database design.
In Database

Here I used create a store procedure to save image in database.
CREATE PROCEDURE [dbo].[sp_UploadImage]
@imageData as image
AS
BEGIN
INSERT INTO Images (imageData) VALUES(@imageData)
END
Now we can look at how to save image in database. We need one FileUpload control to select file, and need to check file extension to verify uploading file is image or not. The below script function "valiadate();" checks the file is an image or not, i.e. we check the file extensions with JavaScript.
Javascript to check Upload file extension
<script language="javascript" type="text/javascript">
            function validate() {
                var result = false;
                var upfile = document.getElementById("FileUpload1").value;
                if (upfile != "") {
                    var accept = "png,gif,jpg,jpeg".split(',');
                    var getExtention = upfile.split('.');
                    var extention = getExtention[getExtention.length - 1];
                    for (i = 0; i < accept.length; i++) {
                        if (accept[i] == extention) {
                            result = true;
                            break;
                        }
                    }
                    if (!result) {
                        alert("allowed file extention are png,gif,jpg,jpeg");
                    }
                }
                else {
                    alert("select image to Upload");
                }
                return result;
            }

</script>
Now check the .aspx page:
<asp:fileupload id="FileUpload1" runat="server">
   <asp:button id="btnUploadImage" onclick="btnUploadImage_Click"
   onclientclick="return validate();" runat="server" text="Upload to DataBase">
Now the server side code. Read bytes value from FileUpload control and pass that value with stored procedure name into a HashTable. That hashtable sends to DataBaseHelper class file to save image in database.
protected void btnUploadImage_Click(object sender, EventArgs e)
{
if (FileUpload1.PostedFile.ContentType.ToLower().StartsWith("image") &&
FileUpload1.HasFile)
{
Hashtable imageHash = new Hashtable();
imageHash.Add("@imageData", FileUpload1.FileBytes);
DataBaseHelper DBHelper = new DataBaseHelper();
DBHelper.ExecuteNonQuery("sp_UploadImage", imageHash);
}
}
Database with Image Data

In Folder
Saving folder is simple to compare saving in database. FileUpload control has SaveAs() method to save file. Here I save images in "savedImages" folder. We are not keeping any values in database. At the time of display image, we pick images from folder using DirectoryInfo and FileInfo Class or Directory.GetFiles method.
protected void btnUploadToFolder_Click(object sender, EventArgs e)
{
if (FileUpload1.PostedFile.ContentType.ToLower().StartsWith
("image") && FileUpload1.HasFile)
{
string savelocation = Server.MapPath("savedImages/");
string fileExtention = System.IO.Path.GetExtension(FileUpload1.FileName);
string fileName = Guid.NewGuid().ToString();
string savePath = savelocation + fileName + fileExtention;
FileUpload1.SaveAs(savePath);
}
}
Preview of saved images in folder

Display Images in Image Control, GridView and DataList
To display image from database is not as simple as displaying from folders because we previously saved image as byte in database.
From Database
To display image, we need to change byte data to Image; to convert byte data to image we need to use a separate page, here I am using a Generic Handler page to show image from database. In that Generic Handler page, we take image byte from database and render in that Handler page and set image controls src or ImageUrl to that Generic Handler page. For example, it work like this:
Image1.ImageUrl="Handler.aspx?id=1";
Image1.ImageUrl="savedImages/ca34fa6c-8321-492c-938b-5413781bdcde.png";
Method 1 - Display image in Generic Handler page:
public void ProcessRequest (HttpContext context) {
HttpRequest request = context.Request;
if (!string.IsNullOrEmpty(request.QueryString["id"]))
{
Hashtable hash = new Hashtable();
hash.Add("@imageID", request.QueryString["id"]);
DataBaseHelper DBHelper = new DataBaseHelper();
byte[] imageByte = (byte[])DBHelper.SQLExecuteNonQuery
("sp_getImage", hash);
System.Drawing.Image b;
Bitmap bitMap = null;
if (imageByte != null && imageByte.Length > 0)
{
using (MemoryStream mm = new MemoryStream())
{
mm.Write(imageByte, 0, imageByte.Length);
b = System.Drawing.Image.FromStream(mm);
bitMap = new System.Drawing.Bitmap(b, b.Width, b.Height);
using (Graphics g = Graphics.FromImage(bitMap))
{
g.InterpolationMode =
System.Drawing.Drawing2D.InterpolationMode.HighQualityBicubic;
g.SmoothingMode = SmoothingMode.HighQuality;
g.CompositingQuality =
System.Drawing.Drawing2D.CompositingQuality.HighQuality;
g.DrawImage(bitMap, 0, 0, b.Width, b.Height);
g.Dispose(); b.Dispose(); mm.Dispose();
context.Response.ContentType = "image/jpeg";
bitMap.Save(context.Response.OutputStream,
System.Drawing.Imaging.ImageFormat.Jpeg);
bitMap.Dispose();
}
}
}
}
}
Method 2 - You can also use this code to render image in Handler page:
public void ProcessRequest (HttpContext context) {
HttpRequest request = context.Request;
if (!string.IsNullOrEmpty(request.QueryString["id"]))
{
Hashtable hash = new Hashtable();
hash.Add("@imageID", request.QueryString["id"]);
DataBaseHelper DBHelper = new DataBaseHelper();
byte[] imageByte = (byte[])DBHelper.SQLExecuteNonQuery("sp_getImage", hash);
if (imageByte != null && imageByte.Length > 0)
{
context.Response.ContentType = "image/jpeg";
context.Response.BinaryWrite(imageByte);
}
}
}
Example of Handler page displaying image, and check the URL, it displays 3rd image from the database.

Stored procedure used to get Image:
CREATE PROCEDURE sp_getImage
@imageID as numeric
AS
BEGIN
SELECT imageData FROM Images WHERE imageId=@imageID
END
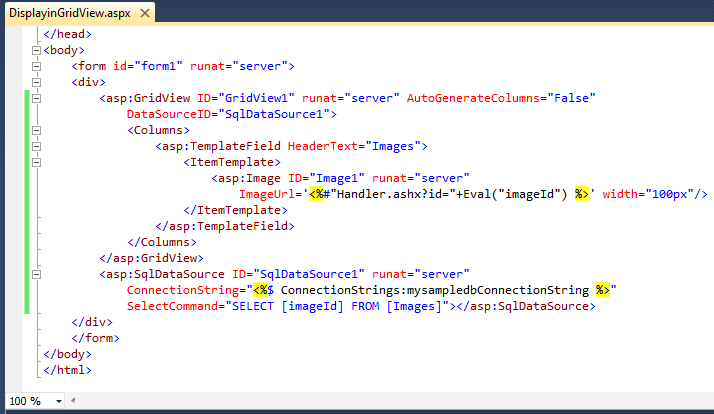
I already said how to display image in Image control. Now we can check how to display in GridView Control form folders and Database. From Database. In the aspx page, I put a GridView and then set SqlDataSource, after that I add a Template column, then drag and drop an Image control in Template column and set ImageUrl of the image control using Image DataBinding.
Setting image URL

Source of GridView
Passing imageId to Handler.ashx page. It will display image as I said above.

Preview with HTML Source.

Displaying Image From Folder
You need to add a template column in GridView after that put one image control on template column, then set image controls DataImageUrlField from DataTable.
<asp:GridView ID="GridView2" runat="server" AutoGenerateColumns="false">
     <Columns>
         <asp:ImageField  DataImageUrlField="Image">
         </asp:ImageField>
     </Columns>
 </asp:GridView>
Server Side Code
private void BindImage()
{
DataTable dt = new DataTable();
dt.Columns.Add(new DataColumn("Image", typeof(string)));
DataRow dr;
int i = 0;
foreach (string file in Directory.GetFiles(Server.MapPath(@"savedImages\")))
{
dr = dt.NewRow();
dt.Rows.Add(dr);
dr["Image"] = "savedImages/" + System.IO.Path.GetFileName(file);
i += 1;
}
GridView2.DataSource = dt;
GridView2.DataBind();
}
Now we can check how DataList works. Datalist is a more simple control than GridView. Here also, we call Database image with Generic Handler file Handler.ashx and pass "id" as QueryString. Handler file display image, and we point that image in to our DataList control.
<asp:DataList ID="DataList1" runat="server"
            RepeatColumns="3" RepeatDirection="Horizontal">
            <ItemTemplate>
                <table>
                    <tr>
                        <td valign="middle" align="center"
            style="background-color:#cccccc;border:1px solid gray;
            width:150px;height:150px;"><%#DataBinder.Eval
            (Container.DataItem, "images") %></td>
                    </tr>
                </table>
            </ItemTemplate>
        </asp:DataList>
protected void Page_Load(object sender, EventArgs e)
    {
        if (!IsPostBack)
            BindDataList();
    }
    private void BindDataList()
    {
        string sqlCmd = "SELECT imageid FROM Images";
        DataBaseHelper DBHelper = new DataBaseHelper();
        DataTable dt = DBHelper.GetTable(sqlCmd);
        //adding new column to display image
        DataColumn imageCol = new DataColumn("images", typeof(string));
        dt.Columns.Add(imageCol);

        if (dt.Rows.Count > 0)
        {
            for (int i = 0; i < dt.Rows.Count; i++)
            {
                dt.Rows[i][imageCol] = string.Format
        ("<img src='Handler.ashx?id={0}' alt='' style='width:100px' />",
            dt.Rows[i][0].ToString());
            }
        }
        DataList1.DataSource = dt;
        DataList1.DataBind();
    }
Preview of Images in DataList Control

Creating Thumbnails Image
To create a thumbnail, we need an image. We can pick image from FileUpload control, then we need to know dimension of image, i.e. [ Width x Height ]. Here I create a UI to handle this.
Check the UI:

To maintain aspect ratio of image with height and width, I use a class AspectRatio.cs. You can get the source code "Browse Code" or "Download Source" Section. Now we can look at the code of thumbnail creating section. As I said above, here I call a function to create thumbs. Let's look at this. The below method returns Bitmap image, I am saving that image in root folder.
public Bitmap CreateThumbnail(byte[] imageByte,
   bool maintainAspectRatio, int desiredWidth, int desiredHeight)
   {
       Bitmap bmp = null;
       try
       {
           MemoryStream memStream = new MemoryStream(imageByte);
           System.Drawing.Image img = System.Drawing.Image.FromStream(memStream);

           if (maintainAspectRatio)
           {
               AspectRatio aspectRatio = new AspectRatio();
               aspectRatio.WidthAndHeight(img.Width, img.Height,
           desiredWidth, desiredHeight);
               bmp = new Bitmap(img, aspectRatio.Width, aspectRatio.Height);
           }
           else
           {
               bmp = new Bitmap(img, desiredWidth, desiredHeight);
           }
           memStream.Dispose();
       }
       catch(Exception ex)
       {
           havException = true;
           ExceptionMessage = ex.Message;
       }
       return bmp;
   }
Server side code of "Create Thumbnail" Button. You can see this button in the above image. Here, I pass image byte[] to CreateThumbnail method. It returns Bitmap Image, and save that file in root folder.
protected void btnCreateThumb_Click(object sender, EventArgs e)
{
int width = 0;
int height = 0;
byte[] image = FileUpload1.FileBytes;
Int32.TryParse(txtDWidth.Text, out width);
Int32.TryParse(txtDHeight.Text, out height);
ImageHandler imageHandler = new ImageHandler();
bool maintainAR = cbxAspectRation.Checked;
Bitmap bmp = imageHandler.CreateThumbnail(image, maintainAR, width, height);
if (bmp != null)
{
string fileName = Guid.NewGuid().ToString() + ".jpg";
bmp.Save(Server.MapPath(fileName));
Image1.ImageUrl = fileName;
}
else
{
if (imageHandler.havException)
{
Response.Write(imageHandler.ExceptionMessage);
}
}
}
You can check preview of Thumbnail, Height and Width of image with the help of Firebug console.

Creating Watermark Text on Image
Now we can discuss how to add Watermark on image. I think you know about Watermark. Here I call a method AddWatermarkText to add watermark on image. I pass image byte and watermark text to this method. The method is created on System.Drawing.Image object from MemoryStream. MemoryStream holds the image Byte. Using System.Drawing.SolidBrush and System.Drawing.Font, we create Text after that:
Graphics.DrawString(string s, Font font, Brush brush, PointF point);
We write text on Image. The below method is AddWatermarkText(byte[] imageByte,string textOnImage); you can check that.
public Image AddWatermarkText(byte[] imageByte,string textOnImage)
    {
        System.Drawing.Image img = null;
        try
        {
            MemoryStream memStream = new MemoryStream(imageByte);
            img = System.Drawing.Image.FromStream(memStream);
            Graphics g = System.Drawing.Graphics.FromImage(img);
            Font font = new Font("Aril", 30, FontStyle.Bold);

            SolidBrush solidBrush = new SolidBrush(Color.Red);
            Point point = new Point(img.Width / 3, img.Height / 2);
            g.DrawString(textOnImage, font, solidBrush, point);
            g.Save();

            memStream.Dispose();
            g.Dispose();
            solidBrush.Dispose();
            font.Dispose();
        }
        catch(Exception ex)
        {
            havException = true;
            ExceptionMessage = ex.Message;
        }
        return img;
    }
The above method returns Image. I am saving this image in root folder and display it using an Image control. You can check the UI of add Watermark Page and watermark on resultant Image.

Now we can check the code of Add Watermark button:
protected void btnAddWaterMark_Click(object sender, EventArgs e)
{
if (FileUpload1.HasFile)
{
byte[] imgbyte = FileUpload1.FileBytes;
ImageHandler imageHandler = new ImageHandler();
System.Drawing.Image imageWithWatermark =
imageHandler.AddWatermarkText(imgbyte, txtWaterMarkText.Text);
if (imageWithWatermark != null)
{
string saveFileName = Guid.NewGuid().ToString() + ".jpg";
imageWithWatermark.Save(Server.MapPath(saveFileName));
Image1.ImageUrl = saveFileName;
imageWithWatermark.Dispose();
}
else
{
if (imageHandler.havException)
{
Response.Write(imageHandler.ExceptionMessage);
}
}
}
}
Image as Watermark
In this section, I am explaining how to add Image as watermark. I think you have seen the same website with images. They have their log on image. We can check how to do something like that. First we need a logo image. Here I take CodeProject's logo image to explain this example. I save CodeProject logo image in watermarklogo folder.

I am embedding CodeProject logo image into an upload image, using Graphics.DrawImage(Image image, Point point); method. Here I add fading to logo image using TextureBrush.
System.Drawing.Image waterMarkimage = System.Drawing.Image.FromFile
(Server.MapPath("watermarklogo/CodeprojectLogo.jpg"));
Graphics opacity = System.Drawing.Graphics.FromImage(waterMarkimage);
Rectangle imageRect = new Rectangle(0, 0, waterMarkimage.Width,
waterMarkimage.Height);
Brush brush = new TextureBrush(waterMarkimage, imageRect);
opacity.FillRectangle(brush, imageRect);
opacity.Save();
Check the sample image:

Check the source code:
protected void btnAddImageAsWaterMark_Click(object sender, EventArgs e)
{
byte[] imageByte = FileUpload1.FileBytes;
MemoryStream memStream = new MemoryStream(imageByte);
System.Drawing.Image img = System.Drawing.Image.FromStream(memStream);
System.Drawing.Image waterMarkimage = System.Drawing.Image.FromFile
(Server.MapPath("watermarklogo/CodeprojectLogo.jpg"));
Graphics opacity = System.Drawing.Graphics.FromImage(waterMarkimage);
Rectangle imageRect = new Rectangle(0, 0, waterMarkimage.Width,
waterMarkimage.Height);
Brush brush = new TextureBrush(waterMarkimage, imageRect);
opacity.FillRectangle(brush, imageRect);
opacity.Save();
Graphics g = System.Drawing.Graphics.FromImage(img);
Point point = new Point(img.Width / 3, img.Height / 2);
g.DrawImage(waterMarkimage, point);
string filename = Guid.NewGuid().ToString() + ".jpg";
img.Save(Server.MapPath(filename));
opacity.Dispose();
memStream.Dispose();
g.Dispose();
waterMarkimage.Dispose();
img.Dispose();
Image1.ImageUrl = filename;
}
