Introduction
This article demonstrates how BoofCV's Android library greatly simplifies working with the Camera2 API, processing camera images, and visualizing the results. Android development and the Camera2 API are both very complex, e.g., as demonstrated by Google's Camera2Basic example. That example covers about 1/2 of what you need to do.
With BoofCV, you just need to tell it what resolution you want, implement an image processing function, and (optionally) write a visualization function. BoofCV will select the camera, open the camera, create a thread pool, synchronize data structures, handle the Android life cycle (open/close the camera properly, stop threads), convert the YUV420 image, correctly align input pixels to screen pixels, and change camera settings upon request.
What we are going to discuss in this article is writing your own auto-focus routine. While not as sexy as say using the latest in Deep Learning (e.g., classifying all objects, aging your face), this article is about being practical and making something that works. Doesn't matter how amazing your computer vision algorithm is if the app is constantly crashing! Once you understand how this code works, you can combine it with other algorithms to say focus the camera on just dogs and not people.
If you want to see additional Android computer vision examples written using this library, checkout the BoofCV demonstration app:
APK on Google Play Store
The auto-focus code in action. This is an interesting mix of hardware and computer vision you don't normally see examples of.
The Auto-Focus Algorithm

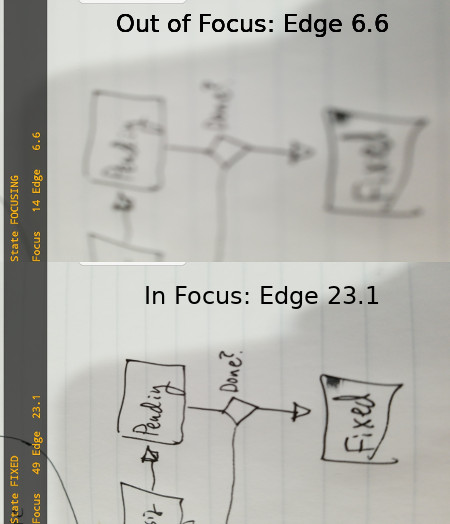
Example of an in focus and out of focus image. Notice how the edge intensity is larger in the in focus image?
How built in auto-focus behaves varies by manufactures and in computer vision applications, my experience is that they tend to focus on anything but what you want them to. To get around this problem, we are going to roll our own auto-focus by manually controlling the camera's focus and finding the focus value with the maximum image "sharpest". The sharpness of an image is determined by its gradient intensity. The image's gradient is its x and y spatial derivatives. The gradient's intensity can be defined in different ways. Here, we use the Euclidean norm, i.e., sqrt(dx**2 + dy**2).

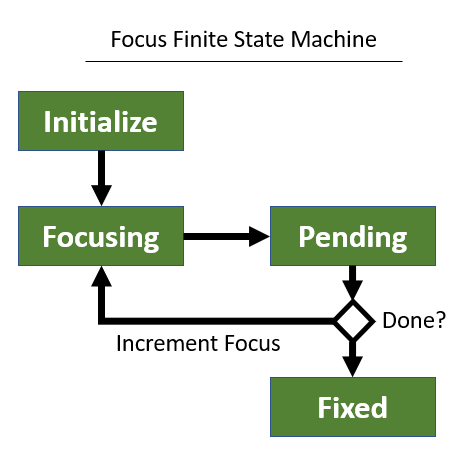
The auto-focus algorithm is a finite state machine, summarized above. It exhaustively goes through all focus values to select the one with the maximum edge intensity. Once the maximum edge intensity is found, it fixes the focus. You can start the process over by tapping the screen.
Source Code Highlights
At this point, you should check out the source code on Github and explore the code a bit. We will step through critical steps in setting up your own project and important lines in the source code itself. It's assumed that you already know a bit about Android development and some steps are skipped for the sake of brevity.
Step One: Create a New Project in Android Studio
This article is labeled as intermediate so I'm assuming you can do this without pictures and a video. The minimum SDK has to be 22. This is the first version in which a nasty bug in Camera 2 API was fixed.
Step Two: Dependencies
Add the following to the dependencies field in app/build.gradle.
dependencies {
    ['boofcv-android', 'boofcv-core'].each {
        String a ->
            implementation group: 'org.boofcv', name: a, version: '0.32-SNAPSHOT'
    }
}
You also need to exclude a few transitive dependencies because Android includes their own version and there will be a conflict.
configurations {
    all*.exclude group: "xmlpull", module: "xmlpull"
    all*.exclude group: "org.apache.commons", module: "commons-compress"
    all*.exclude group: "com.thoughtworks.xstream", module: "commons-compress"
}
Then let Android Studio synchronize your Gradle files.
Step Three: Android Permissions
Inside app/src/main/AndroidManifest.xml, you need to grant yourself access to the camera:
<uses-permission android:name="android.permission.CAMERA" />
<uses-feature android:name="android.hardware.camera2.full" />
Step Four: MainActivity: OnCreate()
You should now open up the MainActivity.java file. Notice how this class extends VisualzieCamera2Activity. That's the activity you should extend if you wish to render something on the screen. Otherwise, you can extend SimpleCamera2Activity if you just needs the camera frames.
Check out the onCreate() function. A lot is going on in this function; getting camera permissions, specifying the type of output image, what resolution you want, and turning off double buffering. Let's go through line by line.
TextureView displays the raw camera preview. FrameLayout for drawing visuals. We also add a touch listener so that the user can restart the focus algorithm. More on that later.
TextureView view = findViewById(R.id.camera_view);
FrameLayout surface = findViewById(R.id.camera_frame);
surface.setOnClickListener(this);
Here, we request access to the camera from the user. This has been covered extensively throughout the web, so look at the source code for details on how this is done.
requestCameraPermission();
BoofCV needs to know what image format we desire. Here, we tell it to give us a gray scale 8-bit image.
setImageType(ImageType.single(GrayU8.class));
Cameras typically support numerous resolutions. BoofCV will handle selecting a resolution for us, but we should tell it something about our requirements. What the line below does is tells BoofCV to find an image resolution which has approximately that many pixels. More complex logic is possible by overriding the selectResolution() function.
targetResolution = 640*480;
BoofCV will also automatically render the captures frame. In this case, we don't want to do that and just show a raw camera feed. So let's turn that behavior off.
bitmapMode = BitmapMode.NONE;
Finally, we tell it to start the camera and to use the following surface and view for visualization.
startCamera(surface,view);
Step Five: Camera Control
By default, the camera is configured to be in full auto mode. We don't want that so we override the default configureCamera() function with our own logic. BoofCV defined configureCamera() and it's not a built in Camera2 API function. It takes a lot more work to do this using the Camera2 API directly.
The in code comments below describe what each block of code is doing. In essence, it's where the finite state machine above is implemented.
@Override
protected void configureCamera(CameraDevice device,
CameraCharacteristics characteristics, CaptureRequest.Builder captureRequestBuilder) {
captureRequestBuilder.set(CaptureRequest.CONTROL_AF_MODE, CaptureRequest.CONTROL_AF_MODE_OFF);
Float minFocus = characteristics.get(CameraCharacteristics.LENS_INFO_MINIMUM_FOCUS_DISTANCE);
switch( state ) {
case INITIALIZE:{
if( minFocus == null ) {
Toast.makeText(this,"manual focus not supported", Toast.LENGTH_SHORT).show();
state = State.UNSUPPORTED;
} else {
focusBestIndex = 0;
focusBestValue = 0;
focusIndex = 0;
focusTime = System.currentTimeMillis()+FOCUS_PERIOD;
state = State.FOCUSING;
captureRequestBuilder.set(CaptureRequest.LENS_FOCUS_DISTANCE, 0f);
}
}break;
case PENDING:{
focusIndex++;
if( focusIndex < FOCUS_LEVELS ) {
focusTime = System.currentTimeMillis()+FOCUS_PERIOD;
captureRequestBuilder.set(CaptureRequest.LENS_FOCUS_DISTANCE,
minFocus*focusIndex/(FOCUS_LEVELS-1));
state = State.FOCUSING;
} else {
captureRequestBuilder.set(CaptureRequest.LENS_FOCUS_DISTANCE,
minFocus*focusBestIndex/(FOCUS_LEVELS-1));
state = State.FIXED;
}
}break;
}
}
Step Six: Image Processing
BoofCV provides its own image processing function that automatically converted the streaming YUV420_888 image into one which you understand. It has also launched a thread for you to process images inside of. This means you can take as long as you want without crashing! Frames are simply discarded if your image processing can't keep up with the camera's feed.
@Override
protected void processImage(ImageBase image) {
GrayU8 gray = (GrayU8)image;
derivX.reshape(gray.width,gray.height);
derivY.reshape(gray.width,gray.height);
intensity.reshape(gray.width,gray.height);
GImageDerivativeOps.gradient(DerivativeType.SOBEL,gray,derivX,derivY, BorderType.EXTENDED);
GGradientToEdgeFeatures.intensityE(derivX, derivY, intensity);
edgeValue = ImageStatistics.mean(intensity);
}
Step Seven: Drawing
Normally, you will need to create a call back for the SurfaceView, but this is also handled for you. You do still need to override the onDrawFrame function below. The code below is fairly standard Android drawing which is why it isn't highlighted. If you want to see how you can use BoofCV render the actual image being processed (not the live video feed) and align visuals to the exact pixel, see the QR Code example.
@Override
protected void onDrawFrame(SurfaceView view, Canvas canvas) {
   super.onDrawFrame(view, canvas);
   ....
}
Step Eight: Responding to User Touches
In onCreate(), we added a touch listener. This allows the user to restart the auto-focus. The code below shows how this is done. By waiting until the auto-focus is in the FIXED state, we don't need to worry about if the camera is busy or not, simplifying the code.
@Override
public void onClick(View v) {
if( state == State.FIXED ) {
state = State.INITIALIZE;
changeCameraConfiguration();
}
}
Using Other Computer Vision Libraries
In this example, we used BoofCV to do the image processing. There's no reason you can't use other libraries like OpenCV or your favorite deep learning library (e.g., Torch) instead. What you will need to do is convert the BoofCV image into an image that the other library will understand. That's much easier to do than obtain the image in the first place! You have full access to the raw byte arrays and image characteristics (e.g., width, height, stride) in BoofCV images.
Additional Examples
BoofCV's repository includes a few additional minimalist Android examples.
Conclusion
We were able to create a fully functional computer vision app on Android which manipulates the camera settings in library, while processing images and displaying information to the user. This was done without extensive knowledge of the Android life cycle, how the Camera2 API works, or know what YUV420 is enabling you to go down to business and create cool computer vision applications with minimal fuss!
History
- 13th November, 2018: Initial version
