This article on microservices focused on what microservices are and their advantages over monolithic services architecture. The article describes how to develop a microservice using ASP.NET Core and run it via IIS and Docker container. It will demonstrate how to create a Product microservice using ASP.NET Core step by step with the help of pictures, go over Entity Framework Core Migrations, and running Run the Product Microservice (via IIS Express).
The term microservices portrays a software development style that has grown from contemporary trends to set up practices that are meant to increase the speed and efficiency of developing and managing software solutions at scale. Microservices is more about applying a certain number of principles and architectural patterns than it is about architecture. Each microservice lives independently, but on the other hand, also all rely on each other. All microservices in a project get deployed in production at their own pace, on-premise, on the cloud, independently, living side by side.
Microservices Architecture
The following picture from Microsoft Docs shows the microservices architecture style.
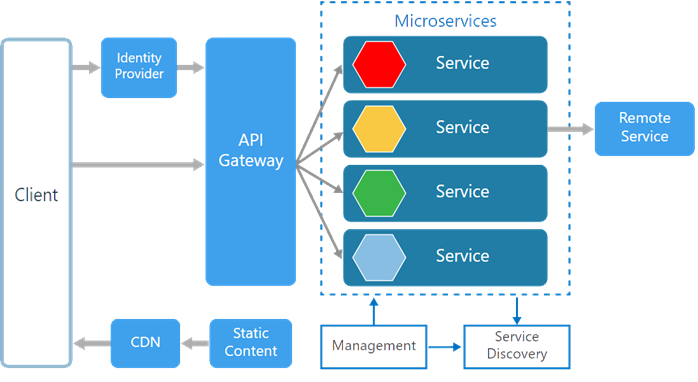
There are various components in a microservices architecture apart from the microservices themselves.
Management. Maintains the nodes for the service.
Identity Provider. Manages the identity information and provides authentication services within a distributed network.
Service Discovery. Keeps track of services and service addresses and endpoints.
API Gateway. Serves as client’s entry point. The single point of contact from the client which, in turn, returns responses from underlying microservices and sometimes an aggregated response from multiple underlying microservices.
CDN. A content delivery network to serve static resources. For example, pages and web content in a distributed network.
Static Content. The static resources like pages and web content.
Microservices are deployed independently with their own database per service so the underlying microservices look as shown in the following picture:

Monolithic vs Microservices Architecture
Monolithic applications are more of a single complete package, having all the related needed components and services encapsulated in one package.
The following is the diagrammatic representation of monolithic architecture whether packaged completely or service based.
A microservice is an approach to create small services, each running in their own space that can communicate via messaging. These are independent services directly calling their own database.
The following is the diagrammatic representation of microservices architecture.
In monolithic architecture, the database remains the same for all the functionalities even if an approach of service-oriented architecture is followed, whereas in microservices, each service will have their own database.
Docker Containers and Docker Installation
Containers like Docker (and others) slice the operating system resources. For example, the network stack, processes namespace, file system hierarchy and the storage stack. Docker is more like virtualizing the operating system. Learn more about Docker here. Open this URL and click on Download from Docker hub. Once downloaded, login to the Docker and follow instructions to install Docker for Windows.
Microservice using ASP.NET Core
This section will demonstrate how to create a Product microservice using ASP.NET Core step by step with the help of pictures. The service will be built using ASP.NET Core 2.1 and Visual Studio 2017. ASP.NET Core comes integrated with VS 2017. This service will have its own dbcontext and database with an isolated repository so that the service can be deployed independently.
Creating an ASP.NET Core Application Solution
- Open the Visual Studio and add a new project.
- Choose the application as ASP.NET Core Web Application and give it a meaningful name.
- Next, choose API as the type of the project and make sure that Enable Docker Support option is selected and that the OS type is set as Linux.
- The solution will look as shown below:
Adding Models
- Add a new folder named Model to the project.
- In the Models folder, add a class named
Product.
- Add a few properties like
Id, Name, Description, Price to the Product class. The product should also be of some kind and for that, a category model is defined and a CategoryId property is added to the product model.
- Similarly, add
Category model.
Enabling EF Core
Though .NET Core API project has inbuilt support for EF Core and all the related dependencies are downloaded at the time of project creation and compilation that could be found under SDK section in the project as shown below.
Microsoft.EntityFrameworkCore.SqlServer (2.1.1) should be the package inside the downloaded SDKs. If it is not present, it could be explicitly added to the project via Nuget Packages.
Adding EF Core DbContext
A database context is needed so that the models could interact with the database.
- Add a new folder named DBContexts to the project.
- Add a new class named
ProductContext which includes the DbSet properties for Products and Categories. OnModelCreating is a method via which the master data could be seeded to the database. So add the OnModelCreating method and add some sample categories that will be added to the database (initially, into the category table) when the database is created.
ProductContext Code
using Microsoft.EntityFrameworkCore;
using ProductMicroservice.Models;

namespace ProductMicroservice.DBContexts
{
  public class ProductContext : DbContext
  {
    public ProductContext(DbContextOptions<ProductContext> options) : base(options)
    {
    }
    public DbSet<Product> Products { get; set; }
    public DbSet<Category> Categories { get; set; }

    protected override void OnModelCreating(ModelBuilder modelBuilder)
    {
      modelBuilder.Entity<Category>().HasData(
          new Category
          {
            Id = 1,
            Name = "Electronics",
            Description = "Electronic Items",
          },
          new Category
          {
            Id = 2,
            Name = "Clothes",
            Description = "Dresses",
          },
          new Category
          {
            Id = 3,
            Name = "Grocery",
            Description = "Grocery Items",
          }
      );
    }
  }
}
- Add a connection string in the appsettings.json file.
Open the Startup.cs file to add the SQL Server DB provider for EF Core. Add the code services.AddDbContext<ProductContext>(o => o.UseSqlServer(Configuration.GetConnectionString("ProductDB"))); under ConfigureServices method. Note that in the GetConnectionString method, the name of the key of the connection string is passed that was added in the appsettings file.
Adding Repository
Repository works as a micro component of microservice that encapsulates the data access layer and helps in data persistence and testability as well.
- Add a new folder named Repository in the project and add an Interface name
IProductRepository in that folder. Add the methods in the interface that performs CRUD operations for Product microservices.
- Add a new concrete class named
ProductRepository in the same Repository folder that implements IProductRepository. All these methods need implementation.
- Add the implementation for the methods via accessing context methods.
ProductRepository.cs
using Microsoft.EntityFrameworkCore;
using ProductMicroservice.DBContexts;
using ProductMicroservice.Models;
using System;
using System.Collections.Generic;
using System.Linq;

namespace ProductMicroservice.Repository
{
  public class ProductRepository: IProductRepository
  {
    private readonly ProductContext _dbContext;

    public ProductRepository(ProductContext dbContext)
    {
      _dbContext = dbContext;
    }
    public void DeleteProduct(int productId)
    {
      var product = _dbContext.Products.Find(productId);
      _dbContext.Products.Remove(product);
      Save();
    }

    public Product GetProductByID(int productId)
    {
      return _dbContext.Products.Find(productId);
    }

    public IEnumerable<Product> GetProducts()
    {
      return _dbContext.Products.ToList();
    }

    public void InsertProduct(Product product)
    {
      _dbContext.Add(product);
      Save();    }

    public void Save()
    {
      _dbContext.SaveChanges();
    }

    public void UpdateProduct(Product product)
    {
      _dbContext.Entry(product).State = EntityState.Modified;
      Save();
    }
  }
}
- Open the
Startup class in the project and add the code as services.AddTransient<IProductRepository, ProductRepository>(); inside the ConfigureServices method so that the repository’s dependency is resolved at run time when needed.
Adding Controller
The microservice should have an endpoint for which a controller is needed, which exposes the HTTP methods to the client as endpoints of the service methods.
- Right click on the Controllers folder and add a new Controller as shown below:
- Select the option API Controller with read/write actions to add the controller.
- Give the name of the controller as
ProductController.
- A
ProductController class will be added in the Controllers folder with default read/write actions that will be replaced later with product read/write actions. HTTP methods are created acting as an endpoint of the service.
ValuesController can be deleted as it is not needed.
- Add implementation to the methods by calling the repository methods as shown below. The basic implementation is shown here for the sake of understanding the concept. The methods could be attribute routed and could be decorated with more annotations as needed.
ProductController.cs
using Microsoft.AspNetCore.Mvc;
using ProductMicroservice.Models;
using ProductMicroservice.Repository;
using System;
using System.Collections.Generic;
using System.Transactions;

namespace ProductMicroservice.Controllers
{
  [Route("api/[controller]")]
  [ApiController]
  public class ProductController : ControllerBase
  {
    private readonly IProductRepository _productRepository;

    public ProductController(IProductRepository productRepository)
    {
      _productRepository = productRepository;
    }

    [HttpGet]
    public IActionResult Get()
    {
      var products = _productRepository.GetProducts();
      return new OkObjectResult(products);
    }

    [HttpGet("{id}", Name = "Get")]
    public IActionResult Get(int id)
    {
      var product = _productRepository.GetProductByID(id);
      return new OkObjectResult(product);
    }

    [HttpPost]
    public IActionResult Post([FromBody] Product product)
    {
      using (var scope = new TransactionScope())
      {
        _productRepository.InsertProduct(product);
        scope.Complete();
        return CreatedAtAction(nameof(Get), new { id = product.Id }, product);
      }
    }

    [HttpPut]
    public IActionResult Put([FromBody] Product product)
    {
      if (product != null)
      {
        using (var scope = new TransactionScope())
        {
          _productRepository.UpdateProduct(product);
          scope.Complete();
          return new OkResult();
        }
      }
      return new NoContentResult();
    }

    [HttpDelete("{id}")]
    public IActionResult Delete(int id)
    {
      _productRepository.DeleteProduct(id);
      return new OkResult();
    }
  }
}
Entity Framework Core Migrations
Migrations allow us to provide code to change the database from one version to another.
- Open Package Manager Console.
- To enable the migration, type the command
Add-Migration and give that a meaningful name like InitialCreate and press enter.
- Once the command is executed, if we look at our solution now, we see there's a new Migrations folder. And it contains two files. One, a snapshot of our current context model. Feel free to check the files. The files are very much self-explanatory.
- To ensure that migrations are applied to the database, there's another command for that. It's called the
update-database command. If executed, the migrations will be applied to the current database.
- Check the SQL Server Management Studio to verify if the database got created.
- When the data of the
Categories table is viewed, the default master data of the three categories is shown.
Run the Product Microservice
The service could be run via IIS Express. For example, Visual Studio default or via Docker container as well.
Via IIS Express
Choose IIS Express in Visual Studio as shown below and press F5, or click the IIS Express button itself.
The application will be up once the browser page is launched. Since it has nothing to show, it will be blank, but the service could be tested via any API testing client. Here Postman is used to testing the service endpoints. Keep it opened and the application running.
Install Postman if it is not on the machine and launch it.
POST
To test the POST method (i.e., creating a new resource), select the method as POST in postman and provide the endpoint (i.e., https://localhost:44312/api/product). Then in the Body section, add JSON that has similar properties of the Product model as shown below and click on Send.
The response is returned with the Id of the product as well.
The Post method of the controller is responsible to create a resource in the database and send the response.
The line return CreatedAtAction(nameof(Get), new { id = product.Id }, product); returns the location of the created resource that could be checked in the Location attribute in the response under the Headers tab.
Perform a select query on the product table and an added row as shown for the newly created product.
Create one more product in a similar way.
GET
Perform a GET request now with the same address and two records are shown as a JSON result response.
DELETE
Perform the delete request by selecting DELETE as the verb and appending id as 1 (if the product with id 1 needs to be deleted) and press Send.
In the database, one record with Id 1 gets deleted.
PUT
PUT verb is responsible for updating the resource. Select the PUT verb, provide the API address, and in the Body section provide details which the product needs to be updated in JSON format. For example, update the product with Id 2 and update its name, description, and price from Samsung to iPhone specific. Press Send.
Check the database to see the updated product.
Via Docker Containers
Running the service could be done via Docker commands to be run in a Docker command prompt and using Visual Studio as well. Since we added the Docker support, it is easy to run the service in a Docker container using Visual Studio.
- Add a container orchestrator support in the solution as shown below:
- This will ask for the orchestrator. Select Docker Compose and press OK.
Once added to the solution, the solution will look like the image below having docker-compose with dockerignore and docker-compose.yml and its override file.
As soon as the solution is saved, it builds the project under the container and creates a Docker image. All the commands execution can be seen in the output window when the solution is saved.
- Open the command prompt in admin mode and navigate to the same folder where the project files are.
- Run the command
docker images to see all the created images. We see that productmicroserviceimage is the latest one.
- Now run the application with Docker as an option as shown below:
- Now, run the command
docker ps to see the running containers. It shows the container is running on 32773:80 port.
- Since the container is in running state, it is good to test the service now running under the container. To test the service, replace "
values" with product in the address as shown below. Ideally, it should get the product details. But it gives an exception as shown below:
- Running the same thing under IIS Express works fine, i.e., on port 44312. Replace "
values" with the product to get the product details.
- Since in IIS Express, the application runs fine and not in Docker container, and the error clearly shows that something is wrong with SQL Server in that it does not understand our Docker container (or it is not running under our Docker container). In this scenario, the Docker container is running as a separate machine inside the host computer. So, to connect to the SQL database in the host machine, remote connections to SQL need to be enabled. We can fix this.
- Open the SQL Server Configuration Manager. Now select Protocols for MSSQLSERVER and get the IPAll port number under TCP/IP section.
- The connection string mentioned in the appsettings.json file points to the data source as local, which the Docker container does not understand. It needs a proper IP addresses with port and SQL authentication. So, provide the relevant details, i.e., Data Source as IP address, port number and SQL authentication details as shown below:
- Now run the application again with Docker as an option as we did earlier.
This time, the response is received.
- Test the same in the Postman.
- Test again with IIS Express URL.
This proves that the microservice is running on two endpoints and on two operating systems independently locally deployed.
Conclusion
A microservice is a service built around a specific business capability, which can be independently deployed and is called bounded context. This article on microservices focused on what microservices are and their advantages over monolithic services architecture. The article describes how to develop a microservice using ASP.NET Core and run it via IIS and Docker container. Likewise, the service can have multiple images and can be run on multiple containers at the same point of time.

