Introduction
Microsoft keeps inventing new frameworks but eventually it's plain old Win32 that wins. Here is a way, based on the new C++ 17/WinRT API to wrap any UWP control inside a plain C++ Win32 application.
You need VS 2017+, Windows 10 build 1903 or later, a recent Windows SDK (17763+) and link against "windowsapp.lib" (Nothing related to precompiled headers discussed in the above page is required).
UWP
UWP provides us some nice controls, found here. We first have to initialize winrt and then WindowsXamlManager:
#include <winrt/base.h>
#include <atlbase.h>
#include <winrt/Windows.system.h>
#include <winrt/Windows.UI.Core.h>
#include <winrt/Windows.UI.Input.Inking.h>
#include <winrt/Windows.UI.Text.h>
#include <winrt/Windows.Foundation.h>
#include <winrt/Windows.Foundation.Collections.h>
#include <winrt/Windows.UI.Xaml.Hosting.h>
#include <winrt/Windows.UI.Xaml.Controls.h>
#include <winrt/Windows.UI.Xaml.Controls.Primitives.h>
#include <winrt/Windows.UI.Xaml.Data.h>
#include <winrt/Windows.UI.Xaml.Media.h>
#include <windows.ui.xaml.hosting.desktopwindowxamlsource.h>
#include <winrt/Windows.UI.Xaml.Markup.h>
#pragma comment(lib, "windowsapp")

using namespace winrt;
using namespace Windows::Foundation;
using namespace Windows::Foundation::Collections;
using namespace Windows::Foundation::Numerics;
using namespace Windows::UI;
using namespace Windows::UI::Composition;
using namespace Windows::UI::Core;
using namespace Windows::UI::Text;
using namespace Windows::UI::Input::Inking;
using namespace Windows::UI::Xaml;
using namespace Windows::UI::Xaml::Data;
using namespace Windows::UI::Xaml::Hosting;
using namespace Windows::UI::Xaml::Controls;
using namespace Windows::Media::Core;
using namespace Windows::UI::Xaml::Markup;

winrt::init_apartment(apartment_type::single_threaded);
WindowsXamlManager windowsXamlManager = WindowsXamlManager::InitializeForCurrentThread();
The operations are provided by DesktopWindowXamlSource as an interop interface:
DesktopWindowXamlSource xs;
auto interopDetail = xs.as<IDesktopWindowXamlSourceNative>();
interopDetail->AttachToWindow(hh);
interopDetail->get_WindowHandle(&s->hwndDetailXamlIsland);
winrt::param::hstring str(LR"(
<Grid Name="MainGrid" xmlns="http: xmlns:x="http://schemas.microsoft.com/winfx/2006/xaml">
<CalendarView />
</Grid>)");
winrt::Windows::Foundation::IInspectable ins = XamlReader::Load(str);
xs.Content(ins.as<UIElement>());
All this is really plain COM. as() is like the old QueryInterface in a template form. We attach the control to our own HWND and we also get an "inner" HWND, created by the framework. To create the control, we use XAML, XML or HTML like control configuration. In this case, we specify a calendar inside a grid. We need a hstring (a winrt string). We can use the winrt::param::hstring wrapper (like _bstr_t). Finally, we load the string to an IInspectable (the base interface like IUnknown) using XamlReader and finally, we load it to the DesktopWindowXamlSource.
To interact with the control, we can use the as() to get a type. For example, if I load a button:
<Button xmlns="http://schemas.microsoft.com/winfx/2006/xaml/presentation"
        xmlns:x="http://schemas.microsoft.com/winfx/2006/xaml" Name="BX">BBBB</Button>
We can mess with it:
Button butt = ins.as<Button>();
butt.Content(box_value(L"Hi"));
I found the class from Button in MSDN so you can use any "member function".
To get events about the button, we can use WinRT event handling along with some nice lambdas:
butt.Click([](const IInspectable&  sender, const RoutedEventArgs& rea)
            {
                sender.as<winrt::Windows::UI::Xaml::Controls::Button>().Content
                         (box_value(L"Clicked"));
            });
Each "callback" takes the IInspectable reference as the first parameter. The rest of the parameters are found in the documentation, for example, the Click() takes a RouterEventArgs argument.
UWPLib
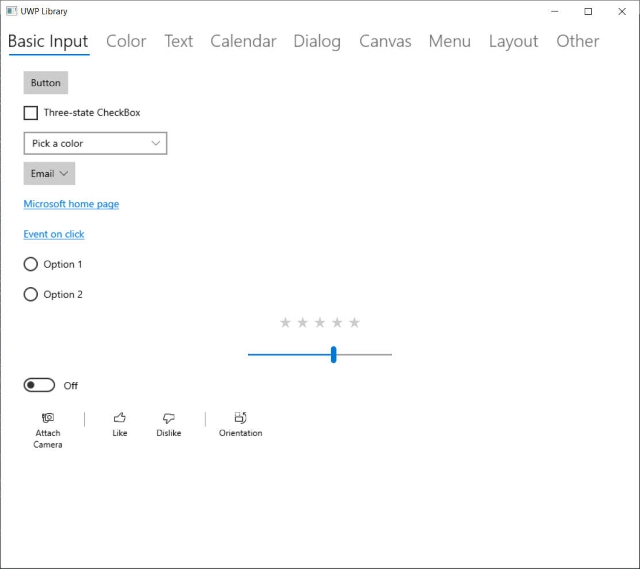
UWPLib is a project to represent UWP controls as Win32 controls with messages and notifications.
- Create an app with the attached manifest
- Call
winrt::init_apartment(apartment_type::single_threaded) - Call
WindowsXamlManager::InitializeForCurrentThread() - Call function
Register()
After that, you create UWP windows with the UWP_Custom class, then use WM_SETTEXT to load the markup. This is used by my new TurboTransfer app:
    auto pv = LR"(<Pivot xmlns="http://schemas.microsoft.com/winfx/2006/xaml/presentation"
        xmlns:x="http://schemas.microsoft.com/winfx/2006/xaml" >
    <PivotItem Header="Items">
            <ListView Name="GridItems"/>
    </PivotItem>
    <PivotItem Header="Transfers">
            <ListView Name="TransferItems"/>
    </PivotItem>
    <PivotItem Header="Add">
        <StackPanel>
            <Button x:Name="btn1" Content="Add Files" Margin="5" Width="150" />
            <Button x:Name="btn2" Content="Add Directory" Margin="5" Width="150" />
        </StackPanel>
    </PivotItem>
    <PivotItem Header="Upload">
        <StackPanel>
        </StackPanel>
    </PivotItem>
    <PivotItem Header="Configuration">
        <StackPanel>
            <TextBox Name="portnum" Margin="5" Header="Port Number" Text="7001"/>
            <CheckBox Name="CB_RightClick" Content="Enable right click" />
            <CheckBox Name="CB_ForceOctetStream"
             Content="Force MIME application/octet-stream" />
            <TextBox x:Name="ip" Margin="5" Header="IP or Hostname (Empty = default) " />
        </StackPanel>
    </PivotItem>
</Pivot>)";

        SetWindowText(GetDlgItem(hh, 901), pv);
        UWPLIB::UWPCONTROL* u = (UWPLIB::UWPCONTROL*)SendDlgItemMessage
                                (hh, 901, UWPM_GET_CONTROL, 0, 0);
        pivot = u->ins.as<Pivot>();


The Project
The project uses the programming aspects discussed here to create some UWP controls, displayed above. Have fun with it. I used it in my big FluentTorrent:

In addition, there is a DLL and Win32 project that demonstrates using an UWP menu in a plain win32 app, with a function that can convert a HMENU to an UWP menu.
History
- 4th February, 2020: More screenshots and controls, added DLL+Win32 app
- 20th March, 2019: Converted to single lib file
- 18th March, 2019: Added UWP library
- 14th March, 2019: First release
