Introduction
After finishing my
XAnalogClock
article, I wanted free-floating
clock to use on my desktop. XCPClock is implemented using
SetLayeredWindowAttributes, which is available in Win 2000 and later.
Features
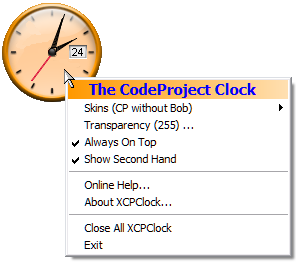
The right-click menu allows you to set transparency, always on top,
second hand, and choose a skin:
Skins
Here are the skins available:
Transparency
Transparency setting allows you to make underlying window partially visible:

|
When transparency setting is not fully opaque (less than 255),
left-clicks and left-double-clicks
will be passed on to underlying window (click-thru).
However, even when transparency is enabled (less than 255),
you can still use right-click to bring up popup menu,
and you can still move clock by dragging (holding down left mouse
button while moving mouse).
|
The Transparent Silver Ring and Transparent Minimal skins
offer another transparency option: the clock face itself is completely
transparent (except for center pivot, date box, and (for
Transparent Silver Ring) the outer
ring), so you can click on any window beneath
the XCPClock. For these two skins, the minute- and hour-hand color
changes automatically, depending on color of underlying window,
so as to maintain good visibility (thanks to John Simmons' excellent article
Determining Ideal Text Color Based on Specified Background Color).
The Transparency Dialog gives some tips on setting the transparency:
Command Line Options
Sometimes just one clock isn't enough. I often deal with people
in different time zones, and it's handy to be able to look at
clock that shows time at their location:
To display the above "clock rack," I use this cmd file:
start XCPClock.exe -s crystalgreen -h -3 -t Honolulu -x 400 -y 300 -w 1
start XCPClock.exe -s crystalblue -t "Los Angeles" -x 501 -y 300 -w 1
start XCPClock.exe -s cpbob -h +3 -t Toronto -x 602 -y 300 -w 1
start XCPClock.exe -s crystalblack -h +9 -t Berlin -x 703 -y 300 -w 1
Here are available command line options:
| Option | Example | Description |
|---|
| -h <hour adjustment> | -h +3 | The adjustment value is added to local
time (hour) to allow for different timezones. It can be positive
(with or without a plus (+) sign), or negative. |
| -r <transparency> | -r 100 | Sets the transparency (visibility
of underlying window).
This can be any number between 30 and 255.
The lower the number, the more transparent.
|
| -s <skin name> | -s neonblue | This is name of skin that will be used.
It can be any of the following:
cpbob, cpnobob, darkblue, silver, gold,
black, lightblue, green, red, rose,
aqua, neonblue, bluestreak, crystalgreen, crystalblack,
crystalblue, crystalred, crystalyellow, silverring, minimal,
white.
|
| -t <tooltip string> | -t "Los Angeles" | This is tooltip that is displayed when
the mouse hovers over XCPClock. Note that quotes (") are required
if string contains spaces. |
| -w <always on top> | -w 1 | Specifies whether XCPClock will remain
on top of other windows. Valid values: 0 or 1. |
| -x <x position> | -x 400 | Specifies initial x display position. |
| -y <y position> | -y 300 | Specifies initial y display position. |
Synchronized Move
Once you have multiple XCPClocks displayed, you may find that you need to
move them. To facilitate this, clicking and dragging any XCPClock
that has been started with command line options will cause all other
XCPClocks to move in sync. You can move an XCPClock independently by
holding down the Ctrl key while dragging the XCPClock.
Synchronized movement will only be applied to XCPClocks that have been
started with command line options.
Global Close
To make displaying multiple XCPClocks more manageable, there is
a selection on the right-click menu to allow you to close all running XCPClocks.
Implementation Notes
Transparent Click-thru
The most requested enhancement of the original XCPClock was transparent
click-thru. This means that clicks on XCPClock would be passed through to
the underlying window, as if XCPClock wasn't there. The value of this is obvious -
to set transparency in XCPClock, and then be able to operate windows
on screen, without having to move XCPClock out of the way.
Some readers actually suggested an easy solution: just add
WS_EX_TRANSPARENT style to the dialog.
Here is what MSDN says about WS_EX_TRANSPARENT:
WS_EX_TRANSPARENT - Specifies that a window created with this
style is to be transparent. That is, any windows that are beneath
the window are not obscured by the window. A window created with
this style receives WM_PAINT messages only after all sibling windows
beneath it have been updated.
OK, that sounds good in theory. In practice, a real disaster. The
effect of adding WS_EX_TRANSPARENT style is to make
XCPClock completely inaccessible to user. It won't receive any
mouse or keyboard input. You can't right-click it, or move it by
dragging. The "suggested" solution for this problem? Use
global mousehook. In my opinion, this is truly evil. Another solution
that is sometimes used is to create tray icon, to allow back-door
UI operations when app cannot respond.
Since use of WS_EX_TRANSPARENT was out of the question,
I decided to do it myself. The first thing was to define how I wanted
click-thrus to work. They had to work for left mouse button, but not
for right button - the right-click popup menu needed to work.
And click-thrus should not work at all unless transparency is enabled
(this meant transparency setting of less than 255).
I knew the key to getting click-thrus to work was in sending
right message to right window. In this case, right message
was obviously WM_LBUTTONDOWN, and right window was the
one lying directly underneath XCPClock. But how to find it? I knew one
thing that MSDN documentation doesn't say; I knew that
EnumWindows() enumerated windows according to their
z-order (the order that they appear on screen, from topmost to
bottommost). This made it easy to find right window - I just
continued enumeration until I found the first window (not XCPClock!)
that contained the click point. Since XCPClock was on top
of other windows, this guaranteed that window would be the one
directly underneath XCPClock.
Now that I had window's HWND, what next? My overly optimistic
thinking was to just send WM_LBUTTONDOWN message,
followed by WM_LBUTTONUP. No matter how I tried to do this,
it didn't work. Fortunately, there's another technique, almost as
simple as sending a message:
the
SendInput() function. Of course, when I tried this, it didn't
work either. It took me a while to realize that the click was being
sent to XCPClock itself, since it was at top of z-order!
After a little experimenting with moving XCPClock out of the way, etc.,
I got sequence down to as few steps as possible:
- Find the underlying window.
- Hide the XCPClock window using
ShowWindow().
- Call
SendInput() to send button down and button up events.
- Un-hide XCPClock with another call to
ShowWindow().
To my surprise, doing these steps in the right order worked on both
XP and Vista. The only (slight) downside was brief flicker when XCPClock
was being hidden and un-hidden, which I now claim is a feature.
Synchronized Move
When you have used a cmd file to display several XCPClocks
on screen at exact position you want, sooner or later
you will want to move them. It happened to me so many times
that I realized it was going to be problem for XCPClock users.
I thought, wouldn't it be nice to be able to click on one of the
XCPClocks and drag it somewhere, and all other XCPClocks would
move with it? So I began to think of ways I could accomplish this.
The first thing that came to mind was sending messages among
running XCPClock apps. I knew I could find all running XCPClock
apps by simply enumerating windows, as I discussed above. Then I could
use MoveWindow() to move XCPClock to a new location.
While I'm sure this would work, it was not what I wanted.
I wanted to move only those XCPClocks that had been started
with command line options. Now things were getting complicated.
After enumerating windows, I would have to send a
message to each XCPClock, telling it to move itself if it was started
with command line options.
Now I am going to let you in on one of my secrets. Here is how I
did all the things I just mentioned, by sending only one message.
The message is a unique registered windows message; it's
registered because I want to broadcast it. So what's the secret?
It's how I send the message - via
SendMessageCallback(),
which has got to be one of least-known Win32 APIs:
The SendMessageCallback function sends the specified message to a
window or windows. It calls the window procedure for the specified window and
returns immediately. After the window procedure processes the message,
the system calls the specified callback function, passing the result of
the message processing and an application-defined value to the callback
function.
This sounds deceptively simple. Consider what's happening:
- I call one API to initiate the process.
- I use registered window message that is broadcast
via
HWND_BROADCAST to all top-level windows.
- I get response from every top-level app.
However, only XCPClock apps respond with predetermined code
(which happens by coincidence to be my CodeProject user ID).
This tells me two things: first, it tells me which responses
are valid - i.e., from XCPClock app that has been started with
command line options; and second, it gives me
HWND of XCPClock app.
Here is the call to SendMessageCallback():
::SendMessageCallback(HWND_BROADCAST, WM_XCPCLOCK_INIT, 0, 0,
    SendAsyncProc, (ULONG_PTR) m_hWnd);
Each XCPClock has its own message handler for registered message
WM_XCPCLOCK_INIT:
LRESULT CXCPClockDlg::OnXCPClockInit(WPARAM , LPARAM )
{
TRACE(_T("in CXCPClockDlg::OnXCPClockInit: 0x%X\n"), m_hWnd);
if (__argc > 1)
return 15759; else
return 0;
}
and here is my implementation of SendAsyncProc():
void CALLBACK SendAsyncProc(HWND hWnd, UINT uMsg, ULONG_PTR dwData, LRESULT lResult) {
TRACE(_T("in SendAsyncProc: hWnd=0x%X lResult=%d\n"), hWnd, lResult);
HWND me = (HWND) dwData;
if ((uMsg == WM_XCPCLOCK_INIT) && (hWnd != me) && (lResult == 15759))
{
TRACE(_T("adding 0x%X\n"), hWnd);
g_hWndArray.Add(hWnd);
}
}
The HWNDs collected in this way are stored in an array - this only
happens once. Using an array of HWNDs, I then move other XCPClock apps
whenever user drags the current app.
Global Close
When I was testing Synchronized Move, I quickly became tired of repeatedly
closing each XCPClock. So I decided to implement a Global Close, which
would close all running XCPClocks.
This was fairly simple to do, because I knew how to enumerate
all windows, and furthermore I knew that XCPClock had
a unique class name which I could use to find running XCPClocks.
This unique class name was implemented by hand-editing XCPClock.rc,
and adding CLASS field to dialog template,
as highlighted below:
IDD_XCPCLOCK_DIALOG DIALOGEX 0, 0, 92, 70
STYLE WS_POPUP | WS_VISIBLE
EXSTYLE WS_EX_APPWINDOW
CLASS "TheCodeProjectClock"
FONT 8, "MS Sans Serif", 0, 0, 0x1
BEGIN
    LTEXT           "",IDC_FRAME,0,0,90,70
END
Once the dialog template was modified, the unique class name could be
used to register new class for XCPClock dialog:
BOOL CXCPClockApp::InitApplication()
{
    WNDCLASS wc;

    wc.style = CS_DBLCLKS | CS_SAVEBITS | CS_BYTEALIGNWINDOW;
    wc.lpfnWndProc = DefDlgProc;
    wc.cbClsExtra = 0;
    wc.cbWndExtra = DLGWINDOWEXTRA;
    wc.hInstance = AfxGetInstanceHandle();
    wc.hIcon = LoadIcon(IDR_MAINFRAME);
    wc.hCursor = ::LoadCursor(NULL, IDC_ARROW);
    wc.hbrBackground = (HBRUSH)COLOR_WINDOW + 1;
    wc.lpszMenuName = NULL;
    wc.lpszClassName = _T("TheCodeProjectClock");
    ::RegisterClass(&wc);

    return CWinApp::InitApplication();
}
Now I could use this unique class name to find running XCPClocks.
First, I began window enumeration:
void CXCPClockDlg::OnCloseAll()
{
::EnumWindows(EnumWindowsProcCloseAll, (LPARAM)m_hWnd);
GetParent()->SendMessage(WM_CLOSE); }
In the enumeration function, I check for unique class name:
BOOL CALLBACK EnumWindowsProcCloseAll(HWND hWnd, LPARAM lParam) {
HWND me = (HWND) lParam;
if (hWnd == me)
{
return TRUE;
}
TCHAR szClassName[100];
::GetClassName(hWnd, szClassName, sizeof(szClassName)/sizeof(TCHAR)-1);
szClassName[sizeof(szClassName)/sizeof(TCHAR)-1] = 0;
if (_tcsicmp(szClassName, _T("TheCodeProjectClock")) == 0)
{
TRACE(_T("closing window 0x%X\n"), hWnd);
::SendMessage(::GetParent(hWnd), WM_CLOSE, 0, 0);
}
return TRUE;
}
Note that the WM_CLOSE message is sent to dialog's parent,
which is actually an invisible window that is created in
CXCPClockApp::InitInstance(); this keeps XCPClock from
showing up on the task bar.
Acknowledgments
References
Revision History
Version 1.1 - 2008 August 23
- Minor bug fixes
- Changed to automatic link to msimg32.lib (previously you
had to add this lib to the project link modules)
- Added new skins
- Added click-thru when transparency is enabled (less than 255)
- Added shortcuts for setting transparency
- Added automatic hand color for new transparent clock faces
- Added command line options
- Added synchronized move
- Added global close option to popup menu
- Added option to show/hide second hand
- Added VS2005 project
Version 1.0 - 2006 March 24
Usage
This software is released into the public domain. You are free
to use it in any way you like, except that you may not sell this
source code. If you modify it or extend it, please to consider posting
new code here for everyone to share. This software is provided "as is"
with no expressed or implied warranty. I accept no liability for any
damage or loss of business that this software may cause.


 General
  News
News  Suggestion
  Question
  Bug
Bug  Answer
  Joke
Joke  Praise
  Rant
Rant  Admin
Admin 


