Introduction
Creating and Calling The Active X Controls
<o:p>
Let’s see how one can develop an ActiveX Control for a button.
<o:p>
Open the .NET editor and go to File Menu.
Select New Project option from the file menu.
This pops up a dialog.
In the project type go and in the Visual C++ Project option select MFC.
In the right hand side option of Templates select MFC Active X Controls.
Give the name as ButtonControl and press OK.
This pops up a dialog of MFC Active X Control Wizard.
Just have a look at the default settings in the left hand panel and go to Control Settings.
<o:p>
In the control settings dialog select BUTTON from the Create Control based on compbo box and select the check box for Flicker Free.
Accept all other default settings and press Finish.
In the Class View you can now see the three classes that are generated.
<o:p>
1) The Application class CButtonControlApp.
2) The Control Class CButtonControlCtrl.
3) The Property Page Class CButtonControlPropPage.
<o:p>
Open the Resource Editor and the IDD_PROPPAGE_BUTTONCONTROL dialog.
Remove the caption that is already placed on the dialog and from the Toolbox add one edit box and a button on the dialog. Change the caption of the button to whatever you want.
Right click on the edit box and add a variable to it.
Again open the resource editor and double click the button that you have already placed on it.
This adds a event handler for the click of the button.
Place the lines of code in this function
<o:p>
void CButtonControlPropPage::OnBnClickedButton1()<o:p>
{<o:p>
CString name;<o:p>
m_edit.GetWindowText(name);<o:p>
AfxMessageBox ("Hello! "+name);<o:p>
}
<o:p>
Open the CButtonControlCtrl class and go to OnOcmCommand function.
Change the code of the function as follows:
<o:p>
LRESULT CButtonControlCtrl::OnOcmCommand(WPARAM wParam, LPARAM lParam)<o:p>
{<o:p>
#ifdef _WIN32<o:p>
WORD wNotifyCode = HIWORD(wParam);<o:p>
#else<o:p>
WORD wNotifyCode = HIWORD(lParam);<o:p>
#endif<o:p>
<o:p>
// TODO: Switch on wNotifyCode here.<o:p>
CDialog *dlg=new CButtonControlPropPage ;<o:p>
dlg->Create (IDD_PROPPAGE_BUTTONCONTROL);<o:p>
dlg->ShowWindow (SW_SHOW);<o:p>
return 0;<o:p>
}<o:p>
Build the project.
If you are in a bit of hurry you can go to tools menu and choose ActiveX Control Test Conainer. Go to Edit menu and from the menu select the Insert New Control Option where you can spot the control we just created by the name of ButtonControl Control.
When you click ok our button is visible on the screen. You can see the effect on clicking on it.
This is all for creating the Active X control and adding the handler’s on that.
<o:p>
For more patient programmer’s who want to call this control in their application.
<o:p>
Now create another MFC Dialog based project and give it the name as ButtonControlCall.
In the resource editor open the dialog and right click anywhere on it.
This opens a pop up.
Select Insert Active X Control from the dialog.
In the dialog box that pops up select the ButtonControl Control option and this adds your button control on the dialog which you can place anywhere in the dialog.
<o:p>
Now build the project.
Press Ctrl+F5 to run the project.
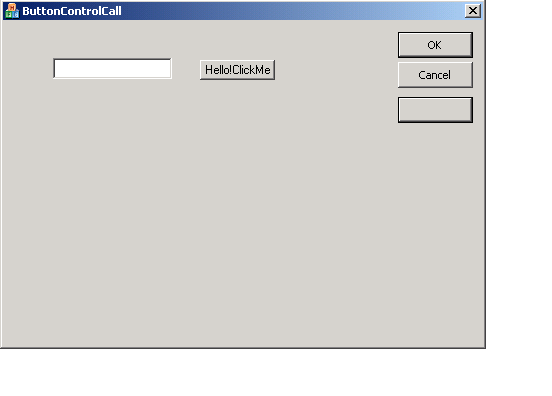
On the screen you can see a dialog with OK,Cancel and one more button that is our ActiveX Button.
<o:p>
Try clicking the button.
This shows two controls on the existing dialog. One is the edit box and second is the button that we had placed on that dialog.
Insert your name in the text box and press the button.
A message box is popped up that shows
Hello! XYZ if you entered your string as XYZ in the edit box
<o:p>
That’s all guys.
