Introduction
This article describes a control engineering technique that allows developers to design graphical layouts of Custom Controls using standard tools available with the Visual Studio IDE, aiming to avoid tedious hand-coding of control hierarchies.
Background
Decisions made during construction phase of a complex project are not always unambiguous. Compromises are made in order to prove concepts, meet the deadlines, or to enforce standards. With time, these compromises begin to accumulate into significant “design debt”, which, when left unattended, incurs interest at a fantastic rate. Refactoring coupled with Test-Driven Development is probably the most reliable approach to keep both the design debt and the resulting system entropy in check.
With ASP.NET web projects specifically, it is very common to see an attempt to re-use class libraries of the pre-existing sites, copying the markup into a new project, and slightly modifying the code-behind directives. Consequently, an ‘internal’ user control built exclusively for one project, all of a sudden, can become a required part of multiple new front-ends. User Controls being a compromise in and out of itself are reusable, however, thanks to their limitations fall far behind the more dynamic and “professional” Custom Controls. What if it would be a matter of a few easy steps to turn an ungainly User Control into its sleek and easy to deploy ‘Custom’ variety? This article will illustrate an approach suitable for converting User Controls into Custom Controls while preserving the original work and functionality. The author fully understands, however, that significant positive effect from this approach can also be realized when developing new composite Custom Controls from scratch. The two preceding paragraphs simply provided the historical background for the readers as well as an excuse for this creative carping exercise.
More on User Controls vs. Custom Controls
“User” controls (in concept) are considered to be easier to work with than “Custom” controls simply because the design-time capabilities of Visual Studio make UI building process straightforward and fast. There is no need to hand-code control positioning and behavior as with the Custom Controls. If there is a requirement for a simple reusable element of the user interface that will not be inherited and exposed only to the project where it resides, the choice in favor of the User Controls is obvious.
However, an attempt to take a User Control to its next level of abstraction or to deploy it outside of the hosting project is somewhat akin to commuting to work by means of a John Deere lawnmower – absolutely feasible and very cool, but hardly practical. This is where the Custom Controls start to prove their worth. They can be effectively inherited, and have a lightweight deployment footprint/overhead. Now, is it possible to combine the WYSIWYG design capability of a User Control with a Custom Control and shamelessly exploit advantages offered by both technologies? In this article, we will attempt to do just that.
The Sample Solution
I have included both the control project (ControlTestRange - class library) and the web project (ControlTester - web project) for testing the control in the sample code. Both are built with Visual Studio 2005. The solution file is solution\Projects\ControlTestRange\ControlTestRange.sln.
I have not tried this with VS2003/.NET 1.1 yet. but there are reasons to believe that it will work just as well.
Step 1 - Designing the User Interface
We will start by designing UI for the sample control. The idea is to keep it as simple and as useless as possible to prevent people from trying to plug it into their real-life projects. After all. it’s just an illustration of the technique. and not an Open Source product. For starters, I added a new HTML page to the control project and replaced the entire HTML generated by the template with short but very meaningful notation:
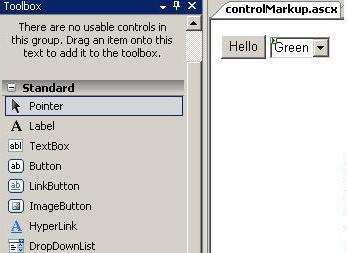
Then, I renamed the HTM file into a “controlMarkup.ascx” in the secret hope that the IDE will let it have the same design-time capabilities as a ‘normal’ User Control (I was quite shocked when it did). Here is the result in both the HTML and the Design renditions:

There are two controls on this ‘phantom’ ASCX template – one is a server-side drop-down list, and another is a basic HTML button. The button is provided with an even more basic event handler.
Step 2 – Adding the Control Class
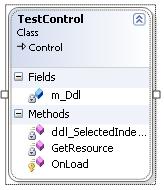
I am not extremely good with names, so my test control is uncomplicatedly enough called TestControl. I added it to the control project, and made it derive from the Control class. You can also derive from the CompositeControl class because it (in the characteristically precise and laconic MSDN-speak) “Implements the basic functionality required by Web controls that contain child controls”.
Step 3- Embedded Resource
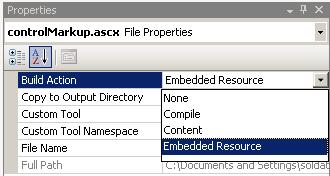
To simplify deployment of a server control, we are interested in the smallest possible number of deployment units. Ideally, there should be just one – the assembly that hosts our world-greatest control library. Adding the markup file as Embedded Resource, our project solves this task very nicely. In the control project, the Build Action property on the “controlMarkup.ascx” file is set to “Embedded Resource”.

To retrieve this resource, I created a short helper method GetResource:
private string GetResource(string resourceName)
{
    Stream stream =
      Assembly.GetExecutingAssembly().GetManifestResourceStream(
      GetType(), resourceName);
    using (StreamReader reader = new StreamReader(stream))
    {
        return reader.ReadToEnd();
    }
}
It is being used to get the content of the controlMarkup.ascx:
string content = GetResource("controlMarkup.ascx");
You can find out more about Embedded Resources on MSDN. It’s really fascinating, especially since ASP.NET 2.0 is not entirely ignorant of this capability and offers a new and exciting feature affectionately called WebResource (a nice overview by Gary Dryden is available here).
Step 4 - Wiring the Control
We discovered earlier how easy it is to mine embedded resources from the dark depths of an assembly. Now, putting this knowledge to good use, we are going to override the OnLoad method of the base class.
protected override void OnLoad(EventArgs e)
{
    base.OnLoad(e);
    if (DesignMode) return;
    string content = GetResource("controlMarkup.ascx");
    Control control = Page.ParseControl(content);
    this.Controls.Add(control);
    m_Ddl = control.FindControl("ddlTrigger") as DropDownList;
    m_Ddl.SelectedIndexChanged += new EventHandler(ddl_SelectedIndexChanged);
}
After the markup from the embedded controlMarkup.ascx is loaded into a string variable, the magic ParseControl method exposed by the hosting page translates it into an instance of a Control. It is Officially Alive! The next move is to add the monster to the TestControl itself. An important part of this exercise was to make sure that server controls are fully functional in this environment. The instance-level field m_Ddl is assigned a reference to a member of Frankenstein’s Controls collection (we know this will work for fact since we actually built the monster). An event handler is then assigned to the drop-down list’s SelectedIndexChanged event. The code in the handler changes the background color of the dropdown list to create a little dramatic effect:
void ddl_SelectedIndexChanged(object sender, EventArgs e)
{
    m_Ddl.BackColor =
      System.Drawing.Color.FromName(m_Ddl.SelectedValue);
}
A strangely normal behavior is observed when running the solution. The event handlers, both client- and server-side, are responding properly, and the inner state of the control is preserved (the background color of the dropdown actually changes). Needless to say, the client-side “onclick” handler also fires as ordered:

Step 5 – FFFFFF (Fat-Free-Food-For-Farther-‘Fot’) and The Conclusion
In most cases, it is significantly less taxing to code the appearance of a control in HTML versus C# or VB. The approach demonstrated here is based, in general, on the ParseControl method of the System.UI.Web.Page class. It is natural to expect the tag prefixes registered on the hosting page to be recognized by the ParseControl. This means that third-party controls can be added to the ‘Frankenstein’, if necessary, provided that the page itself is aware of their existence.
I leave it to the reader to explore more advanced aspects of this technique: ViewState management, subclassing, or hosting it in Master Pages, just to name a few. Please feel free to share what you were able to discover and, as always, Happy Coding!
