Introduction
Having developed a Visual Studio 2005 add-in recently, I found that when it comes to deploying the add-in, there is no setup project automatically created any more. As described in the following excerpt from MSDN online, Visual Studio 2005 now relies on the .addin file for add-in deployment:
In Visual Studio .NET 2002 and Visual Studio .NET 2003, you were required to register add-in assemblies with Windows as COM components by using the Assembly Registration Tool (regasm.exe). Also, you were required to register the add-in with Visual Studio by using keys in the Windows registry before the add-in would appear in the Add-In Manager.
These steps have changed in Visual Studio 2005. You no longer need to register the .NET assemblies with Windows by using regasm. Instead, you simply place the assembly .DLL file into a specific directory along with an XML file that has an .Addin file extension. This XML file describes the information that Visual Studio requires to display the add-in in the Add-In Manager. When Visual Studio starts, it looks in the .Addin File location (listed below) for any available .Addin files. If it finds any, it reads the XML file and provides the Add-In Manager with the information needed to start the add-in when it is clicked.
This simplified registration method allows XCopy-style installations for managed code add-ins. If you put all the files in the right place, then your add-in works just fine. Also, its use of commented XML to define the registration settings for add-ins allows the information to be more easily understood and edited than registry keys.
So now, the question is how we can still use Windows Installer (.msi) to deploy an add-in with this new registration method. Here, I will walk you through building a generic custom action to manipulate and XCopy the .addin file along with your add-in assembly that will work for most add-in deployment scenarios.
The .Addin File
The following is an example of a complete .Addin XML file. The .Addin file is usually placed at \Documents and Settings\All Users\My Documents\Visual Studio 2005\Addins or \Documents and Settings\<user name>\My Documents\Visual Studio 2005\Addins. The Assembly node (in bold) specifies the location of the add-in binaries. This field can be set to a local path, a network path, or a valid URL. And, it is where the custom action comes in to update at the time of deployment.
="1.0"="UTF-16"="no"
<Extensibility
xmlns="http://schemas.microsoft.com/AutomationExtensibility">
<HostApplication>
<Name>Microsoft Visual Studio Macros</Name>
<Version>8.0</Version>
</HostApplication>
<HostApplication>
<Name>Microsoft Visual Studio</Name>
<Version>8.0</Version>
</HostApplication>
<Addin>
<FriendlyName>My new add-in.</FriendlyName>
<Description>This add-in does something important.</Description>
<AboutBoxDetails>Copyright MyCompany 2006.</AboutBoxDetails>
<AboutIconData>0000 . . . FFFF0000</AboutIconData>
<Assembly>[Path to add-in]\MyNewAddin.dll</Assembly>
<FullClassName>MyNewAddin.Connect</FullClassName>
<LoadBehavior>1</LoadBehavior>
<CommandPreload>0</CommandPreload>
<CommandLineSafe>0</CommandLineSafe>
</Addin>
<ToolsOptionsPage>
<Category Name="MyNewAddin">
<SubCategory Name="General">
<Assembly>[Path to add-in]\MyNewAddin.dll</Assembly>
<FullClassName>MyNewAddin.OptionsPage</FullClassName>
</SubCategory>
</Category>
</ToolsOptionsPage>
</Extensibility>
Creating a Custom Action Project
Create a class library project, and add a new item by choosing an Installer class. The newly added class will inherit from the System.Configuration.Install.Installer class, which has methods like Install, Commit, Rollback, and Uninstall that you can override.
namespace AddinCustomAction
{
using System;
using System.IO;
using System.Diagnostics;
using System.Collections;
using System.ComponentModel;
using System.Configuration.Install;
using System.Xml;
[RunInstaller(true)]
public partial class AddinInstaller : Installer
{
private const string ExtNameSpace =
"http://schemas.microsoft.com/AutomationExtensibility";
public AddinInstaller()
: base()
{
InitializeComponent();
}
public override void Install(IDictionary savedState)
{
base.Install(savedState);
string productName = this.Context.Parameters["ProductName"];
string assemblyName = this.Context.Parameters["AssemblyName"];
string addinTargetPath = Path.Combine(Environment.GetFolderPath(
Environment.SpecialFolder.MyDocuments),
@"Visual Studio 2005\Addins");
string assemblyPath = Path.GetDirectoryName(
System.Reflection.Assembly.GetExecutingAssembly().Location);
string addinControlFileName = assemblyName + ".Addin";
string addinAssemblyFileName = assemblyName + ".dll";
try
{
DirectoryInfo dirInfo = new DirectoryInfo(addinTargetPath);
if (!dirInfo.Exists)
{
dirInfo.Create();
}
string sourceFile = Path.Combine(assemblyPath, addinControlFileName);
XmlDocument doc = new XmlDocument();
doc.Load(sourceFile);
XmlNamespaceManager xnm = new XmlNamespaceManager(doc.NameTable);
xnm.AddNamespace("def", ExtNameSpace);
XmlNode node = doc.SelectSingleNode("/def:" +
"Extensibility/def:Addin/def:Assembly", xnm);
if (node != null)
{
node.InnerText = Path.Combine(assemblyPath, addinAssemblyFileName);
}
node = doc.SelectSingleNode("/def:Extensibility/def:" +
"ToolsOptionsPage/def:Category/def:SubCategory/def:Assembly", xnm);
if (node != null)
{
node.InnerText = Path.Combine(assemblyPath, addinAssemblyFileName);
}
doc.Save(sourceFile);
string targetFile = Path.Combine(addinTargetPath, addinControlFileName);
File.Copy(sourceFile, targetFile, true);
savedState.Add("AddinPath", targetFile);
}
catch (Exception ex)
{
Debug.WriteLine(ex.ToString());
}
}
public override void Rollback(IDictionary savedState)
{
base.Rollback(savedState);
try
{
string fileName = (string)savedState["AddinPath"];
if (File.Exists(fileName))
{
File.Delete(fileName);
}
}
catch (Exception ex)
{
Debug.WriteLine(ex.ToString());
}
}
public override void Uninstall(IDictionary savedState)
{
base.Uninstall(savedState);
try
{
string fileName = (string)savedState["AddinPath"];
if (File.Exists(fileName))
{
File.Delete(fileName);
}
}
catch (Exception ex)
{
Debug.WriteLine(ex.ToString());
}
}
}
}
Configuring the Setup Project
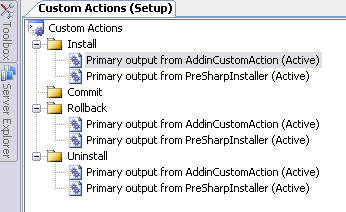
Add the custom action project's output to the setup project. As shown below, in the Custom Action view, add the custom action primary output to Install, Rollback, and Uninstall.

Specify the CustomActionData in the Install action. Specify AssemblyName as the name of your DLL and ProductName as your product's full name.

If you want to debug your custom action, add the following line inside the method you want to debug in the custom action class:
Debugger.Break();
