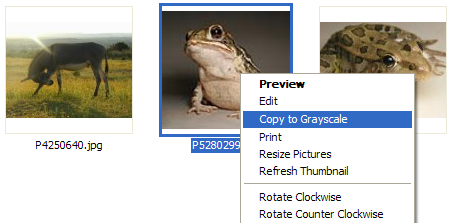
Introduction
Shell context menus are displayed when you right click on shell objects such as files and folders. A full-blown context menu is a COM object that implements the IContextMenu and IShellExtInt interfaces. This article demonstrates how to create a simple shell context menu (also called a shortcut menu) that does not require COM and only requires a few registry entries.
Registry entries
You can hookup a context menu to any file type by adding entries under the HKEY_CLASSES_ROOT\<file type>\shell registry location. For example, the following registry script adds the Register and Unregister context menus to DLL files.
REGEDIT4

[HKEY_CLASSES_ROOT\dllfile\shell]
[HKEY_CLASSES_ROOT\dllfile\shell\Register]
[HKEY_CLASSES_ROOT\dllfile\shell\Register\command]
@="regsvr32 \"%L\""

[HKEY_CLASSES_ROOT\dllfile\shell\Unregister]
[HKEY_CLASSES_ROOT\dllfile\shell\Unregister\command]
@="regsvr32 /u \"%L\""
A view of the registry is shown below. The HKEY_CLASSES_ROOT\dllfile\shell key contains the list of context menus for DLL files. The Register and Unregister keys are two of the menus for DLL files (these also specify the menu text since a default value is not specified). The default value of the command key specifies the command line that is executed when the context menu is invoked. The %L argument is a placeholder to the full path of the selected item. You can read more about the registry settings at the MSDN article: Extending Shortcut Menus.

Registering and un-registering
The sample application contains the FileShellExtension class that registers and un-registers a simple shell context menu. The Register method creates the necessary registry entries, and the Unregister method removes the registry entries.
static class FileShellExtension
{
public static void Register(string fileType,
string shellKeyName, string menuText, string menuCommand)
{
string regPath = string.Format(@"{0}\shell\{1}",
fileType, shellKeyName);
using (RegistryKey key =
Registry.ClassesRoot.CreateSubKey(regPath))
{
key.SetValue(null, menuText);
}
using (RegistryKey key = Registry.ClassesRoot.CreateSubKey(
string.Format(@"{0}\command", regPath)))
{
key.SetValue(null, menuCommand);
}
}
public static void Unregister(string fileType, string shellKeyName)
{
Debug.Assert(!string.IsNullOrEmpty(fileType) &&
!string.IsNullOrEmpty(shellKeyName));
string regPath = string.Format(@"{0}\shell\{1}",
fileType, shellKeyName);
Registry.ClassesRoot.DeleteSubKeyTree(regPath);
}
}
The sample application self-registers when executed without any command line arguments, or with the -register command; it unregisters when the -unregister command is specified. The usage of the FileShellExtension class is shown below.
string menuCommand = string.Format("\"{0}\" \"%L\"",
Application.ExecutablePath);
FileShellExtension.Register("jpegfile", "Simple Context Menu",
"Copy to Grayscale", menuCommand);
FileShellExtension.Unregister("jpegfile", "Simple Context Menu");
Creating a grayscale image
The CopyGrayscaleImage method is called when the context menu is clicked. The ColorMatrix class is used to generate a grayscale copy of the selected image.
static void CopyGrayscaleImage(string filePath)
{
string grayFilePath = Path.Combine(
Path.GetDirectoryName(filePath),
string.Format("{0} (grayscale){1}",
Path.GetFileNameWithoutExtension(filePath),
Path.GetExtension(filePath)));
using (Image image = new Bitmap(filePath))
using (Bitmap grayImage = new Bitmap(image.Width, image.Height))
using (Graphics g = Graphics.FromImage(grayImage))
{
ImageAttributes attr = new ImageAttributes();
attr.SetColorMatrix(new ColorMatrix(new float[][]{
new float[]{0.3086F,0.3086F,0.3086F,0,0},
new float[]{0.6094F,0.6094F,0.6094F,0,0},
new float[]{0.082F,0.082F,0.082F,0,0},
new float[]{0,0,0,1,0,0},
new float[]{0,0,0,0,1,0},
new float[]{0,0,0,0,0,1}}));
g.DrawImage(image, new Rectangle(0, 0, image.Width, image.Height),
0, 0, image.Width, image.Height, GraphicsUnit.Pixel, attr);
grayImage.Save(grayFilePath, ImageFormat.Jpeg);
}
}
The original and generated grayscale images are shown below:

Running the sample
The sample was built with Visual Studio 2005, and requires the .NET Framework 2.0; however, the ideas can easily be incorporated into any .NET version and language. You can do the following to run the sample:
- Build and run the application. This registers the context menu by adding the HKEY_CLASSES_ROOT\jpegfile\shell\Simple Context Menu key to the registry.
- Right click on a JPEG file, you should see a new Copy to Grayscale context menu.
- Click the context menu to create a grayscale copy of the image.
- Unregister the context menu by running SimpleContextMenu.exe –unregister.
Context menus for all files, folders, and drives
You can also hookup context menus to all files, folders, and drives by adding entries to the file type's *, Directory, and Drive registry keys. For example, XP PowerToys adds the Open Command Window Here menu to all folders with the following registry script:
REGEDIT4

[HKEY_CLASSES_ROOT\Directory\shell\cmd]
@="Open Command Window Here"

[HKEY_CLASSES_ROOT\Directory\shell\cmd\command]
@="cmd.exe /k \"cd %L\""
Simple context menus do have limitations, such as only accepting one file on the command line, but they are still pretty useful. I'll cover creating a full-blown .NET COM-based context menu in a future article.
