
Introduction
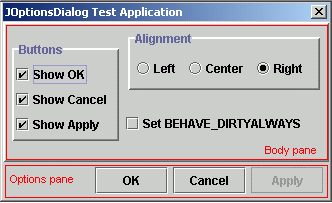
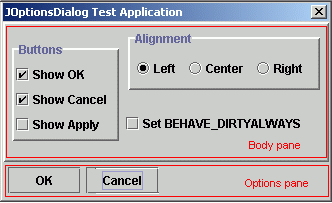
A typical options dialog can be viewed as simply made up of two panes; a body pane where you show the UI components specific to your application, and a more generic options pane where the user can choose to save/discard the changes made and close the dialog box. (see screen shots above)
In addition, most options dialogs feature the dirty behavior. The dirty behavior defines two states; dirty and not dirty. When in the not dirty state (e.g. when the dialog is first initialized or when the apply button is clicked), the apply button is disabled and clicking on the OK button will simply close the dialog. When in the dirty state (e.g. when the user edits a text field or selects a check box), the apply button will be enabled and clicking on the OK button will cause the dialog's data model to be updated before closing the dialog.
JOptionsDialog is a simple abstract class that takes care of all the necessary plumbing works to get such a dialog box going. More specifically, it manages the creation, layout, display and event handling of the options pane, as well as the state of the dialog box (the dirty behavior). In addition, the user can choose to show any combination of the three available buttons, and/or change the alignment and dimensions of the buttons. Most of the features provided are configurable at compile-time or run-time. And if a feature cannot be configured, you can most certainly customize it in your sub-class.
Detailed API documentation of this class, as well as the sample dialog, is provided in both the demo and source zip packages. The source code of the sample dialog, in particular, can be a useful skeleton for building your own specialized dialogs.
Usage
To create your own options dialog, there are typically three things you need to do.
- extend your class from
JOptionsDialog; - implement the initialization of the UI components of the body pane in the abstract method
initBodyPane(); - and finally, implement the data transfer mechanism between the body pane's UI components and the data model in the abstract method
updateData(boolean).
Implementing the Body Pane
As mentioned above, the subclass should implement all initialization of the body pane's UI components in the abstract method initBodyPane(). This method does not take any arguments and returns a java.awt.Container object. The implementation should include the creation, layout and event handling setup of the body pane's UI components. Code snippet from the sample dialog's implementation is shown below:
protected Container initBodyPane() {
JPanel jpButtons = new JPanel();
jpButtons.setLayout(new GridLayout(3,1));
...
m_jcbShowOK = new JCheckBox("Show OK");
m_jcbShowOK.addActionListener(
new ActionListener() {
public void actionPerformed(ActionEvent e) {
setDirty();
}
}
);
jpButtons.add(m_jcbShowOK);
...
JPanel jpBody = new JPanel();
jpBody.add(jpButtons, BorderLayout.WEST);
...
return jpBody;
}
In the code above, notice the call to the method setDirty() (a protected method implemented in JOptionsDialog) in the class attribute m_jcbShowOK's action listener. This sets the dialog state to dirty whenever the user clicks on the "Show OK" check box. It is the subclass' responsibility to call setDirty() at the appropriate times to set the dialog's state to dirty. Otherwise, the dialog will always remain in the not dirty state and the data entered by the user will never get transferred to the dialog's data model. The exception here is when the dialog's style is set to BEHAVE_DIRTY_ALWAYS (see later section on configuring the dialog), which causes the dialog to be permanently in the dirty state.
Implementing the data exchange between the data model and UI components
In a typical options dialog box, UI components (such as JTextField, JComboBox, etc ...) are used to receive user input which are then transferred to the data model. JOptionsDialog facilitates this mechanism through the abstract method updateData(boolean). This method takes a boolean argument which determines the direction of the data flow (i.e. if true, the data should be transferred from the UI components to the data model. And vice versa) and returns nothing. Code snippet from the sample dialog's implementation is shown below:
public void updateData(boolean toModel) {
int flags = 0;
if (toModel)
{
m_prop.clear();
if (m_jcbShowOK.isSelected()) {
flags |= OPTION_OK;
m_prop.setProperty("OPTION_OK", "set");
}
...
} else {
if (m_prop.getProperty("OPTION_OK")!= null) {
flags |= OPTION_OK;
m_jcbShowOK.setSelected(true);
}
...
}
...
}
Configuring JOptionsDialog
JOptionsDialog can be configured easily through the use of style flags. For a list of available styles and their descriptions, please refer to the javadoc. To configure the dialog's style, simply do a bitwise OR of the styles desired and pass the result to the method setDialogProperties(). To configure the dimension of the option buttons, use the method setButtonDimension(). The complete signature of these two methods are shown below:
public void setDialogProperties(int flags, boolean shouldPack) {
...
}
public void setButtonDimension(Dimension dim, boolean shouldPack) {
...
}
The argument shouldPack instructs the method if it should call Window.pack() after setting the new styles. It will be slightly more efficient to pass in false when you have to configure the dialog several times (such as setting the button dimensions at the same time) before displaying it. In most cases, you will want to pass in true to show the updated styles immediately. Two convenient methods are provided for this purpose.
public void setDialogProperties(int flags) {
    setDialogProperties(flags, true);
}

public void setButtonDimension(Dimension dim) {
    setButtonDimension(dim, true);
}
JOptionsDialog convenient functions
public int doModal(){
...
}
VC++ developers will most probably find this most familiar. Yep, the idea is definitely "borrowed" from the Microsoft Foundation Class library. Basically, this is a convenient method to show your option dialog in a modal loop and when the dialog closes, returns the ID of the option button that the user clicked.
public void centerDialog(){
...
}
This is a helper function to center the dialog box relative to its owner. If it doesn't have an owner or if the owner is not visible, then the dialog box is centered relative to the full screen. You may want to use the style flag DISPLAY_CENTER_DIALOG to center the dialog instead.
License
This article has no explicit license attached to it but may contain usage terms in the article text or the download files themselves. If in doubt please contact the author via the discussion board below.
A list of licenses authors might use can be found here.
