Introduction
In this Article You will learn how to Make your own Tabstrip control or How to mimic Tabstrip using Menu and Multiview control. Also i will Explain How To Make Best use of Wizard control.
IN Wizard control Accesing sidebar Links and Disabling was a big challenge for me. I have explained that in this article. Regarding how to use the control and which events to use when Please see Default2.aspx.cs file
This Article will explain Following :
1) How you can tap all the events of asp.net Wizard control in your real App. I have included the demo project which you can see by opening up Default2.aspx file
2) I have written Cool Tabstrip control using ASp.NET 2.0 . You can use that in your Application. Open ShowServerTabs.aspx file and you should be able to see the Custom tabstrip control in action
Here is the code for that :
using System;
using System.Collections;
using System.Web.UI;
using System.Web.UI.WebControls;
namespace myControls
{
[ControlBuilder(typeof(ServerTabsBuilder))]
[ParseChildren(false)]
public class ServerTabs : WebControl, IPostBackEventHandler
{
public int SelectedTabIndex
{
get
{
if (ViewState["SelectedTabIndex"] == null)
return 0;
else
return (int)ViewState["SelectedTabIndex"];
}
set
{
ViewState["SelectedTabIndex"] = value;
}
}
protected override void RenderContents(HtmlTextWriter writer)
{
for (int i = 0; i < this.Controls.Count; i++)
{
ServerTab tab = (ServerTab)this.Controls[i];
string eRef = Page.ClientScript.GetPostBackClientHyperlink(this, i.ToString());
if (SelectedTabIndex == i)
writer.AddAttribute(HtmlTextWriterAttribute.Class, "navigation navigation1");
else
writer.AddAttribute(HtmlTextWriterAttribute.Class, "navigation");
writer.RenderBeginTag(HtmlTextWriterTag.Div);
writer.AddAttribute(HtmlTextWriterAttribute.Href, eRef);
writer.RenderBeginTag(HtmlTextWriterTag.A);
writer.Write(tab.Text);
writer.RenderEndTag();
writer.RenderEndTag();
}
writer.Write("<br style='clear:both' />");
writer.AddAttribute(HtmlTextWriterAttribute.Class, "tabContents");
writer.RenderBeginTag(HtmlTextWriterTag.Div);
this.Controls[SelectedTabIndex].RenderControl(writer);
writer.RenderEndTag();
}
protected override void AddParsedSubObject(object obj)
{
if (obj is ServerTab)
base.AddParsedSubObject(obj);
}
protected override HtmlTextWriterTag TagKey
{
get
{
return HtmlTextWriterTag.Div;
}
}
public void RaisePostBackEvent(string eventArgument)
{
SelectedTabIndex = Int32.Parse(eventArgument);
}
}
public class ServerTabsBuilder : ControlBuilder
{
public override Type GetChildControlType(string tagName, IDictionary attribs)
{
if (String.Compare(tagName, "tab", true) == 0)
return typeof(ServerTab);
else
return null;
}
}
public class ServerTab : Control
{
private string _Text;
public string Text
{
get { return _Text; }
set { _Text = value; }
}
}
}
Best thing about this control is that it uses div instead of tables and applying stylesheet on this is easy. There is another way of creating Tabstrip control by Using Menu and Multiview control. That way you don't loose the flexibility of what menu and Multiview provides in terms of events and databinding. I will explain that next.
Here is the sample stylesheet i have used for this
.navigation

{

float:left;

position:relative;

top:1px;

color: #000;

background-image:none;

text-decoration: none;

}

.navigation a

{

color: #fff;

text-decoration:none;

background-image:none;

background: #ffa20c url(left-tab.gif) left top no-repeat ;

padding-left:10px;

margin-left:5px;

float:left;

}

.navigation a:hover {

color: #fff;

background-image:none;

text-decoration:none;

background: #781351 url(left-tab-hover.gif) left top no-repeat;

overflow:inherit

}

.navigation1

{

float:left;

position:relative;

top:1px;

background-image:none;

text-decoration: none;

color: #fff;

}

.navigation1 a

{

float:left;

text-decoration:none;

background: #781351 url(left-tab-hover.gif) left top no-repeat;

padding-left:10px;

margin-left:5px;

}

.navigation2

{

color: #0ff;

background: #000 ;

padding-left:10px

}
Now here is the sample aspx file using that control
<%@ Register TagPrefix="custom" Namespace="myControls" %>

<custom:ServerTabs

ID="ServerTabs1"

Runat="Server">

<tab Text="First Tab">

Contents of the first tab

</tab>

<tab Text="Second Tab">

Contents of the second tab

</tab>

<tab Text="Third Tab">

Contents of the third tab

</tab>

<tab Text="Fourth Tab">

<ver1:ver ID="verinder" runat="server" />

</tab>

</custom:ServerTabs>
3) I have also created tabstrip like interface using multiview and MEnu Control. I have also used Control adapters to convert menu COntrol to show Output in UL and LI html tags instead of Table tags. This will help you to style the control more properly. You can see that control in action by looking at the code in webusercontrol2.aspx
Here is the ASPX file for that...
<%@ Control Language="C#" AutoEventWireup="true" CodeFile="WebUserControl2.ascx.cs"
    Inherits="WebUserControl2" %>

<script runat="server">

protected void menuTabs_MenuItemClick(object sender, MenuEventArgs e)

{

multiTabs.ActiveViewIndex = Int32.Parse(menuTabs1.SelectedValue);

}

</script>

<div>

<asp:Menu

id="menuTabs1"

CssSelectorClass="PrettyMenu"

StaticMenuItemStyle-CssClass="navigation"

StaticHoverStyle-CssClass="navigation1"

StaticSelectedStyle-CssClass="navigation1"

Orientation="Horizontal"

OnMenuItemClick="menuTabs_MenuItemClick"

Runat="server" Visible="true">

<Items>

<asp:MenuItem

Text="Tab 1"

Value="0"

Selected="true" >

</asp:MenuItem>

<asp:MenuItem

Text="Tab 2"

Value="1"/>

<asp:MenuItem

Text="Tab 3"

Value="2" />

</Items>

</asp:Menu>

</div>

<br style="float:left" />

<div class="tabBody">

<asp:MultiView

id="multiTabs"

ActiveViewIndex="0"

Runat="server">

<asp:View ID="view1" runat="server">

Contents of first tab

<asp:TextBox ID="FirstName" runat="Server" Text="Enter Your FirstName Here"></asp:TextBox>

</asp:View>

<asp:View ID="view2" runat="server">

Contents of second tab

<asp:TextBox ID="LastName" runat="Server" Text="Enter Your LastName Here"></asp:TextBox>

<div>

<asp:CheckBox ID="SkipBenificiary" runat="server" Checked="false"
    Text="Skip Beneficiary" />

<asp:CheckBox ID="AddBenificiaryAsTwoSteps" runat="server" Checked="false"
    Text="Make Benificiary as Two steps" />

<asp:CheckBox ID="OverrideTheDefaultBeneView" runat="server" Checked="false"
    Text="Load Different Bene View" />

</div>

</asp:View>

<asp:View ID="view3" runat="server">

<asp:PlaceHolder ID="PlaceHolder" runat="server" Visible="true">

<asp:TextBox ID="MiddleName" runat="Server"
    Text="Enter Your MiddleName Here"></asp:TextBox>

<Dynamic:Ctrl ID="DynamicallyLoaded" runat="server" />

</asp:PlaceHolder>

</asp:View>

</asp:MultiView>

</div>
In the Above code I am switching views betten Tabs with following code
<
script runat="server">
{
multiTabs.ActiveViewIndex =
}
protected void menuTabs_MenuItemClick(object sender, MenuEventArgs e)Int32.Parse(menuTabs1.SelectedValue);
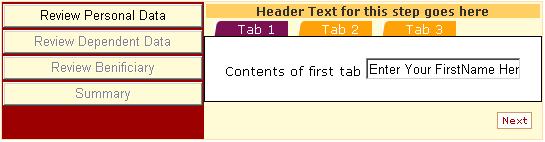
4) I have added code in Default2.aspx.cs to show how you can access The buttons in sidebar of Wizard control and enable and disable it the way U want. By default Wizard control shows all buttons or lins in sidebar enabled all the time. If you are implimenting a commit as you go model then you need to disable the links as you move forward and allow navigation control. This code I have not seen in other places.
Here is the ASPX file for that
<asp:Wizard ID="Wizard1" runat="server" ActiveStepIndex="0"
    BorderColor="#FFDFAD" BackColor="#FFFBD6" BorderWidth="1px"
    Font-Names="Verdana" Font-Size="0.8em" >

<SideBarTemplate><asp:datalist id="SideBarList" runat="server" RepeatDirection="Vertical"
    RepeatLayout="Table" ItemStyle-VerticalAlign="Top">

<ItemStyle Width="15px" />

<itemtemplate>

<asp:Button ID="SideBarButton" BackColor="#FFFBD6" runat="Server" Width="200px"
    style="float:left" />

</itemtemplate>

</asp:datalist>

</SideBarTemplate>

<HeaderTemplate>Header Text for this step goes here</HeaderTemplate>

<WizardSteps>

<asp:WizardStep ID="WizardStep1" runat="server" Title="Review Personal Data" >

<ver1:ver ID="verinder" runat="server" SetActiveTab="0"/>

</asp:WizardStep>

<asp:WizardStep ID="WizardStep2" runat="server" Title="Review Dependent Data">

<ver1:ver ID="ver2" runat="server" SetActiveTab="1" />

</asp:WizardStep>

<asp:TemplatedWizardStep ID="WizardStep3" runat="server"
     Title="Review Benificiary" StepType="Finish">

<ContentTemplate>

My Custom control goes here

</ContentTemplate>

</asp:TemplatedWizardStep>

<asp:TemplatedWizardStep ID="WizardStep4" runat="server" Title="Summary"
    StepType="Complete">

<ContentTemplate>

My Custom control goes here again!

</ContentTemplate>

</asp:TemplatedWizardStep>

</WizardSteps>

<SideBarStyle BackColor="#990000" Font-Size="0.9em" VerticalAlign="Top" />

<NavigationButtonStyle BackColor="White" BorderColor="#CC9966" BorderStyle="Solid"

BorderWidth="1px" Font-Names="Verdana" Font-Size="0.8em" ForeColor="#990000" />

<HeaderStyle BackColor="#FFCC66" BorderColor="#FFFBD6" BorderStyle="Solid"
    BorderWidth="2px"

Font-Bold="True" Font-Size="0.9em" ForeColor="#333333" HorizontalAlign="Center" />

</asp:Wizard>
Here is the CodeBehind File default2.aspx.cs
using System;
using System.Data;
using System.Configuration;
using System.Collections;
using System.Web;
using System.Web.Security;
using System.Web.UI;
using System.Web.UI.WebControls;
using System.Web.UI.WebControls.WebParts;
using System.Web.UI.HtmlControls;
public partial class Default2 : System.Web.UI.Page
{
protected void Page_Load(object sender, EventArgs e)
{
Wizard1.NextButtonClick += new WizardNavigationEventHandler(Wizard1_NextButtonClick);
Wizard1.PreviousButtonClick += new WizardNavigationEventHandler(
Wizard1_PreviousButtonClick);
Wizard1.SideBarButtonClick += new WizardNavigationEventHandler(
Wizard1_SideBarButtonClick);
Wizard1.ActiveStepChanged += new EventHandler(Wizard1_ActiveStepChanged);
Control lst1 = (Control)Wizard1.FindControl("SideBarContainer");
DataList lst = (DataList)lst1.FindControl("SideBarList");
lst.ItemCreated += new DataListItemEventHandler(lst_ItemCreated);
lst.ItemDataBound += new DataListItemEventHandler(lst_ItemDataBound);
}
void lst_ItemDataBound(object sender, DataListItemEventArgs e)
{
if (e.Item.ItemType == ListItemType.Item || e.Item.ItemType ==
ListItemType.AlternatingItem)
{
}
}
void lst_ItemCreated(object sender, DataListItemEventArgs e)
{
if (e.Item.ItemType == ListItemType.Item || e.Item.ItemType ==
ListItemType.AlternatingItem)
{
Button button = (Button)e.Item.FindControl("SideBarButton");
Hashtable hash=GetSideBarButtons();
switch (Wizard1.ActiveStepIndex)
{
case 0:
break;
case 1:
if (hash.ContainsKey("Review Personal Data"))
{
Button btn1 = (Button)hash["Review Personal Data"];
if (btn1 != null)
{
btn1.Enabled = true;
}
}
break;
case 2:
if (hash.ContainsKey("Review Dependent Data"))
{
Button btn1 = (Button)hash["Review Dependent Data"];
if (btn1 != null)
{
btn1.Enabled = true;
}
}
break;
case 3:
if (hash.ContainsKey("Review Benificiary"))
{
Button btn1 = (Button)hash["Review Benificiary"];
if (btn1 != null)
{
btn1.Enabled = true;
}
}
break;
case 4:
break;
}
button.Enabled = false;
}
}
void Wizard1_DataBinding(object sender, EventArgs e)
{
Hashtable buttonList = GetSideBarButtons();
foreach (string btnTxt in buttonList.Keys)
{
if (btnTxt == "Review Personal Data")
{
Button btn = (Button)buttonList<btntxt />;
btn.Enabled = true;
}
else
{
Button btn = (Button)buttonList<btntxt />;
btn.Visible = false;
}
Wizard1.DisplaySideBar = true;
}
}
void Wizard1_ActiveStepChanged(object sender, EventArgs e)
{
WizardStepBase step = Wizard1.ActiveStep;
if (step.ID == "WizardStep1")
{
}
else if (step.ID == "WizardStep2")
{
}
else if (step.ID == "WizardStep3")
{
}
}
private Hashtable GetSideBarButtons()
{
Hashtable buttonsColl = new Hashtable();
Control lst1 = (Control)Wizard1.FindControl("SideBarContainer");
DataList lst = (DataList)lst1.FindControl("SideBarList");
foreach (DataListItem ctrl in lst.Items)
{
Button button = (Button)ctrl.FindControl("SideBarButton");
buttonsColl.Add(button.Text, button);
}
return buttonsColl;
}
void Wizard1_SideBarButtonClick(object sender, WizardNavigationEventArgs e)
{
if (e.NextStepIndex == (e.CurrentStepIndex + 1))
{
e.Cancel = false;
}
else if (e.NextStepIndex < (e.CurrentStepIndex))
{
e.Cancel = false;
}
else if (e.NextStepIndex == e.CurrentStepIndex)
{
e.Cancel = false;
}
else
e.Cancel = true;
}
void Wizard1_PreviousButtonClick(object sender, WizardNavigationEventArgs e)
{
}
protected override void LoadViewState(object savedState)
{
base.LoadViewState(savedState);
string str=(string)ViewState["NewWizardStep"];
if (str == "1")
{
Wizard1.WizardSteps.Insert(3, this.CreateNewWizardStep());
}
else
{
}
}
private WizardStep CreateNewWizardStep()
{
WizardStep step= new WizardStep();
step.AllowReturn=true;
step.Title = "New Bene Step Added";
step.StepType= WizardStepType.Finish;
WebUserControl2 ctrl=LoadControl("~/controls/WebUserControl2.ascx") as WebUserControl2;
ctrl.ID="MyNewBenificiary";
ctrl.SetActiveTab="2";
ctrl.Visible=true;
Wizard1.WizardSteps[2].StepType = WizardStepType.Step;
step.Controls.Add(ctrl);
return step;
}
void Wizard1_NextButtonClick(object sender, WizardNavigationEventArgs e)
{
if (e.NextStepIndex == 2 && e.CurrentStepIndex == 1)
{
WebUserControl2 control2 = Wizard1.FindControl("ver2") as WebUserControl2;
TextBox lastName = (TextBox)control2.FindControl("LastName");
CheckBox skipBenificiary = (CheckBox)control2.FindControl("SkipBenificiary");
CheckBox addNewStepDynamically = (CheckBox)control2.FindControl(
"AddBenificiaryAsTwoSteps");
CheckBox LoadDifferentBeneView = (CheckBox)control2.FindControl(
"OverrideTheDefaultBeneView");
ViewState["NewWizardStep"] = "0";
ViewState["StepDeleted"] = "0";
ViewState["StepThatHasBeenDeleted"]=null;
if (skipBenificiary.Checked == true)
{
Wizard1.WizardSteps.Remove(Wizard1.WizardSteps[2]);
ViewState["StepDeleted"] = "1";
}
else if(addNewStepDynamically.Checked==true)
{
ViewState["NewWizardStep"] = "1";
Wizard1.WizardSteps.Insert(3, this.CreateNewWizardStep());
}
else if (LoadDifferentBeneView.Checked == true)
{
}
if (skipBenificiary.Checked == false)
{
ViewState["StepDeleted"] = "1";
string str=(string)ViewState["StepDeleted"];
if (str == "1")
{
ViewState["StepDeleted"] = 0;
}
}
else
if (addNewStepDynamically.Checked == false)
{
string str=(string)ViewState["NewWizardStep"];
if (str == "1")
{
Wizard1.WizardSteps.Remove(Wizard1.WizardSteps[3]);
Wizard1.WizardSteps[2].StepType = WizardStepType.Finish;
ViewState["NewWizardStep"] = "0";
}
}
}
}
}
My First challenge was how to get to the buttons in sideBar :
Here is the code for that
private Hashtable GetSideBarButtons()Hashtable buttonsColl = new Hashtable();Control lst1 = (Control)Wizard1.FindControl("SideBarContainer");DataList lst = (DataList)lst1.FindControl("SideBarList");foreach (DataListItem ctrl in lst.Items)Button button = (Button)ctrl.FindControl("SideBarButton");return buttonsColl;
{
{
buttonsColl.Add(button.Text, button);
}
}
DataList in SideBar is inside SideBarContainer Which is undocumented and this is how you can rech to buttons
Also Now Next challenge for me was to How to Change this button to Gray(disable it). Doing it in PageLoad doesn't work because Databinding of DataList happens after PageLoad :)
So here is the trick i used . In page Load i attach even listener and then enable and disable control from that listner:
Control lst1 = (Control)Wizard1.FindControl("SideBarContainer");DataList lst = (DataList)lst1.FindControl("SideBarList");new DataListItemEventHandler(lst_ItemCreated);new DataListItemEventHandler(lst_ItemDataBound);
lst.ItemCreated +=
lst.ItemDataBound +=
In the Items Created event Handler i actually enable or disable the buttons.
4) My Next Job was how to Move The Wizard Navigation bar To top . This is Tough . I need to write Control Adapter for that. I will updae this article when i have solution.
5) Microsoft has released control Adapters which you can attach to control to render Different HTML for same Control. This is helpful for lot of controls which emit Table instead of div. Having Div Helps in styling the control. Using control adaptyer is easy. Just google it to see microsoft white paper.
This member has not yet provided a Biography. Assume it's interesting and varied, and probably something to do with programming.


 General
  News
News  Suggestion
  Question
  Bug
Bug  Answer
  Joke
Joke  Praise
  Rant
Rant  Admin
Admin 


