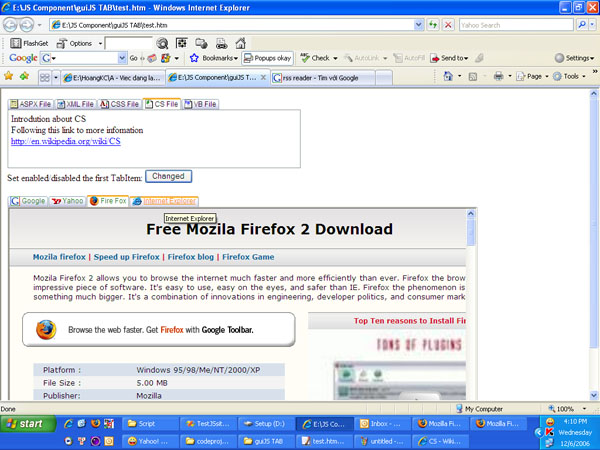
Introduction
TabMenu is a component which almost all web developers have to work with. On creating a website with Visual Studio and a component tool, it's simple for me to create a fine and convenient TabMenu for design. And what about creating a TabMenu with similar functions using JavaScript, just as we use components on ASP.NET? That is, however, a different story.
This article is aimed at providing users with the best method to have a TabMenu that has the most numerous functions and the least code, especially allowing users to define the functions that TabMenu will provide.
Using the Code
All users need to do is to insert this code line where they want the TabMenu to appear:
<div id="coolTab1" MultiPageID="Pages" SiteMap="tabData.xml" ImageUrl="images/"
ClientSideOnLoadCompleted="onLoadComplete" ClientSideOnClick="onClick"></div>
and a script code as below:
window.onload = function() { arrTab = preInitCoolTab("coolTab1"); }
Now, we will talk about the parameters of a TabMenu
id: a unique identifier of TabMenu, this id will be used in the function preInitCoolTab.
Note that if you want, you can have more than one tab. Suppose you have two div tags as defined above, have in turn id: coolTab1 and coolTab2, you only need to add the id of the tab to the function preInitCoolTab.
arrTab is the array which contains every returned CoolTab object.
arrTab = preInitCoolTab("coolTab1", "coolTab2");
MultiPageID: If you want to use Tab to control objects contained in multiPage, each tab item will indicate a page, you only need to add the id of multiPage as an initialized parameter of CoolTab. I use each div tag as a splitter to separate "pages" in multiPage.ImageUrl: Link to Image folder used in CoolTabClientSideOnLoadCompleted: Event which works in non-synchronous order, it will fire when the process of reading data from the XML file is completed, and CoolTab will be rendered. The users can define functions which will work when load has completed.ClientSideOnClick: Event which appears when a TabItem is clicked. Similarly, users can design functions to control the actions that will take place when a TabItem is clicked.SiteMap: Here, I use an XML file to create TabItems for CoolTab. SiteMap shows the link to the XML file. Information in the XML file is to be used as below:
<Tabs>
    <TabItem ID="aspx" Text="ASPX File" LeftIcon="i_aspx.gif"
Selected="true" Enabled="true" Target="frame1" NavigatorUrl="google.com"/>
    <TabItem ID="xml" Text="XML File" LeftIcon="i_xml.gif"/>
    <TabItem ID="css" Text="CSS File" LeftIcon="i_css.gif"/>
    <TabItem ID="cs" Text="CS File" LeftIcon="i_cs.gif" />
    <TabItem ID="vb" Text="VB File" LeftIcon="i_vb.gif"/>
</Tabs>
Let us look at the first TabItem (object). The most important properties are supplied:
Selected = true/false shows which default TabItem is chosen initiallyEnabled = true/false shows the state of this TabItemNavigatorUrl: If this property exists, TabItem will have a link, and be accompanied by a target which the link will be loaded in.Target: Shows the target of the link. Besides, you can define additional properties and here is the access approach to properties that you define in the XML file. For example:
<TabItem ID="id" Text="text" LeftIcon="icon.gif" YourAttribute="Value"/>
Suppose it is the first TabItem of CoolTab (object):
Var oCoolTab = arrTab[0];
alert(oCoolTab.items[0].Keys["YourAttribute"]);
Class Members
CoolTab Class
Properties
DataSource: virtual path to the URL or XML documentitems: a collection of TabItemMultiPage: holds ID of invoked multipageImageBaseUrl: virtual path to the image folderdefaultCss: className of CSS that is applied to current TabItemhoverCss: className of CSS that is applied to current TabItemselectedCss: className of CSS that is applied to current TabItemdisabledCss: className of CSS that is applied to current TabItem
Methods
DataBind: binds datasource to the invoked control and all its controlled childrenAddItem: Add new TabItem into CoolTab
Besides creating TabItem using data from the XML file, users can create additional items during runtime by using the function AddItem of CoolTab (object).
Var oCoolTab = arrTab[0];
Var oTabItem = new TabItem();
oTabItem.initialize("newTabItemID", "Caption", false, true,
"http://microsoft.com", "frame1", "nothing.gif", oCoolTab);
oCoolTab.AddItem(oTabItem);
FindTabItemById: find TabItem by its ID
Events
TabItemClickEvent: fired when an item in CoolTab is clickedLoadCompleteEvent: fired when CoolTab has completed loading data
TabItem Class
Properties
selected: this item is selected or notenabled: this item is enabled or notparent: reference to the CoolTab that contains the TabItemindex: index of this item in the list of CoolTabtarget: targetlnk: navigatorUrl of this itemlabel: display text
Methods
Event
TabClickEvent: fired when a TabItem is clicked
History
This is my first article. If you find it useful, please vote for me.
P.S.: Thanks to Mr Tuan NA for his XML.js to work with XML file in the Mozilla browser.
And thanks to Ms Nhung, I love you very much.
